JVC GR-DVM70U Instruction Manual - Page 23
Journalistic Shooting, Self-Recording, Brightness Control
 |
UPC - 046838157424
View all JVC GR-DVM70U manuals
Add to My Manuals
Save this manual to your list of manuals |
Page 23 highlights
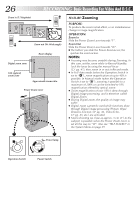
Journalistic Shooting EN23 In some situations different angles of shooting may be required for more dramatic results. 1 OPEN LCD MONITOR Make sure the LCD monitor is fully open. 2 TILT LCD MONITOR Tilt the LCD monitor in the most convenient direction. •The LCD monitor can rotate almost full circle (270°: 90° downward, 180° upward). Self-Recording Self-Recording You can shoot yourself while viewing your own image in the LCD monitor. 1 TILT LCD MONITOR UPWARD Open the LCD monitor and tilt it upward to 180 degrees so that it faces forward. 2 START RECORDING Point the lens toward the subject (yourself when selfrecording) and start recording. •During Self-Recording, the "Tape Running" indicator and warning indications (੬ pg. 102 - 105) are the only ones that are shown; they appear reversed in the display as they would when viewing a mirror, but are not reversed in the recording. NOTE: The tape remaining indicator does not appear during Self- Recording. However, when the remaining time reaches 2 minutes, the indicator appears showing the remaining time: (blinking) (blinking) (blinking) MENU/SET Dial Brightness Control You can adjust the brightness of the display by rotating MENU/SET. 1 ADJUST BRIGHTNESS Rotate MENU/SET until the brightness indicator moves and the display reaches its appropriate brightness. •The brightness indication appears on the display. •If the viewfinder is pulled out, it is also possible to adjust its brightness. BRIGHT - - - - -6- - - - -
-
 1
1 -
2
-
3
-
4
-
5
-
6
-
7
-
8
-
9
-
10
-
11
-
12
-
13
-
14
-
15
-
16
-
17
-
 18
18 -
 19
19 -
 20
20 -
 21
21 -
 22
22 -
 23
23 -
 24
24 -
 25
25 -
 26
26 -
 27
27 -
 28
28 -
29
-
30
-
31
-
32
-
33
-
34
-
35
-
36
-
37
-
38
-
39
-
40
-
41
-
42
-
43
-
44
-
45
-
46
-
47
-
48
-
49
-
50
-
51
-
52
-
53
-
54
-
55
-
56
-
57
-
58
-
59
-
60
-
61
-
62
-
63
-
64
-
65
-
66
-
67
-
68
-
69
-
70
-
71
-
72
-
73
-
74
-
75
-
76
-
77
-
78
-
79
-
80
-
81
-
82
-
83
-
84
-
85
-
86
-
87
-
88
-
89
-
90
-
91
-
92
-
93
-
94
-
95
-
96
-
97
-
98
-
99
-
100
-
101
-
102
-
103
-
104
-
105
-
106
-
107
-
108
-
109
-
110
-
111
-
112
 |
 |
