JVC GR-DVM70U Instruction Manual - Page 35
Flash Brightness Adjustment
 |
UPC - 046838157424
View all JVC GR-DVM70U manuals
Add to My Manuals
Save this manual to your list of manuals |
Page 35 highlights
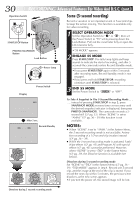
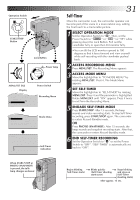
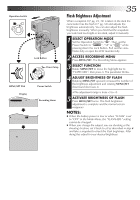
Operation Switch A M Lock Button /PCOFF CAME Power lamp PLAY RA5S DSC DS C PLAY MENU/SET Dial Display 4 FLASH ADJ. 0 TO MODE MENU END Power Switch Recording Menu 4 FLASH ADJ. 2 TO MODE MENU END - - - - -6- - - - - MANUAL 2 EN35 Flash Brightness Adjustment When a snapshot (੬ pg. 24, 32) is taken in the dark the camcorder fires the flash (੬ pg. 34) and adjusts the brightness automatically. You can also adjust the flash brightness manually. When you find that the snapshots you took look too bright or too dark, adjust it manually. 1 SELECT OPERATION MODE Set the Operation Switch to " ". Then, set the Power Switch to " ", "5S" or " " while pressing down the Lock Button. Pull out the view- finder fully or open the LCD monitor fully. 2 ACCESS RECORDING MENU Press MENU/SET. The Recording Menu appears. 3 SELECT FUNCTION Rotate MENU/SET to move the highlight bar to "FLASH ADJ.", then press it. The parameter blinks. 4 ADJUST BRIGHTNESS OF FLASH Rotating MENU/SET upward increases the number of the brightness adjustment and rotating MENU/SET downward decreases it. •The adjustment range is from -3 to +3. 5 ACTIVATE BRIGHTNESS OF FLASH Press MENU/SET twice. The flash brightness adjustment is complete and the normal screen reappears. NOTES: ● When the battery power is low or when "FLASH" is set to "OFF" in the Mode Menu, the "FLASH ADJ." setting cannot be changed. ● When you change the subject you are shooting or the shooting location, set it back to ±0 as described in step 4 and take a snapshot to check the flash brightness. After doing this adjust to your desired brightness.
-
 1
1 -
2
-
3
-
4
-
5
-
6
-
7
-
8
-
9
-
10
-
11
-
12
-
13
-
14
-
15
-
16
-
17
-
18
-
19
-
20
-
21
-
22
-
23
-
24
-
25
-
26
-
27
-
28
-
29
-
 30
30 -
 31
31 -
 32
32 -
 33
33 -
 34
34 -
 35
35 -
 36
36 -
 37
37 -
 38
38 -
 39
39 -
 40
40 -
41
-
42
-
43
-
44
-
45
-
46
-
47
-
48
-
49
-
50
-
51
-
52
-
53
-
54
-
55
-
56
-
57
-
58
-
59
-
60
-
61
-
62
-
63
-
64
-
65
-
66
-
67
-
68
-
69
-
70
-
71
-
72
-
73
-
74
-
75
-
76
-
77
-
78
-
79
-
80
-
81
-
82
-
83
-
84
-
85
-
86
-
87
-
88
-
89
-
90
-
91
-
92
-
93
-
94
-
95
-
96
-
97
-
98
-
99
-
100
-
101
-
102
-
103
-
104
-
105
-
106
-
107
-
108
-
109
-
110
-
111
-
112
 |
 |
