JVC GR-DVM70U Instruction Manual - Page 34
Snapshot Flash Auto Flash
 |
UPC - 046838157424
View all JVC GR-DVM70U manuals
Add to My Manuals
Save this manual to your list of manuals |
Page 34 highlights
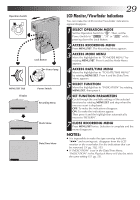
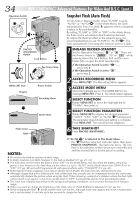
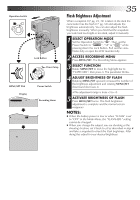
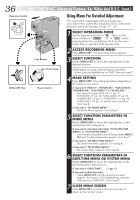
34 EN RECORDING Advanced Features For Video And D.S.C. (cont.) Operation Switch Snapshot Flash (Auto Flash) A M In Full Auto or Manual mode, when "FLASH" is set to "AUTO" or "AUTO " in the Mode Menu, the flash automatically fires if it's dark ( appears) when a snapshot is taken in Record-Standby. By setting "FLASH" to "ON" or "OFF" in the Mode Menu, the flash can be activated or deactivated on demand. To reduce the Red-Eye effect in the subject's eyes, it is recommended that you set "FLASH" to "AUTO ". The flash automatically fires using this function when it is dark. PLAY PHOTO (SNAPSHOT) Button Lock Button /PCOFF CAME Power lamp 1 ENGAGE RECORD-STANDBY Set the Operation Switch to " " or " ". Then, set the Power Switch to " ", "5S" or " " while pressing down the Lock Button. Pull out the view- finder fully or open the LCD monitor fully. If the Operation Switch is set to " .... go to step 6. If the Operation Switch is set to " .... go to step 2. RA5S DSC DS C PLAY MENU/SET Dial Display Power Switch 2 ACCESS RECORDING MENU Press MENU/SET. The Recording Menu appears. 3 ACCESS MODE MENU Move the highlight bar to "TO MODE MENU" by rotating MENU/SET. Press it. The Mode Menu appears. FLASH ADJ. 0 4 TO MODE MENU END Recording Menu 4 SELECT FUNCTION Rotate MENU/SET to move the highlight bar to "FLASH", then press it. 4 FLASH AUTO TO DATE / TIME MENU TO SYSTEM MENU END - - - - -6- - - - - Mode Menu 5 SELECT FUNCTION PARAMETERS Rotate MENU/SET to display the desired parameter ("AUTO", "ON", "OFF" or "AUTO ") and press it. The parameter stops blinking and setting is complete. Press MENU/SET. The normal screen reappears. Flash sensor Flash 6 TAKE SNAPSHOT Press PHOTO (SNAPSHOT). If "AUTO " Is Selected In The Mode Menu . . . .... the Red-Eye reduction indicator lights, then press PHOTO (SNAPSHOT). The flash fires twice. The first flash is for reduction of the human eye's red reflection NOTES: and the second flash is for the actual recording. ● Do not fire the flash at a person at short range. ● In Multi-Analyzer 4 or Multi-Analyzer 9, the flash is disabled (੬ pg. 25, 33). ● The flash does not fire when the flash is set to "OFF" on the Mode Menu and also when the battery remaining power is low. Moreover, the flash does not fire when it is set to "AUTO" on the Mode Menu with GAIN UP set to "OFF" (੬ pg. 38) and with Programme AE with special effects set to "TWILIGHT" ( ੬ pg. 45). ● When taking several snapshots in succession (Motor Drive Mode), the flash fires only during the first one. ● Although images shot with a flash tend to look whiter than they actually are, to compensate for this the camcorder automatically darkens the picture when using the flash. When shooting a subject at a distance where the flash light cannot reach (over approx. 6.5 ft./2 m), set the flash to "OFF" to prevent the picture from becoming too dark. ● The color tone changes depending on the background lighting conditions, such as under fluorescent or halogen lamps. ● When you want to change the brightness of the flash, refer to "Flash Brightness Adjustment" (੬ pg. 35). ● While charging the flash, blinks and the flash will not fire. Although noise may appear, this is not a malfunction and is not recorded. It can take up to ten seconds to charge the flash.
-
 1
1 -
2
-
3
-
4
-
5
-
6
-
7
-
8
-
9
-
10
-
11
-
12
-
13
-
14
-
15
-
16
-
17
-
18
-
19
-
20
-
21
-
22
-
23
-
24
-
25
-
26
-
27
-
28
-
 29
29 -
 30
30 -
 31
31 -
 32
32 -
 33
33 -
 34
34 -
 35
35 -
 36
36 -
 37
37 -
 38
38 -
 39
39 -
40
-
41
-
42
-
43
-
44
-
45
-
46
-
47
-
48
-
49
-
50
-
51
-
52
-
53
-
54
-
55
-
56
-
57
-
58
-
59
-
60
-
61
-
62
-
63
-
64
-
65
-
66
-
67
-
68
-
69
-
70
-
71
-
72
-
73
-
74
-
75
-
76
-
77
-
78
-
79
-
80
-
81
-
82
-
83
-
84
-
85
-
86
-
87
-
88
-
89
-
90
-
91
-
92
-
93
-
94
-
95
-
96
-
97
-
98
-
99
-
100
-
101
-
102
-
103
-
104
-
105
-
106
-
107
-
108
-
109
-
110
-
111
-
112
 |
 |
