JVC HM-DH30000UP 84 pg. instruction manual on the HM-DH30000U D-VHS recorder/p - Page 57
Av Compu-link, Pre-recorded Cc, S-vhs Mode
 |
View all JVC HM-DH30000UP manuals
Add to My Manuals
Save this manual to your list of manuals |
Page 57 highlights
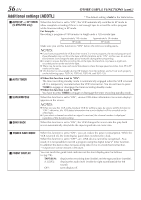
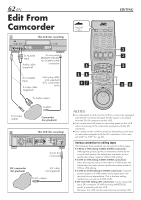
EN 57 * The default setting is bold in the table below. Ⅵ S-VHS MODE ON OFF You can determine which recording mode - either S-VHS mode or VHS mode - is used for recording on D-VHS and S-VHS tapes. When this function is set to "ON", you can record on D-VHS and S-VHS tapes with S-VHS picture quality. When this function is set to "OFF", you can record on D-VHS and S-VHS tapes with VHS picture quality. NOTES: ● To record in S-VHS/VHS mode on D-VHS tape, press D-VHS to turn off the D-VHS indicator. ● S-VHS mode allows you to make high quality video recordings with horizontal resolution of 400 lines, comparing with the 230 lines of resolution of conventional VHS recordings. To achieve the highest quality picture we recommend to record in S-VHS mode. (But remember that a conventional VHS VCR without SQPB cannot play back S-VHS tapes recorded in S-VHS mode.) ● S-VHS MODE setting does not affect recording on VHS tapes. Recording on VHS tapes is always performed in VHS mode except when using S-VHS ET mode (੬ pg. 29). Ⅵ AV COMPU-LINK ON OFF The REMOTE PAUSE/AV COMPULINK terminal on the rear panel can be used as either the REMOTE PAUSE terminal or the AV COMPULINK terminal. When this function is set to "ON", you can use this terminal as the AV COMPULINK terminal. By connecting other JVC's AV COMPULINK components (see the diagram below), including amplifiers (or receivers) and televisions, one touch control of the audio and video components linked via their AV COMPULINK connectors becomes possible. For example: simply load a cassette in the VCR and press PLAY ( 3 ) so that the AV COMPULINK components automatically turn on, the TV's AV mode is selected and the VCR starts playback. (You do not have to press PLAY ( 3 ) if the cassette's record safety tab is removed.) When this function is set to "OFF", you can use this terminal as the REMOTE PAUSE terminal. (੬ pg. 62) NOTE: Connection varies depending on the type of JVC TV you have. Refer to the TV's instruction manual when making this connection. AV COMPU LINK Television This VCR Y PB/CB PR/CR R AUDIO L VIDEO OUT IN(L-1) R AUDIO L(MONO) VIDEO S VIDEO OUT IN(L-2) IN S VIDEO CABLE BOX VHF/UHF ANTENNA IN REMOTE PAUSE/ AV COMPU LINK TV OUT i.LINK IN/OUT DV IN S200 DIGITAL OUT OPTICAL PCM/DOLBY DIGITAL To AV COMPU LINK II (VCR ONLY) To AUDIO IN To AUDIO OUT To S-VIDEO IN Audio cable (supplied) S-video cable (supplied) Mini-plug cable (not supplied) To S VIDEO OUT To REMOTE PAUSE/ AV COMPULINK Ⅵ PRE-RECORDED CC OFF CC1 CC2 CC3 CC4 Closed captions subtitles are usually found on caption channel CC1. The other channels are available for future use. Select the appropriate mode when you play back the pre-recorded tape.
-
 1
1 -
2
-
3
-
4
-
5
-
6
-
7
-
8
-
9
-
10
-
11
-
12
-
13
-
14
-
15
-
16
-
17
-
18
-
19
-
20
-
21
-
22
-
23
-
24
-
25
-
26
-
27
-
28
-
29
-
30
-
31
-
32
-
33
-
34
-
35
-
36
-
37
-
38
-
39
-
40
-
41
-
42
-
43
-
44
-
45
-
46
-
47
-
48
-
49
-
50
-
51
-
 52
52 -
 53
53 -
 54
54 -
 55
55 -
 56
56 -
 57
57 -
 58
58 -
 59
59 -
 60
60 -
 61
61 -
 62
62 -
63
-
64
-
65
-
66
-
67
-
68
-
69
-
70
-
71
-
72
-
73
-
74
-
75
-
76
-
77
-
78
-
79
-
80
-
81
-
82
-
83
-
84
 |
 |
