Konica Minolta Kodak Scan Station 710 Operation Guide - Page 18
Installation and Getting Started, Setup overview, Power saver modeand activating theScan Station
 |
View all Konica Minolta Kodak Scan Station 710 manuals
Add to My Manuals
Save this manual to your list of manuals |
Page 18 highlights
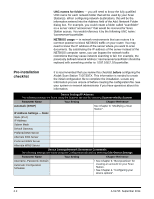
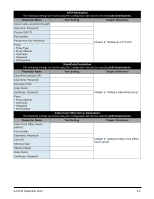
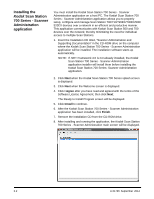
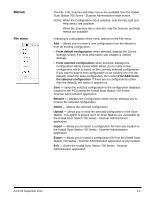
3 Installation and Getting Started Contents Setup overview 3-1 Power saver mode and activating the Scan Station 3-1 Installing the Kodak Scan Station 700 Series - Scanner Administration application 3-2 The main screen 3-3 Menus 3-5 File menu 3-5 Edit menu 3-6 Scanner menu 3-6 Help menu 3-9 Icons 3-9 Setup overview Power saver mode and activating the Scan Station Following is a list of things you need to do to prepare for configuring your Scan Station 710/730EX. • Unpack your Scan Station(s) according to the unpacking instructions in the box that your Scan Station was packaged in. • Setup the Scan Station and make the necessary connections. See the Installation Guide or the section entitled, "Setting up the Scan Station" in Chapter 1. • Review the pre-installation checklist in Chapter 2 and gather all of the information required to configure the Scan Station. Having this information available in advance will help ensure an easy Scan Station configuration. • When the Scan Station is properly connected, press the power button and wait a few moments for the Scan Station to start up and display the application. • Install the Kodak Scan Station 700 Series - Scanner Administration application on a separate PC. See the section entitled, "Installing the Kodak Scan Station 700 Series - Scanner Administration application" later in this chapter for procedures. By default, after 15 minutes of inactivity, the Scan Station will automatically enter into power saver mode. To activate the Scan Station from power saver mode press the power button. A-61796 September 2014 3-1
-
 1
1 -
2
-
3
-
4
-
5
-
6
-
7
-
8
-
9
-
10
-
11
-
12
-
 13
13 -
 14
14 -
 15
15 -
 16
16 -
 17
17 -
 18
18 -
 19
19 -
 20
20 -
 21
21 -
 22
22 -
 23
23 -
24
-
25
-
26
-
27
-
28
-
29
-
30
-
31
-
32
-
33
-
34
-
35
-
36
-
37
-
38
-
39
-
40
-
41
-
42
-
43
-
44
-
45
-
46
-
47
-
48
-
49
-
50
-
51
-
52
-
53
-
54
-
55
-
56
-
57
-
58
-
59
-
60
-
61
-
62
-
63
-
64
-
65
-
66
-
67
-
68
-
69
-
70
-
71
-
72
-
73
-
74
-
75
-
76
-
77
-
78
-
79
-
80
-
81
-
82
-
83
-
84
-
85
-
86
-
87
-
88
-
89
-
90
-
91
-
92
-
93
-
94
-
95
-
96
-
97
-
98
-
99
-
100
-
101
-
102
-
103
-
104
-
105
-
106
-
107
-
108
-
109
-
110
-
111
-
112
-
113
-
114
-
115
-
116
-
117
-
118
-
119
-
120
-
121
-
122
-
123
-
124
-
125
-
126
-
127
-
128
-
129
-
130
-
131
-
132
-
133
-
134
-
135
-
136
-
137
-
138
-
139
-
140
-
141
-
142
-
143
-
144
-
145
-
146
 |
 |
