Kyocera C8100DN Command Center Guide - Page 34
FAX / i-FAX > i-FAX > POP3, Login User Name
 |
View all Kyocera C8100DN manuals
Add to My Manuals
Save this manual to your list of manuals |
Page 34 highlights
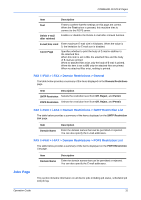
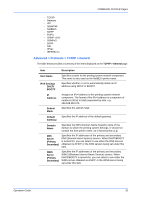
COMMAND CENTER Pages Item Description E-mail Size Limit Enter the maximum size of E-mail that can be sent in Kilobytes. When the value is 0, the limitation for E-mail size is disabled. Sender Address Displays the sender address used for E-mails sent from this machine. For how to change the sender address, Set the Email address in E-mail Address on FAX / i-FAX > i-FAX > POP3 on page 30. Signature Displays the signature to be inserted in the end of the E-mail body. For how to change the signature, refer to Advanced > E-mail > SMTP > General on page 40. FAX / i-FAX > i-FAX > POP3 The table below provides a summary of the items displayed on the POP3 page. Item Description POP3 Auto Receive Check Interval Run once now E-mail Address POP3 Server Name Enables or disables POP3. For how to change this setting, refer to Advanced > E-mail > POP3 > General on page 42. Specifies whether to print received i-FAX messages automatically. When this item is set to On, the system checks the POP3 server for received messages at the intervals set in Check Interval descried below and immediately prints the messages if any. When this item is set to Off, the periodic checks are not executed. Click Receive described below to check for messages. Displays the interval, in minutes, for connecting to the POP3 server to check for incoming mails. For how to change this setting, refer to Advanced > E-mail > POP3 > General on page 42. Click the Receive button to immediately receive E-mail from the POP3 server. Enter the E-mail address for i-FAX . The E-mail address is displayed in Sender Address on FAX / i-FAX > i-FAX > SMTP on page 29. Enter the POP3 server name or IP address. POP3 Port Number Enter the POP3 port number or use the default port number 110. POP3 Server Timeout Enter the timeout in seconds during which this machine tries to connect to the POP3 server. Login User Name Enter the login name of the user. Login Password Enter the password for connecting to the user name above. Use APOP Enables or disables APOP. 30 KYOCERA COMMAND CENTER
-
 1
1 -
2
-
3
-
4
-
5
-
6
-
7
-
8
-
9
-
10
-
11
-
12
-
13
-
14
-
15
-
16
-
17
-
18
-
19
-
20
-
21
-
22
-
23
-
24
-
25
-
26
-
27
-
28
-
 29
29 -
 30
30 -
 31
31 -
 32
32 -
 33
33 -
 34
34 -
 35
35 -
 36
36 -
 37
37 -
 38
38 -
 39
39 -
40
-
41
-
42
-
43
-
44
-
45
-
46
-
47
-
48
-
49
-
50
-
51
-
52
-
53
-
54
-
55
-
56
-
57
-
58
-
59
 |
 |
