Kyocera C8100DN Command Center Guide - Page 37
Document Box > FAX Box, Editing a Custom Box, Adding a New FAX Box
 |
View all Kyocera C8100DN manuals
Add to My Manuals
Save this manual to your list of manuals |
Page 37 highlights
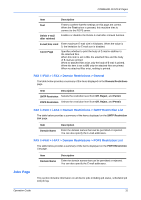
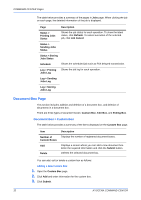
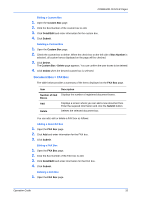
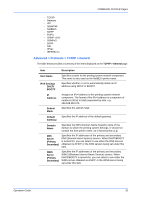
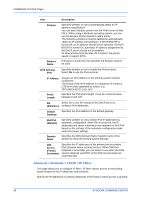
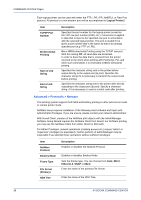
COMMAND CENTER Pages Editing a Custom Box 1. Open the Custom Box page. 2. Click the Box Number of the custom box to edit. 3. Click Detail/Edit and enter information for the custom box. 4. Click Submit. Deleting a Custom Box 1. Open the Custom Box page. 2. Check the custom box to delete. When the check box on the left side of Box Number is selected, all custom boxes displayed on the page will be checked. 3. Click Delete. The Custom Box - Delete page appears. You can confirm the user boxes to be deleted. 4. Click Delete when the desired custom box is selected. Document Box > FAX Box The table below provides a summary of the items displayed on the FAX Box page. Item Description Number of FAX Displays the number of registered document boxes. Boxes Add Delete Displays a screen where you can add a new document box. Enter the required information and click the Submit button. Deletes the selected document box. You can add, edit or delete a FAX box as follows: Adding a New FAX Box 1. Open the FAX Box page. 2. Click Add and enter information for the FAX box. 3. Click Submit. Editing a FAX Box 1. Open the FAX Box page. 2. Click the Box Number of the FAX box to edit. 3. Click Detail/Edit and enter information for the FAX box. 4. Click Submit. Deleting a FAX Box 1. Open the FAX Box page. Operation Guide 33
-
 1
1 -
2
-
3
-
4
-
5
-
6
-
7
-
8
-
9
-
10
-
11
-
12
-
13
-
14
-
15
-
16
-
17
-
18
-
19
-
20
-
21
-
22
-
23
-
24
-
25
-
26
-
27
-
28
-
29
-
30
-
31
-
 32
32 -
 33
33 -
 34
34 -
 35
35 -
 36
36 -
 37
37 -
 38
38 -
 39
39 -
 40
40 -
 41
41 -
 42
42 -
43
-
44
-
45
-
46
-
47
-
48
-
49
-
50
-
51
-
52
-
53
-
54
-
55
-
56
-
57
-
58
-
59
 |
 |
