Lenovo PC 300PL Installing Options in your PC - 6862, 6275 - Page 58
The following illustration shows a cable being routed from a CD-ROM drive
 |
View all Lenovo PC 300PL manuals
Add to My Manuals
Save this manual to your list of manuals |
Page 58 highlights
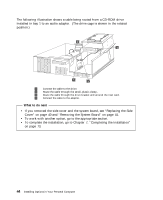
The following illustration shows a cable being routed from a CD-ROM drive installed in bay 1 to an audio adapter. (The drive cage is shown in the rotated position.) 1 Connect the cable to the drive. 2 Route the cable through the small, plastic clamp. 3 Route the cable through the drive bracket and around the riser card. 4 Connect the cable to the adapter. What to do next If you removed the side cover and the system board, see "Replacing the Side Cover" on page 40 and "Removing the System Board" on page 41. To work with another option, go to the appropriate section. To complete the installation, go to Chapter 7, "Completing the Installation" on page 73. 44 Installing Options in Your Personal Computer
-
 1
1 -
2
-
3
-
4
-
5
-
6
-
7
-
8
-
9
-
10
-
11
-
12
-
13
-
14
-
15
-
16
-
17
-
18
-
19
-
20
-
21
-
22
-
23
-
24
-
25
-
26
-
27
-
28
-
29
-
30
-
31
-
32
-
33
-
34
-
35
-
36
-
37
-
38
-
39
-
40
-
41
-
42
-
43
-
44
-
45
-
46
-
47
-
48
-
49
-
50
-
51
-
52
-
 53
53 -
 54
54 -
 55
55 -
 56
56 -
 57
57 -
 58
58 -
 59
59 -
 60
60 -
 61
61 -
 62
62 -
 63
63 -
64
-
65
-
66
-
67
-
68
-
69
-
70
-
71
-
72
-
73
-
74
-
75
-
76
-
77
-
78
-
79
-
80
-
81
-
82
-
83
-
84
-
85
-
86
-
87
-
88
-
89
-
90
-
91
-
92
-
93
-
94
-
95
-
96
-
97
-
98
-
99
-
100
-
101
-
102
-
103
-
104
-
105
-
106
-
107
-
108
 |
 |

The following illustration shows a cable being routed from a CD-ROM drive
installed in bay 1 to an audio adapter.
(The drive cage is shown in the rotated
position.)
What to do next
±
If you removed the side cover and the system board, see “Replacing the Side
Cover” on page
40 and “Removing the System Board” on page
41.
±
To work with another option, go to the appropriate section.
±
To complete the installation, go to Chapter
7, “Completing the Installation”
on page
73.
±1²
Connect the cable to the drive.
±2²
Route the cable through the small, plastic clamp.
±3²
Route the cable through the drive bracket and around the riser card.
±4²
Connect the cable to the adapter.
44
Installing Options in Your Personal Computer