Lenovo PC 300PL Installing Options in your PC - 6862, 6275 - Page 75
Rotating the Drive Cage Back into Fixed Position, Before you begin, What to do next
 |
View all Lenovo PC 300PL manuals
Add to My Manuals
Save this manual to your list of manuals |
Page 75 highlights
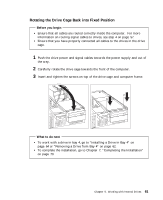
Rotating the Drive Cage Back into Fixed Position Before you begin Ensure that all cables are routed correctly inside the computer. For more information on routing signal cables to drives, see step 4 on page 57. Ensure that you have properly connected all cables to the drives in the drive cage. 1 Push the drive power and signal cables towards the power supply and out of the way. 2 Carefully rotate the drive cage towards the front of the computer. 3 Insert and tighten the screws on top of the drive cage and computer frame. What to do next To work with a drive in bay 4, go to "Installing a Drive in Bay 4" on page 64 or "Removing a Drive from Bay 4" on page 62. To complete the installation, go to Chapter 7, "Completing the Installation" on page 73. Chapter 5. Working with Internal Drives 61
-
 1
1 -
2
-
3
-
4
-
5
-
6
-
7
-
8
-
9
-
10
-
11
-
12
-
13
-
14
-
15
-
16
-
17
-
18
-
19
-
20
-
21
-
22
-
23
-
24
-
25
-
26
-
27
-
28
-
29
-
30
-
31
-
32
-
33
-
34
-
35
-
36
-
37
-
38
-
39
-
40
-
41
-
42
-
43
-
44
-
45
-
46
-
47
-
48
-
49
-
50
-
51
-
52
-
53
-
54
-
55
-
56
-
57
-
58
-
59
-
60
-
61
-
62
-
63
-
64
-
65
-
66
-
67
-
68
-
69
-
 70
70 -
 71
71 -
 72
72 -
 73
73 -
 74
74 -
 75
75 -
 76
76 -
 77
77 -
 78
78 -
 79
79 -
 80
80 -
81
-
82
-
83
-
84
-
85
-
86
-
87
-
88
-
89
-
90
-
91
-
92
-
93
-
94
-
95
-
96
-
97
-
98
-
99
-
100
-
101
-
102
-
103
-
104
-
105
-
106
-
107
-
108
 |
 |
