Lenovo PC 300PL Installing Options in your PC - 6862, 6275 - Page 71
Route the signal cable inside the computer.
 |
View all Lenovo PC 300PL manuals
Add to My Manuals
Save this manual to your list of manuals |
Page 71 highlights
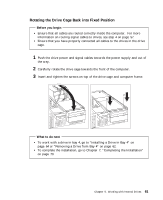
4 Route the signal cable inside the computer. The following illustration shows a signal cable being routed from a drive installed in bay 1 to the secondary IDE connector on the riser card. 1 The signal cable connects to the drive here. 2 Route the signal cable through the plastic clamp. A detailed illustration on using this clamp is shown on page 58. 3 Route the signal cable around the drive bracket. 4 Connect the signal cable to the IDE connector. Notes: a. The preceding steps should be used with all signal cables that are routed from drives in the drive cage to connectors on the opposite side of the riser card. If you are connecting a drive to the primary IDE connector on the riser card (on the same side as the drive cage), also route the signal cable through the plastic clamp and then attach it to the primary IDE connector. Refer to "Adapters and the Riser Card" on page 27 for an illustration showing the locations of the connectors on the riser card. b. If you added a CD-ROM drive and want to connect it to an audio adapter, see "Routing a Cable from an Adapter to a Drive in Bay 1, 2, or 3" on page 43. This section provides information about routing a cable from an audio adapter to a drive installed in bay 1, 2, or 3. Chapter 5. Working with Internal Drives 57
-
 1
1 -
2
-
3
-
4
-
5
-
6
-
7
-
8
-
9
-
10
-
11
-
12
-
13
-
14
-
15
-
16
-
17
-
18
-
19
-
20
-
21
-
22
-
23
-
24
-
25
-
26
-
27
-
28
-
29
-
30
-
31
-
32
-
33
-
34
-
35
-
36
-
37
-
38
-
39
-
40
-
41
-
42
-
43
-
44
-
45
-
46
-
47
-
48
-
49
-
50
-
51
-
52
-
53
-
54
-
55
-
56
-
57
-
58
-
59
-
60
-
61
-
62
-
63
-
64
-
65
-
 66
66 -
 67
67 -
 68
68 -
 69
69 -
 70
70 -
 71
71 -
 72
72 -
 73
73 -
 74
74 -
 75
75 -
 76
76 -
77
-
78
-
79
-
80
-
81
-
82
-
83
-
84
-
85
-
86
-
87
-
88
-
89
-
90
-
91
-
92
-
93
-
94
-
95
-
96
-
97
-
98
-
99
-
100
-
101
-
102
-
103
-
104
-
105
-
106
-
107
-
108
 |
 |
