Lenovo PC 300PL Installing Options in your PC - 6862, 6275 - Page 85
Before you begin, CAUTION, Do not touch any of the internal components of the computer.
 |
View all Lenovo PC 300PL manuals
Add to My Manuals
Save this manual to your list of manuals |
Page 85 highlights
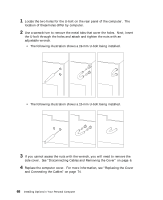
Before you begin Clearing CMOS memory sets the configuration of your computer to the default settings. Because you need to reconfigure the computer after clearing CMOS memory, if possible, record the configuration information of your computer before moving the Clear CMOS Request jumper. Using the Configuration/Setup Utility program, record all configuration information. Read "Electrical Safety" on page 4 and "Handling Static-Sensitive Devices" on page 5. Turn off the computer and disconnect all cables except the power cord. Remove the computer cover. Locate the Clear CMOS Request jumper. See "Identifying Parts on the System Board" on page 13. Note: A label on the underside of the computer cover also shows the location of this jumper and other computer components. 1 Move the jumper from its normal position (pins 1 and 2) to pins 2 and 3. It might be helpful to use needle-nose pliers to move the jumper, but be careful not to scrape any system board components or crush the jumper. 21 3 1 2 3 21 3 CAUTION: Do not touch any of the internal components of the computer. 2 Reconnect the cables and turn on the computer. CMOS memory is now cleared and the passwords have been erased. After the POST completes, configuration error messages are displayed. 3 Follow the instructions on the screen to continue. Chapter 6. Working with Security Options 71
-
 1
1 -
2
-
3
-
4
-
5
-
6
-
7
-
8
-
9
-
10
-
11
-
12
-
13
-
14
-
15
-
16
-
17
-
18
-
19
-
20
-
21
-
22
-
23
-
24
-
25
-
26
-
27
-
28
-
29
-
30
-
31
-
32
-
33
-
34
-
35
-
36
-
37
-
38
-
39
-
40
-
41
-
42
-
43
-
44
-
45
-
46
-
47
-
48
-
49
-
50
-
51
-
52
-
53
-
54
-
55
-
56
-
57
-
58
-
59
-
60
-
61
-
62
-
63
-
64
-
65
-
66
-
67
-
68
-
69
-
70
-
71
-
72
-
73
-
74
-
75
-
76
-
77
-
78
-
79
-
 80
80 -
 81
81 -
 82
82 -
 83
83 -
 84
84 -
 85
85 -
 86
86 -
 87
87 -
 88
88 -
 89
89 -
 90
90 -
91
-
92
-
93
-
94
-
95
-
96
-
97
-
98
-
99
-
100
-
101
-
102
-
103
-
104
-
105
-
106
-
107
-
108
 |
 |
