Lenovo PC 300PL Installing Options in your PC - 6862, 6275 - Page 72
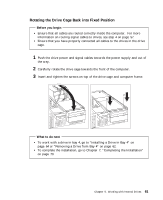
For details, see Rotating the Drive Cage Back
 |
View all Lenovo PC 300PL manuals
Add to My Manuals
Save this manual to your list of manuals |
Page 72 highlights
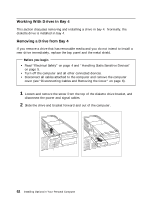
The following illustration shows how to open and close the clamp used for securing signal cables. 5 Attach all cables to the drive. Note: If more than one drive is installed, attach cables to the lowest drive first and work your way up. Power Cables Signal Cables What to do next Go to the device-record form in Using Your Personal Computer and record the new installation. Rotate the drive cage back. For details, see "Rotating the Drive Cage Back into Fixed Position" on page 61. 58 Installing Options in Your Personal Computer
-
 1
1 -
2
-
3
-
4
-
5
-
6
-
7
-
8
-
9
-
10
-
11
-
12
-
13
-
14
-
15
-
16
-
17
-
18
-
19
-
20
-
21
-
22
-
23
-
24
-
25
-
26
-
27
-
28
-
29
-
30
-
31
-
32
-
33
-
34
-
35
-
36
-
37
-
38
-
39
-
40
-
41
-
42
-
43
-
44
-
45
-
46
-
47
-
48
-
49
-
50
-
51
-
52
-
53
-
54
-
55
-
56
-
57
-
58
-
59
-
60
-
61
-
62
-
63
-
64
-
65
-
66
-
 67
67 -
 68
68 -
 69
69 -
 70
70 -
 71
71 -
 72
72 -
 73
73 -
 74
74 -
 75
75 -
 76
76 -
 77
77 -
78
-
79
-
80
-
81
-
82
-
83
-
84
-
85
-
86
-
87
-
88
-
89
-
90
-
91
-
92
-
93
-
94
-
95
-
96
-
97
-
98
-
99
-
100
-
101
-
102
-
103
-
104
-
105
-
106
-
107
-
108
 |
 |

The following illustration shows how to open and close the clamp used for
securing signal cables.
5
Attach all cables to the drive.
Note:
If more than one drive is installed, attach cables to the lowest drive
first and work your way up.
Power
Cables
Signal
Cables
What to do next
±
Go to the device-record form in
Using Your Personal Computer
and record the
new installation.
±
Rotate the drive cage back.
For details, see “Rotating the Drive Cage Back
into Fixed Position” on page
61.
58
Installing Options in Your Personal Computer