Lenovo PC 300PL Installing Options in your PC - 6862, 6275 - Page 66
Removing a Bay Panel, Save the removed bay panel for possible future use.
 |
View all Lenovo PC 300PL manuals
Add to My Manuals
Save this manual to your list of manuals |
Page 66 highlights
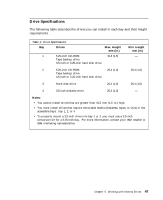
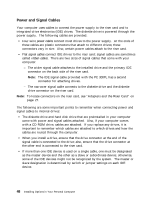
Removing a Bay Panel 1 Locate the appropriate bay panel in the computer cover. 2 Remove the cover (see "Disconnecting Cables and Removing the Cover" on page 6) and look inside at the back of the bay panel. 3 Use the tip of a screwdriver if necessary to flex the plastic tabs holding the bay panel in the cover. If you are planning to install a CD-ROM drive in bay 1, you must release the tab nearest the outside edge first. 4 Flex the bay panel a little, until both tabs are released. 5 Remove the bay panel. The following illustrations show a bay panel being removed from bay 1. 6 Save the removed bay panel for possible future use. 7 If applicable, repeat steps 1-3 to remove another bay panel. What to do next Remove the metal shield covering the bay. To remove a drive, go to "Removing a Drive from Bay 1, 2, or 3" on page 59. To install the drive cage, go to "Rotating the Drive Cage Back into Fixed Position" on page 61. 52 Installing Options in Your Personal Computer
-
 1
1 -
2
-
3
-
4
-
5
-
6
-
7
-
8
-
9
-
10
-
11
-
12
-
13
-
14
-
15
-
16
-
17
-
18
-
19
-
20
-
21
-
22
-
23
-
24
-
25
-
26
-
27
-
28
-
29
-
30
-
31
-
32
-
33
-
34
-
35
-
36
-
37
-
38
-
39
-
40
-
41
-
42
-
43
-
44
-
45
-
46
-
47
-
48
-
49
-
50
-
51
-
52
-
53
-
54
-
55
-
56
-
57
-
58
-
59
-
60
-
 61
61 -
 62
62 -
 63
63 -
 64
64 -
 65
65 -
 66
66 -
 67
67 -
 68
68 -
 69
69 -
 70
70 -
 71
71 -
72
-
73
-
74
-
75
-
76
-
77
-
78
-
79
-
80
-
81
-
82
-
83
-
84
-
85
-
86
-
87
-
88
-
89
-
90
-
91
-
92
-
93
-
94
-
95
-
96
-
97
-
98
-
99
-
100
-
101
-
102
-
103
-
104
-
105
-
106
-
107
-
108
 |
 |
