Lenovo PC 300PL Installing Options in your PC - 6862, 6275 - Page 73
Removing a Drive from Bay 1, 2, or 3
 |
View all Lenovo PC 300PL manuals
Add to My Manuals
Save this manual to your list of manuals |
Page 73 highlights
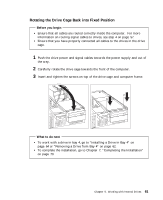
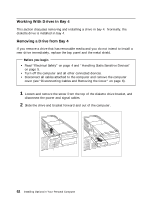
Removing a Drive from Bay 1, 2, or 3 Before you begin Read "Working with Drives in Bays 1, 2, and 3" on page 54. Read "Rotating the Drive Cage" on page 54. After you have rotated the drive cage from the computer frame: 1 Disconnect the cables from the drive that you want to remove. 2 Loosen and remove the screws holding the drive in the drive cage, and then slide the drive out of the bay. a. The following illustration shows a 5.25-inch drive (a CD-ROM) being removed from bay 1. Drive Cage Chapter 5. Working with Internal Drives 59
-
 1
1 -
2
-
3
-
4
-
5
-
6
-
7
-
8
-
9
-
10
-
11
-
12
-
13
-
14
-
15
-
16
-
17
-
18
-
19
-
20
-
21
-
22
-
23
-
24
-
25
-
26
-
27
-
28
-
29
-
30
-
31
-
32
-
33
-
34
-
35
-
36
-
37
-
38
-
39
-
40
-
41
-
42
-
43
-
44
-
45
-
46
-
47
-
48
-
49
-
50
-
51
-
52
-
53
-
54
-
55
-
56
-
57
-
58
-
59
-
60
-
61
-
62
-
63
-
64
-
65
-
66
-
67
-
 68
68 -
 69
69 -
 70
70 -
 71
71 -
 72
72 -
 73
73 -
 74
74 -
 75
75 -
 76
76 -
 77
77 -
 78
78 -
79
-
80
-
81
-
82
-
83
-
84
-
85
-
86
-
87
-
88
-
89
-
90
-
91
-
92
-
93
-
94
-
95
-
96
-
97
-
98
-
99
-
100
-
101
-
102
-
103
-
104
-
105
-
106
-
107
-
108
 |
 |

Removing a Drive from Bay 1, 2, or 3
Before you begin
±
Read “Working with Drives in Bays 1, 2, and 3” on page
54.
±
Read “Rotating the Drive Cage” on page
54.
After you have rotated the drive cage from the computer frame:
1
Disconnect the cables from the drive that you want to remove.
2
Loosen and remove the screws holding the drive in the drive cage, and then
slide the drive out of the bay.
a.
The following illustration shows a 5.25-inch drive (a CD-ROM) being
removed from bay
1.
Drive Cage
Chapter
5.
Working with Internal Drives
59