Lenovo Storage N3310 (English) User Guide and Hardware Maintenance Manual - Le - Page 59
Removing and reinstalling the rack handles, Notes, Attention
 |
View all Lenovo Storage N3310 manuals
Add to My Manuals
Save this manual to your list of manuals |
Page 59 highlights
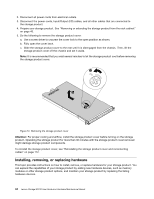
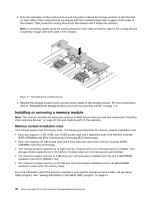
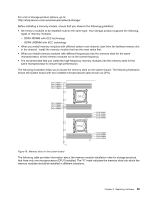
If you are handling a storage product option, refer to the appropriate installation or removal instructions in this topic along with the instructions that come with the option. Notes: • Use only parts provided by Lenovo. • Depending on the model, your storage product might look slightly different from the illustrations in this topic. The EMI integrity and cooling of the storage product are protected by having all drive bays and PCIe card slots covered or occupied. When you install an internal drive or a PCIe card, save the EMI shield or dummy tray from the drive bay or save the PCIe card slot bracket in case that you later remove the device. Attention: An unoccupied drive bay or PCIe card slot without a cover, shield, dummy tray, filler, or any other protection might impact the EMI integrity and cooling of the storage product, which might result in overheating or component damage. Removing and reinstalling the rack handles Attention: Do not open your storage product or attempt any repair before reading and understanding "Safety information" on page iii and "Guidelines" on page 41. Before you begin, print all the related instructions or ensure that you can view the PDF version on another computer for reference. To remove and reinstall the rack handles, do the following: 1. On each side of the storage product, remove the five screws that secure the rack handle and then remove the rack handle from the chassis. Figure 14. Removing the rack handles Chapter 6. Replacing hardware 45
-
 1
1 -
2
-
3
-
4
-
5
-
6
-
7
-
8
-
9
-
10
-
11
-
12
-
13
-
14
-
15
-
16
-
17
-
18
-
19
-
20
-
21
-
22
-
23
-
24
-
25
-
26
-
27
-
28
-
29
-
30
-
31
-
32
-
33
-
34
-
35
-
36
-
37
-
38
-
39
-
40
-
41
-
42
-
43
-
44
-
45
-
46
-
47
-
48
-
49
-
50
-
51
-
52
-
53
-
 54
54 -
 55
55 -
 56
56 -
 57
57 -
 58
58 -
 59
59 -
 60
60 -
 61
61 -
 62
62 -
 63
63 -
 64
64 -
65
-
66
-
67
-
68
-
69
-
70
-
71
-
72
-
73
-
74
-
75
-
76
-
77
-
78
-
79
-
80
-
81
-
82
-
83
-
84
-
85
-
86
-
87
-
88
-
89
-
90
-
91
-
92
-
93
-
94
-
95
-
96
-
97
-
98
-
99
-
100
-
101
-
102
-
103
-
104
-
105
-
106
-
107
-
108
-
109
-
110
-
111
-
112
-
113
-
114
-
115
-
116
-
117
-
118
-
119
-
120
-
121
-
122
-
123
-
124
-
125
-
126
-
127
-
128
-
129
-
130
-
131
-
132
-
133
-
134
-
135
-
136
-
137
-
138
-
139
-
140
-
141
-
142
-
143
-
144
-
145
-
146
-
147
-
148
-
149
-
150
-
151
-
152
 |
 |
