Lenovo Storage N3310 (English) User Guide and Hardware Maintenance Manual - Le - Page 67
Remove all external media from the drives and turn off all attached devices and the storage product.
 |
View all Lenovo Storage N3310 manuals
Add to My Manuals
Save this manual to your list of manuals |
Page 67 highlights
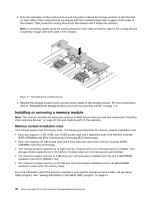
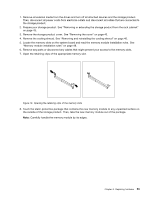
1. Remove all external media from the drives and turn off all attached devices and the storage product. Then, disconnect all power cords from electrical outlets and disconnect all cables that are connected to the storage product. 2. Prepare your storage product. See "Removing or extending the storage product from the rack cabinet" on page 43. 3. Remove the storage product cover. See "Removing the cover" on page 43. 4. Remove the cooling shroud. See "Removing and reinstalling the cooling shroud" on page 46. 5. Locate the memory slots on the system board and read the memory module installation rules. See "Memory module installation rules" on page 48. 6. Remove any parts or disconnect any cables that might prevent your access to the memory slots. 7. Open the retaining clips of the appropriate memory slot. Figure 19. Opening the retaining clips of the memory slots 8. Touch the static-protective package that contains the new memory module to any unpainted surface on the outside of the storage product. Then, take the new memory module out of the package. Note: Carefully handle the memory module by its edges. Chapter 6. Replacing hardware 53
-
 1
1 -
2
-
3
-
4
-
5
-
6
-
7
-
8
-
9
-
10
-
11
-
12
-
13
-
14
-
15
-
16
-
17
-
18
-
19
-
20
-
21
-
22
-
23
-
24
-
25
-
26
-
27
-
28
-
29
-
30
-
31
-
32
-
33
-
34
-
35
-
36
-
37
-
38
-
39
-
40
-
41
-
42
-
43
-
44
-
45
-
46
-
47
-
48
-
49
-
50
-
51
-
52
-
53
-
54
-
55
-
56
-
57
-
58
-
59
-
60
-
61
-
 62
62 -
 63
63 -
 64
64 -
 65
65 -
 66
66 -
 67
67 -
 68
68 -
 69
69 -
 70
70 -
 71
71 -
 72
72 -
73
-
74
-
75
-
76
-
77
-
78
-
79
-
80
-
81
-
82
-
83
-
84
-
85
-
86
-
87
-
88
-
89
-
90
-
91
-
92
-
93
-
94
-
95
-
96
-
97
-
98
-
99
-
100
-
101
-
102
-
103
-
104
-
105
-
106
-
107
-
108
-
109
-
110
-
111
-
112
-
113
-
114
-
115
-
116
-
117
-
118
-
119
-
120
-
121
-
122
-
123
-
124
-
125
-
126
-
127
-
128
-
129
-
130
-
131
-
132
-
133
-
134
-
135
-
136
-
137
-
138
-
139
-
140
-
141
-
142
-
143
-
144
-
145
-
146
-
147
-
148
-
149
-
150
-
151
-
152
 |
 |
