Lenovo Storage N3310 (English) User Guide and Hardware Maintenance Manual - Le - Page 60
Removing and reinstalling the cooling shroud, Removing the cooling shroud
 |
View all Lenovo Storage N3310 manuals
Add to My Manuals
Save this manual to your list of manuals |
Page 60 highlights
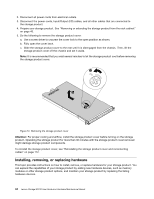
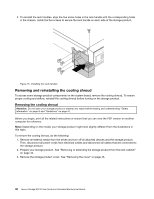
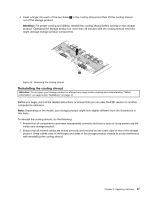
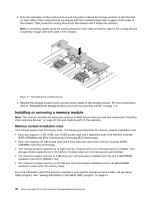
2. To reinstall the rack handles, align the five screw holes in the rack handle with the corresponding holes in the chassis. Install the five screws to secure the rack handle on each side of the storage product. Figure 15. Installing the rack handles Removing and reinstalling the cooling shroud To access some storage product components on the system board, remove the cooling shroud. To ensure proper cooling and airflow, reinstall the cooling shroud before turning on the storage product. Removing the cooling shroud Attention: Do not open your storage product or attempt any repair before reading and understanding "Safety information" on page iii and "Guidelines" on page 41. Before you begin, print all the related instructions or ensure that you can view the PDF version on another computer for reference. Note: Depending on the model, your storage product might look slightly different from the illustrations in this topic. To remove the cooling shroud, do the following: 1. Remove all external media from the drives and turn off all attached devices and the storage product. Then, disconnect all power cords from electrical outlets and disconnect all cables that are connected to the storage product. 2. Prepare your storage product. See "Removing or extending the storage product from the rack cabinet" on page 43. 3. Remove the storage product cover. See "Removing the cover" on page 43. 46 Lenovo Storage N3310 User Guide and Hardware Maintenance Manual
-
 1
1 -
2
-
3
-
4
-
5
-
6
-
7
-
8
-
9
-
10
-
11
-
12
-
13
-
14
-
15
-
16
-
17
-
18
-
19
-
20
-
21
-
22
-
23
-
24
-
25
-
26
-
27
-
28
-
29
-
30
-
31
-
32
-
33
-
34
-
35
-
36
-
37
-
38
-
39
-
40
-
41
-
42
-
43
-
44
-
45
-
46
-
47
-
48
-
49
-
50
-
51
-
52
-
53
-
54
-
 55
55 -
 56
56 -
 57
57 -
 58
58 -
 59
59 -
 60
60 -
 61
61 -
 62
62 -
 63
63 -
 64
64 -
 65
65 -
66
-
67
-
68
-
69
-
70
-
71
-
72
-
73
-
74
-
75
-
76
-
77
-
78
-
79
-
80
-
81
-
82
-
83
-
84
-
85
-
86
-
87
-
88
-
89
-
90
-
91
-
92
-
93
-
94
-
95
-
96
-
97
-
98
-
99
-
100
-
101
-
102
-
103
-
104
-
105
-
106
-
107
-
108
-
109
-
110
-
111
-
112
-
113
-
114
-
115
-
116
-
117
-
118
-
119
-
120
-
121
-
122
-
123
-
124
-
125
-
126
-
127
-
128
-
129
-
130
-
131
-
132
-
133
-
134
-
135
-
136
-
137
-
138
-
139
-
140
-
141
-
142
-
143
-
144
-
145
-
146
-
147
-
148
-
149
-
150
-
151
-
152
 |
 |
