Lenovo Storage N3310 (English) User Guide and Hardware Maintenance Manual - Le - Page 68
Removing a memory module,
 |
View all Lenovo Storage N3310 manuals
Add to My Manuals
Save this manual to your list of manuals |
Page 68 highlights
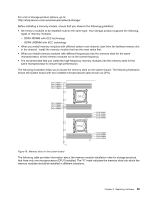
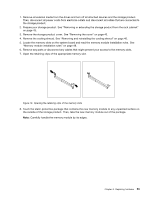
9. Position the new memory module over the memory slot. Ensure that the notch 1 on the new memory module is aligned with the key 2 in the memory slot. Then, press the new memory module straight down into the memory slot until the retaining clips close and the new memory module snaps into position. Note: If there is a gap between the memory module and the retaining clips, the memory module has not been installed correctly. Open the retaining clips, remove the memory module, and then reinstall it into the memory slot until the retaining clips are completely closed. Figure 20. Installing a memory module 10. Reinstall any parts or reconnect any cables that you have removed. What to do next: • To work with another piece of hardware, go to the appropriate section. • To complete the installation, go to "Completing the parts replacement" on page 112. Removing a memory module Attention: Do not open your storage product or attempt any repair before reading and understanding "Safety information" on page iii and "Guidelines" on page 41. Before you begin, print all the related instructions or ensure that you can view the PDF version on another computer for reference. Note: To optimize system performance, ensure that you consider and follow the memory module installation rules when performing the operation. See "Memory module installation rules" on page 48. To remove a memory module, do the following: 1. Remove all external media from the drives and turn off all attached devices and the storage product. Then, disconnect all power cords from electrical outlets and disconnect all cables that are connected to the storage product. 2. Prepare your storage product. See "Removing or extending the storage product from the rack cabinet" on page 43. 3. Remove the storage product cover. See "Removing the cover" on page 43. 4. Remove the cooling shroud. See "Removing and reinstalling the cooling shroud" on page 46. 5. Locate the memory slots on the system board and read the memory module installation rules. See "Memory module installation rules" on page 48. 6. Remove any parts or disconnect any cables that might prevent your access to the memory slots. 54 Lenovo Storage N3310 User Guide and Hardware Maintenance Manual
-
 1
1 -
2
-
3
-
4
-
5
-
6
-
7
-
8
-
9
-
10
-
11
-
12
-
13
-
14
-
15
-
16
-
17
-
18
-
19
-
20
-
21
-
22
-
23
-
24
-
25
-
26
-
27
-
28
-
29
-
30
-
31
-
32
-
33
-
34
-
35
-
36
-
37
-
38
-
39
-
40
-
41
-
42
-
43
-
44
-
45
-
46
-
47
-
48
-
49
-
50
-
51
-
52
-
53
-
54
-
55
-
56
-
57
-
58
-
59
-
60
-
61
-
62
-
 63
63 -
 64
64 -
 65
65 -
 66
66 -
 67
67 -
 68
68 -
 69
69 -
 70
70 -
 71
71 -
 72
72 -
 73
73 -
74
-
75
-
76
-
77
-
78
-
79
-
80
-
81
-
82
-
83
-
84
-
85
-
86
-
87
-
88
-
89
-
90
-
91
-
92
-
93
-
94
-
95
-
96
-
97
-
98
-
99
-
100
-
101
-
102
-
103
-
104
-
105
-
106
-
107
-
108
-
109
-
110
-
111
-
112
-
113
-
114
-
115
-
116
-
117
-
118
-
119
-
120
-
121
-
122
-
123
-
124
-
125
-
126
-
127
-
128
-
129
-
130
-
131
-
132
-
133
-
134
-
135
-
136
-
137
-
138
-
139
-
140
-
141
-
142
-
143
-
144
-
145
-
146
-
147
-
148
-
149
-
150
-
151
-
152
 |
 |
