Lexmark Forms Printer 2400 Service Manual - Page 75
Power Supply Removal, securing the power supply to
 |
View all Lexmark Forms Printer 2400 manuals
Add to My Manuals
Save this manual to your list of manuals |
Page 75 highlights
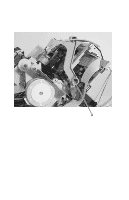
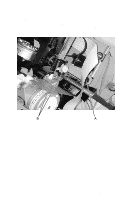
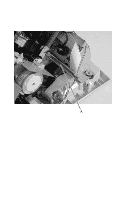
24xx Power Supply Removal CAUTION: The power supply may be hot. 1. Turn off the printer and disconnect the power cord at both ends. 2. Remove the top cover. Go to "Covers, Top Removal" on page 4-8. 3. Remove the print unit. Go to "Print Unit Removal" on page 4-28. 4. Disconnect the power supply cable [A]. 5. Remove the five screws [B] securing the power supply to the bottom cover. Take care not to lose the ground clips which must be replaced between the ground plate and the board. 6. Remove the two ground wire screws [C]. 7. Remove the power supply. Repair Information 4-15
-
 1
1 -
2
-
3
-
4
-
5
-
6
-
7
-
8
-
9
-
10
-
11
-
12
-
13
-
14
-
15
-
16
-
17
-
18
-
19
-
20
-
21
-
22
-
23
-
24
-
25
-
26
-
27
-
28
-
29
-
30
-
31
-
32
-
33
-
34
-
35
-
36
-
37
-
38
-
39
-
40
-
41
-
42
-
43
-
44
-
45
-
46
-
47
-
48
-
49
-
50
-
51
-
52
-
53
-
54
-
55
-
56
-
57
-
58
-
59
-
60
-
61
-
62
-
63
-
64
-
65
-
66
-
67
-
68
-
69
-
 70
70 -
 71
71 -
 72
72 -
 73
73 -
 74
74 -
 75
75 -
 76
76 -
 77
77 -
 78
78 -
 79
79 -
 80
80 -
81
-
82
-
83
-
84
-
85
-
86
-
87
-
88
-
89
-
90
-
91
-
92
-
93
-
94
-
95
-
96
-
97
-
98
-
99
-
100
-
101
-
102
-
103
-
104
-
105
-
106
-
107
-
108
-
109
-
110
-
111
-
112
-
113
-
114
-
115
-
116
-
117
-
118
-
119
-
120
-
121
-
122
-
123
-
124
-
125
-
126
-
127
-
128
-
129
-
130
-
131
-
132
-
133
-
134
-
135
-
136
-
137
-
138
-
139
-
140
-
141
-
142
-
143
-
144
-
145
-
146
-
147
-
148
-
149
-
150
-
151
-
152
-
153
-
154
-
155
-
156
-
157
-
158
-
159
-
160
-
161
-
162
-
163
-
164
-
165
-
166
-
167
-
168
-
169
-
170
 |
 |

Repair Information
4-15
24xx
Power Supply Removal
CAUTION:
The power supply may be hot.
1.
Turn off the printer and disconnect the power cord at both ends.
2.
Remove the top cover. Go to
“Covers, Top Removal” on
page 4-8
.
3.
Remove the print unit. Go to
“Print Unit Removal” on
page 4-28
.
4.
Disconnect the power supply cable [
A
].
5.
Remove the five screws [
B
] securing the power supply to the
bottom cover. Take care not to lose the ground clips which must
be replaced between the ground plate and the board.
6.
Remove the two ground wire screws [
C
].
7.
Remove the power supply.