Lexmark Forms Printer 2400 Service Manual - Page 90
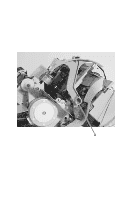
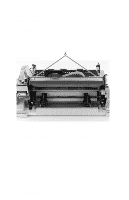
Ribbon Drive Rack Gear Removal, the print unit.
 |
View all Lexmark Forms Printer 2400 manuals
Add to My Manuals
Save this manual to your list of manuals |
Page 90 highlights
24xx Ribbon Drive Rack Gear Removal 1. Remove the top cover. Go to "Covers, Top Removal" on page 4-8. 2. Remove the carrier. Go to "Carrier Removal" on page 4-16. 3. Unsnap the white plastic end stop [A] from the top left side of the print unit. 4. Unlatch the left side of the rack from the top of the print unit. 5. Slide the rack to the right and out of the print unit. 4-30 Service Manual
-
 1
1 -
2
-
3
-
4
-
5
-
6
-
7
-
8
-
9
-
10
-
11
-
12
-
13
-
14
-
15
-
16
-
17
-
18
-
19
-
20
-
21
-
22
-
23
-
24
-
25
-
26
-
27
-
28
-
29
-
30
-
31
-
32
-
33
-
34
-
35
-
36
-
37
-
38
-
39
-
40
-
41
-
42
-
43
-
44
-
45
-
46
-
47
-
48
-
49
-
50
-
51
-
52
-
53
-
54
-
55
-
56
-
57
-
58
-
59
-
60
-
61
-
62
-
63
-
64
-
65
-
66
-
67
-
68
-
69
-
70
-
71
-
72
-
73
-
74
-
75
-
76
-
77
-
78
-
79
-
80
-
81
-
82
-
83
-
84
-
 85
85 -
 86
86 -
 87
87 -
 88
88 -
 89
89 -
 90
90 -
 91
91 -
 92
92 -
 93
93 -
 94
94 -
 95
95 -
96
-
97
-
98
-
99
-
100
-
101
-
102
-
103
-
104
-
105
-
106
-
107
-
108
-
109
-
110
-
111
-
112
-
113
-
114
-
115
-
116
-
117
-
118
-
119
-
120
-
121
-
122
-
123
-
124
-
125
-
126
-
127
-
128
-
129
-
130
-
131
-
132
-
133
-
134
-
135
-
136
-
137
-
138
-
139
-
140
-
141
-
142
-
143
-
144
-
145
-
146
-
147
-
148
-
149
-
150
-
151
-
152
-
153
-
154
-
155
-
156
-
157
-
158
-
159
-
160
-
161
-
162
-
163
-
164
-
165
-
166
-
167
-
168
-
169
-
170
 |
 |

4-30
Service Manual
24xx
Ribbon Drive Rack Gear Removal
1.
Remove the top cover. Go to
“Covers, Top Removal” on
page 4-8
.
2.
Remove the carrier. Go to
“Carrier Removal” on page 4-16
.
3.
Unsnap the white plastic end stop [
A
] from the top left side of
the print unit.
4.
Unlatch the left side of the rack from the top of the print unit.
5.
Slide the rack to the right and out of the print unit.