Lexmark X422 X422 MFP Setup Guide - Page 20
Unlock the scanner, Ready
 |
View all Lexmark X422 manuals
Add to My Manuals
Save this manual to your list of manuals |
Page 20 highlights
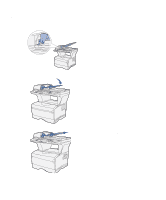
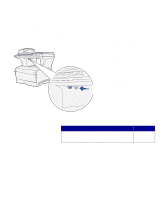
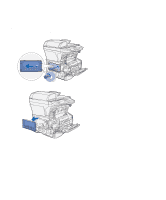
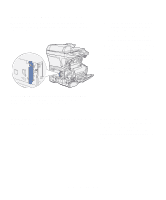
Unlock the scanner Note: The scanner is shipped in a locked position to prevent damage. We highly recommend that you lock the scanner anytime you move the MFP. After you have finished assembling your MFP, you must unlock the scanner. To unlock the scanner: 1 Locate the scanner lock under the left side of the scanner flatbed on the MFP. 2 Move the locking mechanism toward the front of the MFP. To lock the scanner (if you move your MFP after initial setup): 1 Make sure the scanner is in the Ready (idle) state. 2 Turn off and unplug the scanner. 3 Move the locking mechanism toward the back of the MFP. This locks the scanner. What do I do next? Task After you have installed MFP optional drawers, attached the ADF tray, and unlocked the scanner, you are now ready to install optional memory cards. Go to page... 13 Set up MFP and options 12
-
 1
1 -
2
-
3
-
4
-
5
-
6
-
7
-
8
-
9
-
10
-
11
-
12
-
13
-
14
-
 15
15 -
 16
16 -
 17
17 -
 18
18 -
 19
19 -
 20
20 -
 21
21 -
 22
22 -
 23
23 -
 24
24 -
 25
25 -
26
-
27
-
28
-
29
-
30
-
31
-
32
-
33
-
34
-
35
-
36
-
37
-
38
-
39
-
40
-
41
-
42
-
43
-
44
-
45
-
46
-
47
-
48
-
49
-
50
-
51
-
52
-
53
-
54
-
55
-
56
-
57
-
58
-
59
-
60
-
61
-
62
-
63
-
64
-
65
-
66
-
67
-
68
-
69
-
70
-
71
-
72
-
73
-
74
-
75
-
76
-
77
-
78
-
79
-
80
-
81
-
82
 |
 |
