NEC M40-2-AV M40/46-2 user's manual - Page 12
Stand Removal
 |
UPC - 805736024913
View all NEC M40-2-AV manuals
Add to My Manuals
Save this manual to your list of manuals |
Page 12 highlights
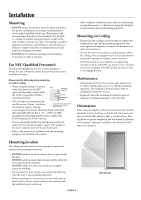
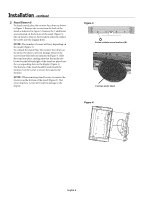
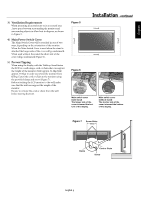
Installation - continued 2) Stand Removal To detach stand, place the monitor face down as shown in Figure 2. Remove the screws from the back of the stand as indicated in Figure 3. Remove the 2 additional screws located on the bottom of the stand (Figure 3). Lift up stand to remove. After stand is removed, replace the screws into the original holes. NOTE: The number of screws will vary depending on the model (Figure 3). To reattach the stand. Place the monitor face down on the protective sheet to prevent damage. Remove the screws from their holes as indicated in Figure 3. Slide the stand into place, making sure that the inside tabs located on the left and right of the stand are placed into the corresponding slots on the display (Figure 4). The bottom of the stand should fit underneath the monitor. Use the screws to secure the stand to the monitor NOTE: When removing stand, be sure to remove the 2 screws on the bottom of the stand (Figure 3). Not removing these screws will result in damage to the display. Figure 3 Circles indicate screw locations (8). 2 screws under stand Figure 4 English-8
-
 1
1 -
2
-
3
-
4
-
5
-
6
-
 7
7 -
 8
8 -
 9
9 -
 10
10 -
 11
11 -
 12
12 -
 13
13 -
 14
14 -
 15
15 -
 16
16 -
 17
17 -
18
-
19
-
20
-
21
-
22
-
23
-
24
-
25
-
26
-
27
-
28
-
29
-
30
-
31
-
32
-
33
-
34
-
35
-
36
-
37
-
38
-
39
-
40
-
41
-
42
-
43
-
44
-
45
-
46
-
47
-
48
-
49
-
50
-
51
-
52
-
53
-
54
-
55
-
56
-
57
-
58
-
59
-
60
-
61
-
62
-
63
-
64
-
65
-
66
-
67
-
68
-
69
-
70
-
71
-
72
-
73
-
74
-
75
-
76
-
77
-
78
-
79
-
80
-
81
-
82
-
83
-
84
-
85
-
86
-
87
-
88
-
89
-
90
-
91
-
92
-
93
-
94
-
95
-
96
-
97
-
98
-
99
-
100
-
101
-
102
-
103
-
104
-
105
-
106
-
107
-
108
-
109
-
110
-
111
-
112
-
113
-
114
-
115
-
116
-
117
-
118
-
119
-
120
-
121
-
122
-
123
-
124
-
125
-
126
-
127
-
128
-
129
-
130
-
131
-
132
-
133
-
134
-
135
-
136
-
137
-
138
-
139
-
140
-
141
-
142
-
143
-
144
-
145
-
146
-
147
-
148
-
149
-
150
-
151
-
152
 |
 |
