NEC M40-2-AV M40/46-2 user's manual - Page 13
Ventilation Requirements, Main Power Switch Cover, Prevent Tipping
 |
UPC - 805736024913
View all NEC M40-2-AV manuals
Add to My Manuals
Save this manual to your list of manuals |
Page 13 highlights
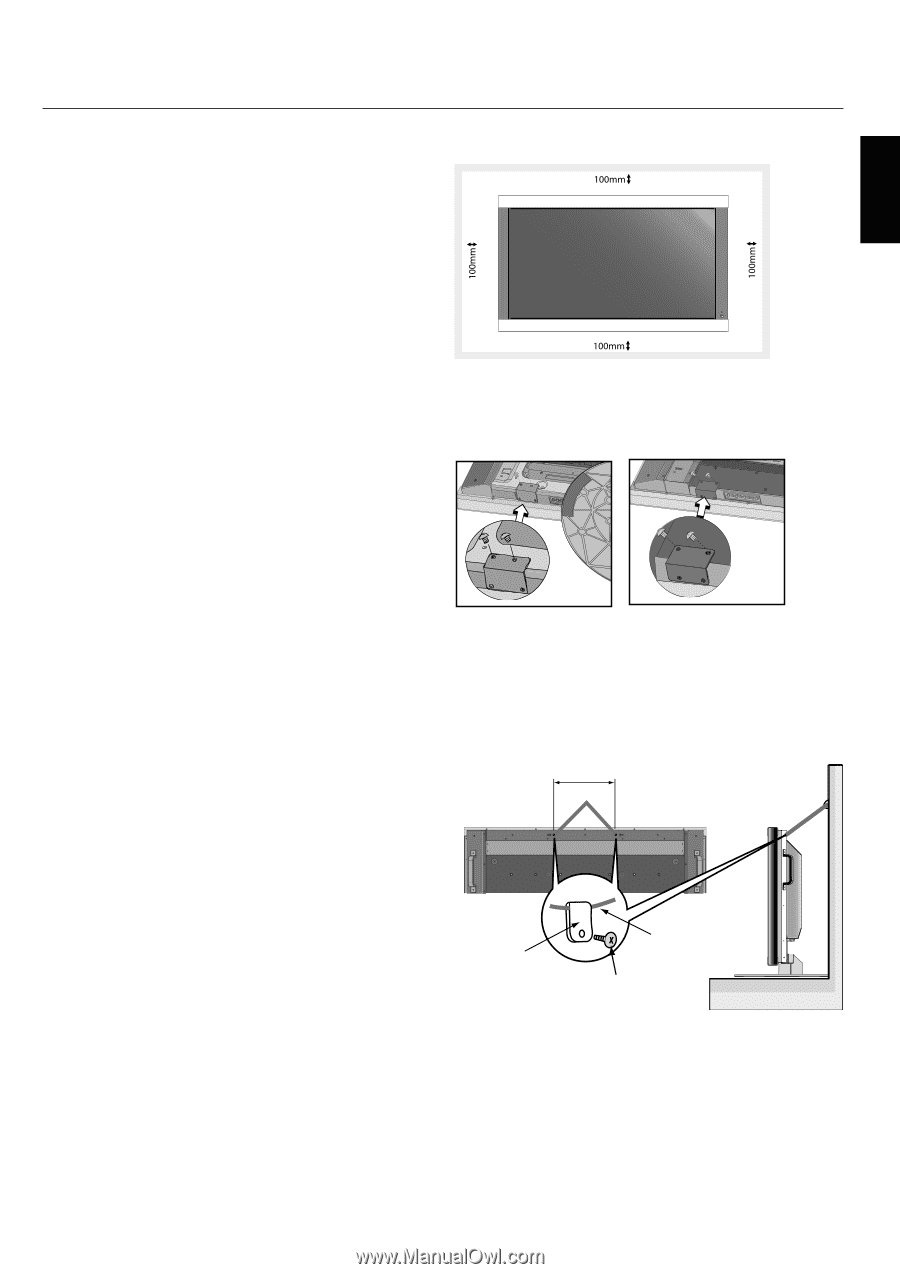
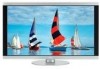
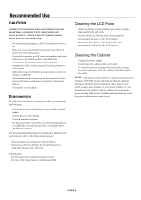
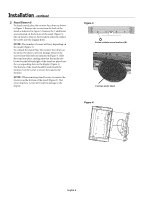
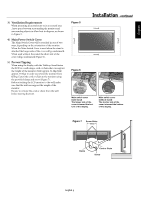
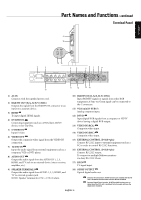
English 3) Ventilation Requirements When mounting in an enclosure or in a recessed area , leave space between surrounding the monitor and surrounding objects to allow heat to disperse, as shown in Figure 5. 4) Main Power Switch Cover The Main Switch Cover will be attached in one of two ways, depending on the orientation of the monitor. When the Main Switch Cover is used when the stand is attached the longer side of the cover will go underneath. When used without the stand, the short side of the cover will go underneath (Figure 6). 5) Prevent Tipping When using the display with the Tabletop Stand fasten the LCD to a wall using a cord or chain that can support the weight of the monitor (M40 approx. 32.6kg; M46 approx. 39.3kg) in order to prevent the monitor from falling. Fasten the cord or chain to the monitor using the provided clamp and screw (Figure 7). Before attaching the LCD monitor to the wall, make sure that the wall can support the weight of the monitor. Be sure to remove the cord or chain from the wall before moving the LCD. Figure 5 Installation - continued Figure 6 Main switch cover (with stand) The longer side of the cover is toward the bottom of the display. Main switch cover (without stand) The shorter side of the cover is toward the bottom of the display. Figure 7 Screw Holes 250mm Clamp Cord or Chain Screw English-9
-
 1
1 -
2
-
3
-
4
-
5
-
6
-
7
-
 8
8 -
 9
9 -
 10
10 -
 11
11 -
 12
12 -
 13
13 -
 14
14 -
 15
15 -
 16
16 -
 17
17 -
 18
18 -
19
-
20
-
21
-
22
-
23
-
24
-
25
-
26
-
27
-
28
-
29
-
30
-
31
-
32
-
33
-
34
-
35
-
36
-
37
-
38
-
39
-
40
-
41
-
42
-
43
-
44
-
45
-
46
-
47
-
48
-
49
-
50
-
51
-
52
-
53
-
54
-
55
-
56
-
57
-
58
-
59
-
60
-
61
-
62
-
63
-
64
-
65
-
66
-
67
-
68
-
69
-
70
-
71
-
72
-
73
-
74
-
75
-
76
-
77
-
78
-
79
-
80
-
81
-
82
-
83
-
84
-
85
-
86
-
87
-
88
-
89
-
90
-
91
-
92
-
93
-
94
-
95
-
96
-
97
-
98
-
99
-
100
-
101
-
102
-
103
-
104
-
105
-
106
-
107
-
108
-
109
-
110
-
111
-
112
-
113
-
114
-
115
-
116
-
117
-
118
-
119
-
120
-
121
-
122
-
123
-
124
-
125
-
126
-
127
-
128
-
129
-
130
-
131
-
132
-
133
-
134
-
135
-
136
-
137
-
138
-
139
-
140
-
141
-
142
-
143
-
144
-
145
-
146
-
147
-
148
-
149
-
150
-
151
-
152
 |
 |