Netgear FVS318 FVS318 Reference Manual - Page 88
Con the VPN Client Key Exchange Proposal., Save the VPN Client Settings., In the Key Group menu
 |
UPC - 606449023381
View all Netgear FVS318 manuals
Add to My Manuals
Save this manual to your list of manuals |
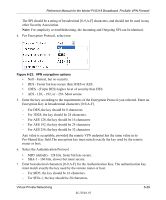
Page 88 highlights
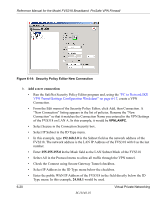
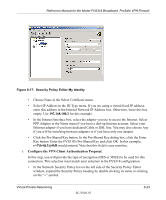
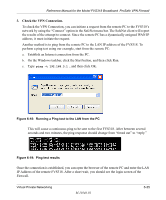
Reference Manual for the Model FVS318 Broadband ProSafe VPN Firewall • Expand the Authentication subheading by double clicking its name or clicking on the "+" symbol. Then select Proposal 1 below Authentication. • In the Authentication Method menu, select Pre-Shared key. • In the Encrypt Alg menu, select the type of encryption to correspond with what you configured for the Encryption Protocol in the FVS318 in Figure 6-13. In this example, use DES. • In the Hash Alg menu, select MD5. • In the SA Life menu, select Unspecified. • In the Key Group menu, select Diffie-Hellman Group 1. g. Configure the VPN Client Key Exchange Proposal. In this step, you will provide the type of encryption (DES or 3DES) to be used for this connection. This selection must match your selection in the FVS318 configuration. • Expand the Key Exchange subheading by double clicking its name or clicking on the "+" symbol. Then select Proposal 1 below Key Exchange. • In the SA Life menu, select Unspecified. • In the Compression menu, select None. • Check the Encapsulation Protocol (ESP) checkbox. • In the Encrypt Alg menu, select the type of encryption to correspond with what you configured for the Encryption Protocol in the FVS318 in Figure 6-13. In this example, use DES. • In the Hash Alg menu, select MD5. • In the Encapsulation menu, select Tunnel. • Leave the Authentication Protocol (AH) checkbox unchecked. h. Save the VPN Client Settings. From the File menu at the top of the Security Policy Editor window, select Save Changes. After you have configured and saved the VPN client information, your PC will automatically open the VPN connection when you attempt to access any IP addresses in the range of the remote VPN router's LAN. 6-24 M-10146-01 Virtual Private Networking
-
 1
1 -
2
-
3
-
4
-
5
-
6
-
7
-
8
-
9
-
10
-
11
-
12
-
13
-
14
-
15
-
16
-
17
-
18
-
19
-
20
-
21
-
22
-
23
-
24
-
25
-
26
-
27
-
28
-
29
-
30
-
31
-
32
-
33
-
34
-
35
-
36
-
37
-
38
-
39
-
40
-
41
-
42
-
43
-
44
-
45
-
46
-
47
-
48
-
49
-
50
-
51
-
52
-
53
-
54
-
55
-
56
-
57
-
58
-
59
-
60
-
61
-
62
-
63
-
64
-
65
-
66
-
67
-
68
-
69
-
70
-
71
-
72
-
73
-
74
-
75
-
76
-
77
-
78
-
79
-
80
-
81
-
82
-
 83
83 -
 84
84 -
 85
85 -
 86
86 -
 87
87 -
 88
88 -
 89
89 -
 90
90 -
 91
91 -
 92
92 -
 93
93 -
94
-
95
-
96
-
97
-
98
-
99
-
100
-
101
-
102
-
103
-
104
-
105
-
106
-
107
-
108
-
109
-
110
-
111
-
112
-
113
-
114
-
115
-
116
-
117
-
118
-
119
-
120
-
121
-
122
-
123
-
124
-
125
-
126
-
127
-
128
-
129
-
130
-
131
-
132
-
133
-
134
-
135
-
136
-
137
-
138
-
139
-
140
-
141
-
142
-
143
-
144
-
145
-
146
-
147
-
148
-
149
-
150
-
151
-
152
-
153
-
154
-
155
-
156
-
157
-
158
-
159
-
160
-
161
-
162
-
163
-
164
-
165
-
166
-
167
-
168
-
169
-
170
-
171
-
172
-
173
-
174
-
175
-
176
-
177
-
178
-
179
-
180
-
181
-
182
-
183
-
184
-
185
-
186
-
187
-
188
-
189
-
190
-
191
-
192
-
193
-
194
-
195
-
196
-
197
-
198
-
199
-
200
-
201
-
202
-
203
-
204
-
205
-
206
-
207
-
208
-
209
-
210
-
211
-
212
-
213
-
214
-
215
-
216
-
217
-
218
-
219
-
220
-
221
-
222
 |
 |
