Netgear R7800 User Manual - Page 134
Delete a Port Forwarding Entry, Application Example: Make a Local Web Server Public
 |
View all Netgear R7800 manuals
Add to My Manuals
Save this manual to your list of manuals |
Page 134 highlights
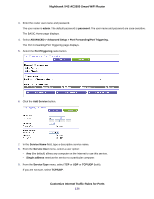
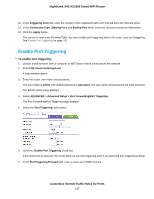
Nighthawk X4S AC2600 Smart WiFi Router Delete a Port Forwarding Entry To delete a port forwarding entry: 1. Launch a web browser from a computer or WiFi device that is connected to the network. 2. Enter http://www.routerlogin.net. A login window opens. 3. Enter therouter user name and password. The user name is admin. The default password is password. The user name and password are case-sensitive. The BASIC Home page displays. 4. Select ADVANCED > Advanced Setup > Port Forwarding/Port Triggering. The Port Forwarding/Port Triggering page displays. 5. Leave the Port Forwarding radio button selected. 6. In the table, select the radio button next to the service name. 7. Click the Delete Service button. The service is deleted. Application Example: Make a Local Web Server Public If you host a web server on your local network, you can use port forwarding to allow web requests from anyone on the Internet to reach your web server. To make a local web server public: 1. Assign your web server either a fixed IP address or a dynamic IP address using DHCP address reservation. In this example, your router always gives your web server an IP address of 192.168.1.33. 2. On the Port Forwarding/Port Triggering page, configure the router to forward the HTTP service to the local address of your web server at 192.168.1.33. HTTP (port 80) is the standard protocol for web servers. 3. (Optional) Register a host name with a Dynamic DNS service and specify that name in the Dynamic DNS page of the router. Dynamic DNS makes it much easier to access a server from the Internet because you can type the name in the Internet browser. Otherwise, you must know the IP address that the ISP assigned, which typically changes. Customize Internet Traffic Rules for Ports 134
-
 1
1 -
2
-
3
-
4
-
5
-
6
-
7
-
8
-
9
-
10
-
11
-
12
-
13
-
14
-
15
-
16
-
17
-
18
-
19
-
20
-
21
-
22
-
23
-
24
-
25
-
26
-
27
-
28
-
29
-
30
-
31
-
32
-
33
-
34
-
35
-
36
-
37
-
38
-
39
-
40
-
41
-
42
-
43
-
44
-
45
-
46
-
47
-
48
-
49
-
50
-
51
-
52
-
53
-
54
-
55
-
56
-
57
-
58
-
59
-
60
-
61
-
62
-
63
-
64
-
65
-
66
-
67
-
68
-
69
-
70
-
71
-
72
-
73
-
74
-
75
-
76
-
77
-
78
-
79
-
80
-
81
-
82
-
83
-
84
-
85
-
86
-
87
-
88
-
89
-
90
-
91
-
92
-
93
-
94
-
95
-
96
-
97
-
98
-
99
-
100
-
101
-
102
-
103
-
104
-
105
-
106
-
107
-
108
-
109
-
110
-
111
-
112
-
113
-
114
-
115
-
116
-
117
-
118
-
119
-
120
-
121
-
122
-
123
-
124
-
125
-
126
-
127
-
128
-
 129
129 -
 130
130 -
 131
131 -
 132
132 -
 133
133 -
 134
134 -
 135
135 -
 136
136 -
 137
137 -
 138
138 -
 139
139 -
140
-
141
-
142
-
143
-
144
-
145
-
146
-
147
-
148
-
149
-
150
-
151
-
152
-
153
-
154
-
155
-
156
-
157
-
158
-
159
-
160
 |
 |
