Netgear R7800 User Manual - Page 137
Enable Port Triggering, Customize Internet Traffic Rules for Ports
 |
View all Netgear R7800 manuals
Add to My Manuals
Save this manual to your list of manuals |
Page 137 highlights
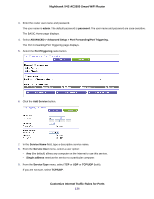
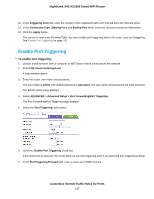
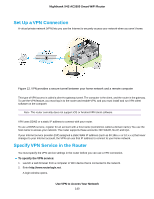
Nighthawk X4S AC2600 Smart WiFi Router 10. In the Triggering Port field, enter the number of the outbound traffic port that will open the inbound ports. 11. In the Connection Type, Starting Port, and Ending Port fields, enter the inbound connection information. 12. Click the Apply button. The service is now in the Portmap Table. You must enable port triggering before the router uses port triggering. See Enable Port Triggering on page 137. Enable Port Triggering To enable port triggering: 1. Launch a web browser from a computer or WiFi device that is connected to the network. 2. Enter http://www.routerlogin.net . A login window opens. 3. Enter the router user name and password. The user name is admin. The default password is password. The user name and password are case-sensitive. The BASIC Home page displays. 4. Select ADVANCED > Advanced Setup > Port Forwarding/Port Triggering. The Port Forwarding/Port Triggering page displays. 5. Select the Port Triggering radio button. 6. Clear the Disable Port Triggering check box. If this check box is selected, the router does not use port triggering even if you specified port triggering settings. 7. In the Port Triggering Timeout field, enter a value up to 9999 minutes. Customize Internet Traffic Rules for Ports 137
-
 1
1 -
2
-
3
-
4
-
5
-
6
-
7
-
8
-
9
-
10
-
11
-
12
-
13
-
14
-
15
-
16
-
17
-
18
-
19
-
20
-
21
-
22
-
23
-
24
-
25
-
26
-
27
-
28
-
29
-
30
-
31
-
32
-
33
-
34
-
35
-
36
-
37
-
38
-
39
-
40
-
41
-
42
-
43
-
44
-
45
-
46
-
47
-
48
-
49
-
50
-
51
-
52
-
53
-
54
-
55
-
56
-
57
-
58
-
59
-
60
-
61
-
62
-
63
-
64
-
65
-
66
-
67
-
68
-
69
-
70
-
71
-
72
-
73
-
74
-
75
-
76
-
77
-
78
-
79
-
80
-
81
-
82
-
83
-
84
-
85
-
86
-
87
-
88
-
89
-
90
-
91
-
92
-
93
-
94
-
95
-
96
-
97
-
98
-
99
-
100
-
101
-
102
-
103
-
104
-
105
-
106
-
107
-
108
-
109
-
110
-
111
-
112
-
113
-
114
-
115
-
116
-
117
-
118
-
119
-
120
-
121
-
122
-
123
-
124
-
125
-
126
-
127
-
128
-
129
-
130
-
131
-
 132
132 -
 133
133 -
 134
134 -
 135
135 -
 136
136 -
 137
137 -
 138
138 -
 139
139 -
 140
140 -
 141
141 -
 142
142 -
143
-
144
-
145
-
146
-
147
-
148
-
149
-
150
-
151
-
152
-
153
-
154
-
155
-
156
-
157
-
158
-
159
-
160
 |
 |
