Netgear WAX204 User Manual - Page 44
Use Auto Detect for an IPv6 Internet connection [router mode], PPPoE
 |
View all Netgear WAX204 manuals
Add to My Manuals
Save this manual to your list of manuals |
Page 44 highlights
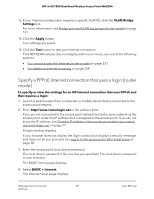
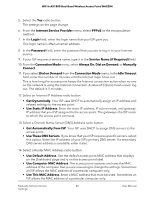
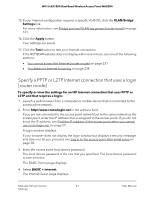
WiFi 6 AX1800 Dual Band Wireless Access Point WAX204 • DHCP. For more information, see Set up an IPv6 DHCP Internet connection [router mode] on page 54. • 6rd. For more information, see Set up an IPv6 6rd Internet connection [router mode] on page 49. • PPPoE. For more information, see Set up an IPv6 PPPoE Internet connection [router mode] on page 56. When you enable IPv6 and select any connection type other than IPv6 pass-through, the access point starts the stateful packet inspection (SPI) firewall function on the WAN interface. This process is referred to as IPv6 filtering. The access point creates connection records and checks every inbound IPv6 packet. If the inbound packet is not destined for the access point itself and the access point does not expect to receive such a packet, or the packet is not in the connection record, the access point blocks this packet. This function works either in secured more or in open mode. In secured mode, the access point inspects both TCP and UDP packets. In open mode, the access point inspects UDP packets only. IPv6 addresses are denoted by eight groups of hexadecimal quartets that are separated by colons. You can reduce any four-digit group of zeros within an IPv6 address to a single zero or omit it. The following errors invalidate an IPv6 address: • More than eight groups of hexadecimal quartets • More than four hexadecimal characters in a quartet • More than two colons in a row Use Auto Detect for an IPv6 Internet connection [router mode] To set up an IPv6 Internet connection through autodetection: 1. Launch a web browser from a computer or mobile device that is connected to the access point network. 2. Enter http//www.routerlogin.net in the address field. If you are not connected to the access point network but to the same network as the access point, enter the IP address that is assigned to the access point. If you do not know the IP address, see Find the IP address of the access point when you cannot use routerlogin.net on page 27. A login window displays. If your browser does not display the login window but displays a security message and does not let you proceed, see Log in to the access point after initial setup on page 30. Manually Set Up Internet 44 Settings User Manual
-
 1
1 -
2
-
3
-
4
-
5
-
6
-
7
-
8
-
9
-
10
-
11
-
12
-
13
-
14
-
15
-
16
-
17
-
18
-
19
-
20
-
21
-
22
-
23
-
24
-
25
-
26
-
27
-
28
-
29
-
30
-
31
-
32
-
33
-
34
-
35
-
36
-
37
-
38
-
 39
39 -
 40
40 -
 41
41 -
 42
42 -
 43
43 -
 44
44 -
 45
45 -
 46
46 -
 47
47 -
 48
48 -
 49
49 -
50
-
51
-
52
-
53
-
54
-
55
-
56
-
57
-
58
-
59
-
60
-
61
-
62
-
63
-
64
-
65
-
66
-
67
-
68
-
69
-
70
-
71
-
72
-
73
-
74
-
75
-
76
-
77
-
78
-
79
-
80
-
81
-
82
-
83
-
84
-
85
-
86
-
87
-
88
-
89
-
90
-
91
-
92
-
93
-
94
-
95
-
96
-
97
-
98
-
99
-
100
-
101
-
102
-
103
-
104
-
105
-
106
-
107
-
108
-
109
-
110
-
111
-
112
-
113
-
114
-
115
-
116
-
117
-
118
-
119
-
120
-
121
-
122
-
123
-
124
-
125
-
126
-
127
-
128
-
129
-
130
-
131
-
132
-
133
-
134
-
135
-
136
-
137
-
138
-
139
-
140
-
141
-
142
-
143
-
144
-
145
-
146
-
147
-
148
-
149
-
150
-
151
-
152
-
153
-
154
-
155
-
156
-
157
-
158
-
159
-
160
-
161
-
162
-
163
-
164
-
165
-
166
-
167
-
168
-
169
-
170
-
171
-
172
-
173
-
174
-
175
-
176
-
177
-
178
-
179
-
180
-
181
-
182
-
183
-
184
-
185
-
186
-
187
-
188
-
189
-
190
-
191
-
192
-
193
-
194
-
195
-
196
-
197
-
198
-
199
-
200
-
201
-
202
-
203
-
204
-
205
-
206
-
207
-
208
-
209
-
210
-
211
-
212
-
213
-
214
-
215
-
216
-
217
-
218
-
219
-
220
-
221
-
222
-
223
-
224
-
225
-
226
-
227
-
228
-
229
-
230
-
231
-
232
-
233
-
234
-
235
-
236
-
237
-
238
-
239
-
240
-
241
-
242
-
243
-
244
-
245
-
246
 |
 |
