Nikon COOLPIX AW100 Reference Manual - Page 118
The Setup Menu, COOLPIX, Select an image, Time zone, Photo info, Framing grid+auto info, Sports - review
 |
View all Nikon COOLPIX AW100 manuals
Add to My Manuals
Save this manual to your list of manuals |
Page 118 highlights
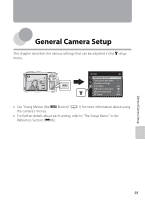
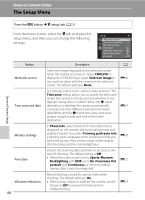
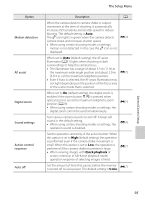
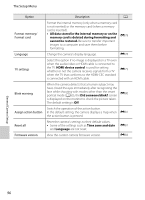
General Camera Setup The Setup Menu General Camera Setup Press the d button M z (setup) tab (A11) From the menu screen, select the z tab to display the setup menu, and then you can change the following settings. Set up Welcome screen Time zone and date Monitor settings Print date Vibration reduction Motion detection AF assist Option Welcome screen Time zone and date Monitor settings Print date Vibration reduction 94 Description A Select the image displayed as the welcome screen when the camera is turned on. Select COOLPIX to display the COOLPIX logo. Select Select an image to use a picture taken with the camera as the welcome screen. The default setting is None. E66 Set settings related to the camera's date and time. The Time zone setting allows you to specify the time zone where the camera is mainly used and whether or not daylight saving time is in effect. When the x travel destination is selected, the camera automatically calculates the time difference between the travel destination and the w home time zone, and saves images using the date and time of the travel destination. E67 In Photo info, select the kind of information that is displayed on the monitor during shooting mode and playback mode. If you select Framing grid+auto info, a framing grid is displayed when shooting to help you frame the picture. Also, set the image review display after shooting and the screen brightness. E70 Imprint the shooting date and time on pictures at the time of shooting. The default setting is Off. • When the scene mode is set to Sports, Museum, Backlighting with HDR set to On, Panorama, Pet portrait with Continuous, or when recording movies, date cannot be imprinted. E72 Reduce blurring caused by camera shake when shooting. The default setting is On. • When using a tripod to stabilize the camera, set this feature to Off to prevent this feature from malfunctioning. E73
-
 1
1 -
2
-
3
-
4
-
5
-
6
-
7
-
8
-
9
-
10
-
11
-
12
-
13
-
14
-
15
-
16
-
17
-
18
-
19
-
20
-
21
-
22
-
23
-
24
-
25
-
26
-
27
-
28
-
29
-
30
-
31
-
32
-
33
-
34
-
35
-
36
-
37
-
38
-
39
-
40
-
41
-
42
-
43
-
44
-
45
-
46
-
47
-
48
-
49
-
50
-
51
-
52
-
53
-
54
-
55
-
56
-
57
-
58
-
59
-
60
-
61
-
62
-
63
-
64
-
65
-
66
-
67
-
68
-
69
-
70
-
71
-
72
-
73
-
74
-
75
-
76
-
77
-
78
-
79
-
80
-
81
-
82
-
83
-
84
-
85
-
86
-
87
-
88
-
89
-
90
-
91
-
92
-
93
-
94
-
95
-
96
-
97
-
98
-
99
-
100
-
101
-
102
-
103
-
104
-
105
-
106
-
107
-
108
-
109
-
110
-
111
-
112
-
 113
113 -
 114
114 -
 115
115 -
 116
116 -
 117
117 -
 118
118 -
 119
119 -
 120
120 -
 121
121 -
 122
122 -
 123
123 -
124
-
125
-
126
-
127
-
128
-
129
-
130
-
131
-
132
-
133
-
134
-
135
-
136
-
137
-
138
-
139
-
140
-
141
-
142
-
143
-
144
-
145
-
146
-
147
-
148
-
149
-
150
-
151
-
152
-
153
-
154
-
155
-
156
-
157
-
158
-
159
-
160
-
161
-
162
-
163
-
164
-
165
-
166
-
167
-
168
-
169
-
170
-
171
-
172
-
173
-
174
-
175
-
176
-
177
-
178
-
179
-
180
-
181
-
182
-
183
-
184
-
185
-
186
-
187
-
188
-
189
-
190
-
191
-
192
-
193
-
194
-
195
-
196
-
197
-
198
-
199
-
200
-
201
-
202
-
203
-
204
-
205
-
206
-
207
-
208
-
209
-
210
-
211
-
212
-
213
-
214
-
215
-
216
-
217
-
218
-
219
-
220
-
221
-
222
-
223
-
224
-
225
-
226
-
227
-
228
-
229
-
230
-
231
-
232
-
233
-
234
-
235
-
236
-
237
-
238
-
239
-
240
-
241
-
242
 |
 |
