Nikon COOLPIX AW100 Reference Manual - Page 155
Using Preset Manual, White balance, Preset manual, Measure, Note on Preset Manual
 |
View all Nikon COOLPIX AW100 manuals
Add to My Manuals
Save this manual to your list of manuals |
Page 155 highlights
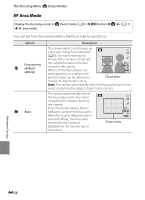
The Shooting Menu (A (Auto) Mode) Using Preset Manual Use when white balance setting (Auto, Incandescent, etc.) may not produce the desired results, such as when shooting under unusual lighting conditions (e.g., when you want to make pictures taken under lamps with reddish-light look as though they were shot in normal light). Use the procedure below to measure the white balance value under the lighting used during shooting. 1 Place a white or gray reference object under the lighting that will be used during shooting. 2 Display the shooting menu (A51), use the multi selector to set White balance to b Preset manual, then press the k button. • The lens extends to the zoom position for measurement. White balance Auto Preset manual Daylight Incandescent Fluorescent Cloudy Flash 3 Choose Measure. • To apply the most recently measured white balance value, select Cancel and press the k button. The most recently measured white balance value will be set. Preset manual Cancel Measure 4 Frame a white or gray reference object in the reference object frame. Preset manual Reference Section Cancel Measure Reference object frame 5 Press the k button to measure the white balance value. • The shutter is released and the new white balance preset value is set (no picture is recorded). B Note on Preset Manual The camera cannot measure a white balance value for when the flash fires. When shooting with the flash, set White balance to Auto or Flash. E35
-
 1
1 -
2
-
3
-
4
-
5
-
6
-
7
-
8
-
9
-
10
-
11
-
12
-
13
-
14
-
15
-
16
-
17
-
18
-
19
-
20
-
21
-
22
-
23
-
24
-
25
-
26
-
27
-
28
-
29
-
30
-
31
-
32
-
33
-
34
-
35
-
36
-
37
-
38
-
39
-
40
-
41
-
42
-
43
-
44
-
45
-
46
-
47
-
48
-
49
-
50
-
51
-
52
-
53
-
54
-
55
-
56
-
57
-
58
-
59
-
60
-
61
-
62
-
63
-
64
-
65
-
66
-
67
-
68
-
69
-
70
-
71
-
72
-
73
-
74
-
75
-
76
-
77
-
78
-
79
-
80
-
81
-
82
-
83
-
84
-
85
-
86
-
87
-
88
-
89
-
90
-
91
-
92
-
93
-
94
-
95
-
96
-
97
-
98
-
99
-
100
-
101
-
102
-
103
-
104
-
105
-
106
-
107
-
108
-
109
-
110
-
111
-
112
-
113
-
114
-
115
-
116
-
117
-
118
-
119
-
120
-
121
-
122
-
123
-
124
-
125
-
126
-
127
-
128
-
129
-
130
-
131
-
132
-
133
-
134
-
135
-
136
-
137
-
138
-
139
-
140
-
141
-
142
-
143
-
144
-
145
-
146
-
147
-
148
-
149
-
 150
150 -
 151
151 -
 152
152 -
 153
153 -
 154
154 -
 155
155 -
 156
156 -
 157
157 -
 158
158 -
 159
159 -
 160
160 -
161
-
162
-
163
-
164
-
165
-
166
-
167
-
168
-
169
-
170
-
171
-
172
-
173
-
174
-
175
-
176
-
177
-
178
-
179
-
180
-
181
-
182
-
183
-
184
-
185
-
186
-
187
-
188
-
189
-
190
-
191
-
192
-
193
-
194
-
195
-
196
-
197
-
198
-
199
-
200
-
201
-
202
-
203
-
204
-
205
-
206
-
207
-
208
-
209
-
210
-
211
-
212
-
213
-
214
-
215
-
216
-
217
-
218
-
219
-
220
-
221
-
222
-
223
-
224
-
225
-
226
-
227
-
228
-
229
-
230
-
231
-
232
-
233
-
234
-
235
-
236
-
237
-
238
-
239
-
240
-
241
-
242
 |
 |
