Nikon COOLPIX AW100 Reference Manual - Page 126
Notes on Panorama Assist, exposure lock Indicator, Panorama Creation, More Information
 |
View all Nikon COOLPIX AW100 manuals
Add to My Manuals
Save this manual to your list of manuals |
Page 126 highlights
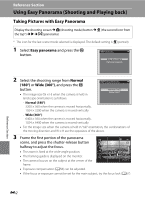
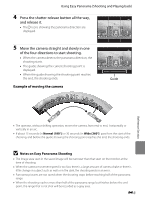
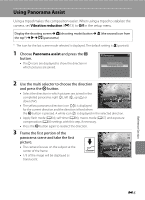
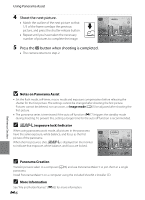
Using Panorama Assist 4 Shoot the next picture. • Match the outline of the next picture so that 1/3 of the frame overlaps the previous picture, and press the shutter-release button. • Repeat until you have taken the necessary number of pictures to complete the image. 5 Press the k button when shooting is completed. • The camera returns to step 2. 29m 0s End 1341 Reference Section B Notes on Panorama Assist • Set the flash mode, self-timer, macro mode and exposure compensation before releasing the shutter for the first picture. The settings cannot be changed after shooting the first picture. Pictures cannot be deleted, nor can zoom, or Image mode (A61) be adjusted after shooting the first picture. • The panorama series is terminated if the auto off function (E77) triggers the standby mode during shooting. To prevent this, setting a longer time for the auto off function is recommended. C R (exposure lock) Indicator When using panorama assist mode, all pictures in the panorama have the same exposure, white balance, and focus as the first picture of the panorama. When the first picture is shot, R is displayed on the monitor to indicate that exposure, white balance, and focus are locked. 29m 0s End 1341 C Panorama Creation Transfer pictures taken to a computer (A76) and use Panorama Maker 5 to join them in a single panorama. Install Panorama Maker 5 on a computer using the included ViewNX 2 Installer CD. C More Information See "File and Folder Names" (E85) for more information. E6
-
 1
1 -
2
-
3
-
4
-
5
-
6
-
7
-
8
-
9
-
10
-
11
-
12
-
13
-
14
-
15
-
16
-
17
-
18
-
19
-
20
-
21
-
22
-
23
-
24
-
25
-
26
-
27
-
28
-
29
-
30
-
31
-
32
-
33
-
34
-
35
-
36
-
37
-
38
-
39
-
40
-
41
-
42
-
43
-
44
-
45
-
46
-
47
-
48
-
49
-
50
-
51
-
52
-
53
-
54
-
55
-
56
-
57
-
58
-
59
-
60
-
61
-
62
-
63
-
64
-
65
-
66
-
67
-
68
-
69
-
70
-
71
-
72
-
73
-
74
-
75
-
76
-
77
-
78
-
79
-
80
-
81
-
82
-
83
-
84
-
85
-
86
-
87
-
88
-
89
-
90
-
91
-
92
-
93
-
94
-
95
-
96
-
97
-
98
-
99
-
100
-
101
-
102
-
103
-
104
-
105
-
106
-
107
-
108
-
109
-
110
-
111
-
112
-
113
-
114
-
115
-
116
-
117
-
118
-
119
-
120
-
 121
121 -
 122
122 -
 123
123 -
 124
124 -
 125
125 -
 126
126 -
 127
127 -
 128
128 -
 129
129 -
 130
130 -
 131
131 -
132
-
133
-
134
-
135
-
136
-
137
-
138
-
139
-
140
-
141
-
142
-
143
-
144
-
145
-
146
-
147
-
148
-
149
-
150
-
151
-
152
-
153
-
154
-
155
-
156
-
157
-
158
-
159
-
160
-
161
-
162
-
163
-
164
-
165
-
166
-
167
-
168
-
169
-
170
-
171
-
172
-
173
-
174
-
175
-
176
-
177
-
178
-
179
-
180
-
181
-
182
-
183
-
184
-
185
-
186
-
187
-
188
-
189
-
190
-
191
-
192
-
193
-
194
-
195
-
196
-
197
-
198
-
199
-
200
-
201
-
202
-
203
-
204
-
205
-
206
-
207
-
208
-
209
-
210
-
211
-
212
-
213
-
214
-
215
-
216
-
217
-
218
-
219
-
220
-
221
-
222
-
223
-
224
-
225
-
226
-
227
-
228
-
229
-
230
-
231
-
232
-
233
-
234
-
235
-
236
-
237
-
238
-
239
-
240
-
241
-
242
 |
 |
