Oki MPS480mb MPS480mb User Guide (English) - Page 132
Test printing the macro, Defining overlays
 |
View all Oki MPS480mb manuals
Add to My Manuals
Save this manual to your list of manuals |
Page 132 highlights
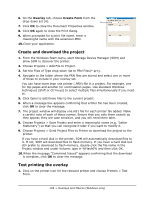
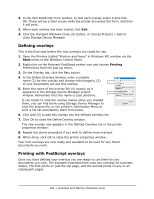
10.When the message "Command Issued" appears confirming that the download is complete, click OK to clear the message. Test printing the macro 1. Choose Printers > Test Macro. 2. In the Test Macro window, enter its ID number and click OK. After a short pause the printer will print the macro. 3. When each macro has been tested, click Exit. 4. Click the standard Windows Close (X) button, or choose Projects > Exit to close Storage Device Manager. Defining overlays This is the final step before the new overlays are ready for use. 1. Open the Printers (called "Printers and Faxes" in Windows XP) window via the Start menu or the Windows Control Panel. 2. Right-click on the Relevant PostScript printer icon and choose Printing Preferences from the pop-up menu. 3. On the Job Options tab, click the Overlay button. 4. In the Overlay window, Click the Define Overlays button (1). 1 5. In the Define Overlays window, enter the name (a) and ID (b) of the required overlay, and define which page(s) (c) of your documents will use this overlay. Then click the Add button (3) to add this overlay to the 3 list of defined overlays. Repeat for any other related a overlays. When done, click the Close button (4) to close b the window. c The example illustrated shows two overlays defined, one 4 for a cover page and one for continuation pages. Remember that names and IDs of overlay files must be entered exactly as they appeared in the Storage Device Manager project window. Remember also that names are case sensitive. If you forgot to note the overlay name or ID when you created them, you can find them using Storage Device Manager to view the project file, or the printer's Information Menu to print a file list and identify them from there. 132 • Overlays and Macros (Windows only)
-
 1
1 -
2
-
3
-
4
-
5
-
6
-
7
-
8
-
9
-
10
-
11
-
12
-
13
-
14
-
15
-
16
-
17
-
18
-
19
-
20
-
21
-
22
-
23
-
24
-
25
-
26
-
27
-
28
-
29
-
30
-
31
-
32
-
33
-
34
-
35
-
36
-
37
-
38
-
39
-
40
-
41
-
42
-
43
-
44
-
45
-
46
-
47
-
48
-
49
-
50
-
51
-
52
-
53
-
54
-
55
-
56
-
57
-
58
-
59
-
60
-
61
-
62
-
63
-
64
-
65
-
66
-
67
-
68
-
69
-
70
-
71
-
72
-
73
-
74
-
75
-
76
-
77
-
78
-
79
-
80
-
81
-
82
-
83
-
84
-
85
-
86
-
87
-
88
-
89
-
90
-
91
-
92
-
93
-
94
-
95
-
96
-
97
-
98
-
99
-
100
-
101
-
102
-
103
-
104
-
105
-
106
-
107
-
108
-
109
-
110
-
111
-
112
-
113
-
114
-
115
-
116
-
117
-
118
-
119
-
120
-
121
-
122
-
123
-
124
-
125
-
126
-
 127
127 -
 128
128 -
 129
129 -
 130
130 -
 131
131 -
 132
132 -
 133
133 -
 134
134 -
 135
135 -
 136
136 -
 137
137 -
138
-
139
-
140
-
141
-
142
-
143
-
144
-
145
-
146
-
147
-
148
-
149
-
150
-
151
-
152
-
153
-
154
-
155
-
156
-
157
-
158
-
159
-
160
-
161
-
162
-
163
-
164
-
165
-
166
-
167
-
168
-
169
-
170
-
171
-
172
-
173
-
174
-
175
-
176
 |
 |
