Oki MPS480mb MPS480mb User Guide (English) - Page 42
Setting up an SMTP Server, Scan to NetworkPC - admin password
 |
View all Oki MPS480mb manuals
Add to My Manuals
Save this manual to your list of manuals |
Page 42 highlights
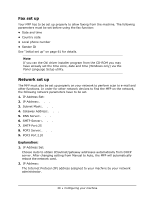
Setting up an SMTP Server 1. Using the Down arrow key, scroll to Menu, then press Enter. 2. Using the Down arrow key, scroll to Admin setup, then press Enter. 3. Using the arrow keys and on-screen keypad, enter the Administrator password. Highlight Done and press Enter. 4. Using the Down arrow key, scroll to Network Menu, then press Enter. 5. Using the Down arrow key, scroll to Mail Server Setup , then press Enter. 6. Press Enter to select SMTP server. 7. Press Enter. 8. Enter your IP address. Note Numbers are entered using the keypad. When a number is entered from the keypad, the number currently displayed is cleared and the number just entered is displayed as the first digit. When another number is entered, the first number entered moves to the left, and so on. You can increment/decrement the digits using the UP/Down arrow keys. 9. To confirm, press the Enter key. Note To cancel the IP address, press the Stop key until you exit the menu without saving the changes. Scan to NetworkPC Via the intranet with FTP (File Transfer Protocol) or CIFS (Common Internet File System). The MFP allows you to save scanned documents directly to a designated server or to a personal computer on the network in a standard PDF, JPEG, or TIFF file format. CIFS is the sharing system of Microsoft Windows. What is unique about this filing function is that it allows all corporate users to share one machine to send documents to each file folder on a designated server or individual computer. The following settings or destinations must be defined by the system administrator before the MFP can be used to distribute any scanned document(s) on the network. • Network and E-mail parameters: Defines the parameters for TCP/IP, SMTP, and POP3 protocols to send your scanned document to e-mail addresses. 42 • Configuring your machine
-
 1
1 -
2
-
3
-
4
-
5
-
6
-
7
-
8
-
9
-
10
-
11
-
12
-
13
-
14
-
15
-
16
-
17
-
18
-
19
-
20
-
21
-
22
-
23
-
24
-
25
-
26
-
27
-
28
-
29
-
30
-
31
-
32
-
33
-
34
-
35
-
36
-
 37
37 -
 38
38 -
 39
39 -
 40
40 -
 41
41 -
 42
42 -
 43
43 -
 44
44 -
 45
45 -
 46
46 -
 47
47 -
48
-
49
-
50
-
51
-
52
-
53
-
54
-
55
-
56
-
57
-
58
-
59
-
60
-
61
-
62
-
63
-
64
-
65
-
66
-
67
-
68
-
69
-
70
-
71
-
72
-
73
-
74
-
75
-
76
-
77
-
78
-
79
-
80
-
81
-
82
-
83
-
84
-
85
-
86
-
87
-
88
-
89
-
90
-
91
-
92
-
93
-
94
-
95
-
96
-
97
-
98
-
99
-
100
-
101
-
102
-
103
-
104
-
105
-
106
-
107
-
108
-
109
-
110
-
111
-
112
-
113
-
114
-
115
-
116
-
117
-
118
-
119
-
120
-
121
-
122
-
123
-
124
-
125
-
126
-
127
-
128
-
129
-
130
-
131
-
132
-
133
-
134
-
135
-
136
-
137
-
138
-
139
-
140
-
141
-
142
-
143
-
144
-
145
-
146
-
147
-
148
-
149
-
150
-
151
-
152
-
153
-
154
-
155
-
156
-
157
-
158
-
159
-
160
-
161
-
162
-
163
-
164
-
165
-
166
-
167
-
168
-
169
-
170
-
171
-
172
-
173
-
174
-
175
-
176
 |
 |
