Optoma FHDQ130 FHDQ130 User Manual - Page 17
Note: When mounting an intelligent module back, pay more attention to the guide pin which is located
 |
View all Optoma FHDQ130 manuals
Add to My Manuals
Save this manual to your list of manuals |
Page 17 highlights
Step 4. Pull the right handle towards the center. Step 5. Ensure the magnet is locked. Detach the tile carefully. Step 6. Put down the intelligent module and tool together carefully onto an EPE (or other soft pad). Step 7. Push the lock toward inside and pull the right handle toward outside and lift the tool up carefully. Mount Intelligent Module 1. Take out a spare intelligent module and locate the intelligent module to case, please pay attention to the arrow direction on the back side of it. 2. Apply pressure to the intelligent module. Note: When mounting an intelligent module back, pay more attention to the guide pin which is located in corners to mount it smoothly. Page 17 of 64
-
 1
1 -
2
-
3
-
4
-
5
-
6
-
7
-
8
-
9
-
10
-
11
-
 12
12 -
 13
13 -
 14
14 -
 15
15 -
 16
16 -
 17
17 -
 18
18 -
 19
19 -
 20
20 -
 21
21 -
 22
22 -
23
-
24
-
25
-
26
-
27
-
28
-
29
-
30
-
31
-
32
-
33
-
34
-
35
-
36
-
37
-
38
-
39
-
40
-
41
-
42
-
43
-
44
-
45
-
46
-
47
-
48
-
49
-
50
-
51
-
52
-
53
-
54
-
55
-
56
-
57
-
58
-
59
-
60
-
61
-
62
-
63
-
64
 |
 |

Page
17 of 64
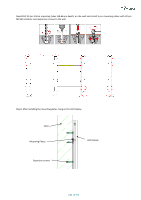
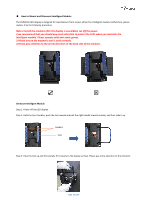
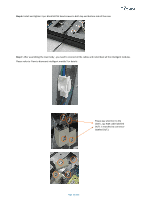
Step 4. Pull the right handle towards the center.
Step 5.
Ensure the magnet is locked. Detach the tile carefully.
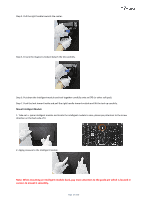
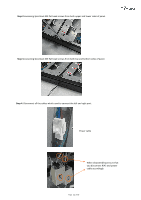
Step 6. Put down the intelligent module and tool together carefully onto an EPE (or other soft pad).
Step 7. Push the lock toward inside and pull the right handle toward outside and lift the tool up carefully.
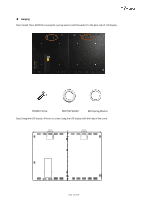
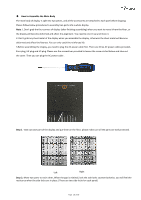
Mount Intelligent Module
1.
Take out a spare intelligent module and locate the intelligent module to case, please pay attention to the arrow
direction on the back side of it.
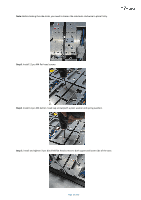
2. Apply pressure to the intelligent module.
Note: When mounting an intelligent module back, pay more attention to the guide pin which is located in
corners to mount it smoothly.