Optoma FHDQ130 FHDQ130 User Manual - Page 22
Step 2, Step 3, Step 4.
 |
View all Optoma FHDQ130 manuals
Add to My Manuals
Save this manual to your list of manuals |
Page 22 highlights
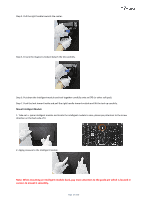
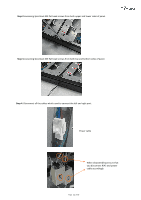
Step 2.Loosening 3pcs black M3 flat head screws from both upper and lower sides of panel. Step 3.Loosening 3pcs black M3 flat head screws from both top and bottom sides of panel. Step 4. Disconnect all the cables which used to connect the left and right part. Power cable When disassembling ensure that you disconnect RJ45 and power cable accordingly. Page 22 of 64
-
 1
1 -
2
-
3
-
4
-
5
-
6
-
7
-
8
-
9
-
10
-
11
-
12
-
13
-
14
-
15
-
16
-
 17
17 -
 18
18 -
 19
19 -
 20
20 -
 21
21 -
 22
22 -
 23
23 -
 24
24 -
 25
25 -
 26
26 -
 27
27 -
28
-
29
-
30
-
31
-
32
-
33
-
34
-
35
-
36
-
37
-
38
-
39
-
40
-
41
-
42
-
43
-
44
-
45
-
46
-
47
-
48
-
49
-
50
-
51
-
52
-
53
-
54
-
55
-
56
-
57
-
58
-
59
-
60
-
61
-
62
-
63
-
64
 |
 |

Page
22 of 64
Step 2
.Loosening 3pcs black M3 flat head screws from both upper and lower sides of panel.
Step 3
.Loosening 3pcs black M3 flat head screws from both top and bottom sides of panel.
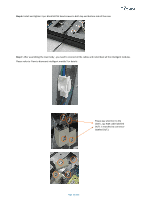
Step 4.
Disconnect all the cables which used to connect the left and right part.
Power cable
When disassembling ensure that
you disconnect RJ45 and power
cable accordingly.