Panasonic KX-P3696 Operating Instructions
Panasonic KX-P3696 Manual
 |
View all Panasonic KX-P3696 manuals
Add to My Manuals
Save this manual to your list of manuals |
Panasonic KX-P3696 manual content summary:
- Panasonic KX-P3696 | Operating Instructions - Page 1
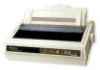
Operating Instructions Impact Dot Matrix Printer KX-P3696 - a • • se • t S # ••- 4 is 4••,•1 • k • • • 4 . • $ Before operating this unit. please read these instructions completely. - Panasonic KX-P3696 | Operating Instructions - Page 2
installation. This equipment generates, uses and can radiate radio frequency energy and, if not installed and used in accordance with the instructions listed on the nameplate. Plug the printer only into an outlet with the for future reference. MODEL NO.. KX-P3696 NAME OF DEALER SERIAL NO. DATE - Panasonic KX-P3696 | Operating Instructions - Page 3
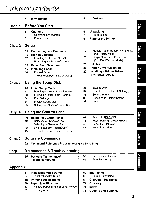
Self Test 26 Printer Driver Selection C) 27 Installing a Printer Driver tv (Windows Ver. 3.1) Chap. 3 Using the Setup Disk 28 Initial Setup Mode 32 Running the Initial Setup Program 33 Exiting the Initial Setup Program 34 Print Settings 34 Display Setting List 35 Setting Selections on Setup - Panasonic KX-P3696 | Operating Instructions - Page 4
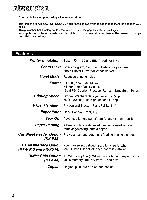
0 0 Congratulations on purchasing a Panasonic printer. This printer is a versatile, high quality 9-pin dot matrix printer which is designed to meet the needs of your office. This printer has been factory set to operate with most of the popular software packages. Your application software should - Panasonic KX-P3696 | Operating Instructions - Page 5
. 'MIS ri0A Oi0108 00000 0 0 0 0 \ "N\ Extremely high or low humidity (humidity range: 20-80% RH) •Do not operate the printer without paper and a ribbon cassette installed. N •S. Areas of high dust concentration \ Areas of poor ventilation [a minimum of 4" (10 cm) clearance on all sides is - Panasonic KX-P3696 | Operating Instructions - Page 6
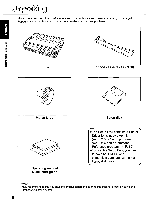
the store from which the unit was purchased. ..or mizt, Printer Ribbon cassette (KX-P170) vets noA aiolag 0 Platen knob Setup disk Operating manual Quick start guide •The Setup Disk contains a Printer Driver for Windows Ver. 3.1 (u P. 27), a Setup program (air P. 28) and a Command Reference - Panasonic KX-P3696 | Operating Instructions - Page 7
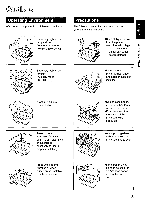
side of the printer and rotate it slowly until it slips onto C) the shaft. Push the platen knob onto the platen shaft to secure. 3Ue3S noA woos 9 // II la (b) 0 Fold forward the smoked plastic cover using the tab. e Remove the protective paper which includes unpacking instructions. Raise the - Panasonic KX-P3696 | Operating Instructions - Page 8
while holding the tab. Paper easel Separator pad Tab Note: •Be sure to replace the carriage stopper band and the separator pad before transporting the printer. 8 - Panasonic KX-P3696 | Operating Instructions - Page 9
21) 01 end): Paper guides ( or P. 24) /// when the printer is in the installed. It blinks when paper is not installed. (a P. 46) (D Cover Open Sensor When the cover is opened, the machine will beep and printing will stop. To resume printing close cover and press ON LINE 0 Micro Line Feed/TOF SET - Panasonic KX-P3696 | Operating Instructions - Page 10
) (Tear bar=top edge) Tractors ( rife' P. 17, 20) .O Paper door (oir P. 21) PBS WA 810198 Printhead Rear supports (ow P. 18) Paper easel (ErP 18, 23) Paper easel hand guide ( or P. 18, 23) Head gap lever Adjusts the gap between the platen and the printhead. The lever moves in increments of - Panasonic KX-P3696 | Operating Instructions - Page 11
Clips .;r Connector Parallel interface cable Frame ground wire Attach the other end of the parallel interface cable from your computer to your printer and secure the printer clips. Note: •11 you do not have a parallel interface cable, you will need to purchase one from your local computer store or - Panasonic KX-P3696 | Operating Instructions - Page 12
area. Note: •The ribbon cassette can only be installed in this area. o Fold forward the smoked plastic cover using the tab. 0 OFF POWER ON 2 Head gap lever 0 Raise the smoked plastic cover using the Ribbon cassette r' back portion of the ribbon into the printer first. Ribbon posts 12 - Panasonic KX-P3696 | Operating Instructions - Page 13
with your thumb and forefinger, tm o remove the blue ribbon guide by lifting from the ribbon cassette. 0 Slide the blue ribbon guide onto the ribbon guide holder of the carriage and push the blue ribbon guide down. Note: •If the ribbon does not insert easily between the printhead nose and the - Panasonic KX-P3696 | Operating Instructions - Page 14
6 .0 0 Adjust the head gap lever for the thickness of paper you are using. Position 1 or 2 3, 4, 5 or 6 Used for Thinner sheets Thick sheets, multi-part forms or envelopes Removing the Ribbon Cassette 1 To remove the ribbon cassette, perform step 1-2 of "Installing the Ribbon Cassette" at first - Panasonic KX-P3696 | Operating Instructions - Page 15
paper.) -multipart single forms -envelopes Top feeding O Note: •For optimum print quality, do not use reverse line feeding in bottom and front feeding. If reverse feeding is necessary in bottom and front feeding, set REVERSE LF/PULL in the INSTALL menu to ON by using the Setup Disk. •Paper Parking - Panasonic KX-P3696 | Operating Instructions - Page 16
will flash indicating that paper is not installed in the printer. S Adjust the head gap lever for the thickness of paper you are using. Position 1 or 2 3, 4, 5 or 6 Used for Thinner sheets Thick sheets or multi-part forms 0 Set - Panasonic KX-P3696 | Operating Instructions - Page 17
tool for C) predetermining your left most print position. CD -0 I%) O Slide the two paper supports between the tractors at equal spaces. 0 Open the tractor covers. (Rear view) Top cover 41> Feed paper through opening between printer - Panasonic KX-P3696 | Operating Instructions - Page 18
Installing paper Tractor when locking. Press (LOAD/PARK) This will load the paper to the first print line. • Note: •Do not use LF/FF to load paper. 10 the smoked plastic cover. 11 Paper easel hand guide 12 Paper separator 4 Rear supports 18 Paper easel Extend the paper separator by first - Panasonic KX-P3696 | Operating Instructions - Page 19
ready to print. Note: •If setting up the printer for the first time, proceed to Printer Driver Selection. (a P. 26) Fanfold Paper: (Bottom, Front Feed/Pull Tractor Mode) -ma0 Paper feed 4 selector OTurn the power on. The PAPER OUT indicator will flash indicating that paper is not installed in - Panasonic KX-P3696 | Operating Instructions - Page 20
Installing paper Tab Pull up roller unit I Remove the pull up roller unit by grabbing "0" indicator on the back of the cover is a useful tool for predetermining your left most print position. OSlide the two paper supports between the tractors at equal spaces. 0 Open the tractor covers. 0; Paper - Panasonic KX-P3696 | Operating Instructions - Page 21
-o\ Paper door 04 6 153 .o\ Installing i t.licaji When Bottom Feeding: With the printer being supported by a printer stand, or on a table that well as temperature and humidity conditions may effect accurate line feeding and print quality may not be optimum. For optimum output buttom feed is - Panasonic KX-P3696 | Operating Instructions - Page 22
to print. Note: •If setting up the printer for the first time, proceed to Printer Driver Selection. set REVERSE LF/PULL in the INSTALL menu to ON by using the Setup Disk. •When in tractor mode please do not use paper guides on the top cover to guide the paper. In tractor mode the paper is guided - Panasonic KX-P3696 | Operating Instructions - Page 23
OUT indicator will flash indicating that no paper is installed in the printer. O Adjust the head gap lever for the thickness of paper you are using Set the paper feed selector to "El" tD - 34 (Friction mode). 0 U- e 5 6 • Head gap lever 0 0 MSS OFF POWER ON 2 Paper easel hand guide - Panasonic KX-P3696 | Operating Instructions - Page 24
guides. The paper will automatically be loaded to the first print position. Note: •To disable Auto Loading, turn it OFF in the Install positioned manually as required. Set the selector back to before printing. to print. Note: •If setting up the printer for the first time, proceed to Printer Driver - Panasonic KX-P3696 | Operating Instructions - Page 25
has a self test feature which allows you to test the printer. When activated, this feature will print 5 lines of each resident font. When complete, it will return Roma FGHIJKLMNOPQRSTUVWXY2[\)" STUVWXYZ.B1:1-- A Once you see that the printer is -I- functioning properly, you may turn the power off - Panasonic KX-P3696 | Operating Instructions - Page 26
install a Windows printer driver. This driver is located on the Setup Disk supplied with your printer. Proceed to Installing a Printer Driver section on page 27 for the installation procedure. Printer Driver Selections (in order of priority) Printer Selections Panasonic KX-P3696 Panasonic KX-P1695 - Panasonic KX-P3696 | Operating Instructions - Page 27
OO0n_5,°riEiRgi D 0 0 The following steps are only necessary if using Microsoft Windows Version 3.1, The Setup Disk packaged with your printer contains a Panasonic KX-P3696 Printer Driver for Windows Version 3.1. To install this printer driver, you must begin at the Program Manager screen in your - Panasonic KX-P3696 | Operating Instructions - Page 28
>ism dniag ato 6u!sn This printer allows you to select 45 initial setup items shown in the table below. You can select all these items by using the Setup Disk. Menu Item Setting Description PRINT STYLE FONT DRAFT* ROMAN SANS SERIF COURIER PRESTIGE SCRIPT BOLD PS Selects Draft or NLQ (Near - Panasonic KX-P3696 | Operating Instructions - Page 29
dnies eq Bupn Menu Item Setting Description PRINT MODE GRAPHIC DIRECTION BI DIRECTION UNI DIRECTION* Graphics are printed left-to-right only (UNI DIRECTION) or in both directions (BI DIRECTION). TEXT DIRECTION BI DIRECTION* UNI DIRECTION Text is printed left-to-right only (UNI DIRECTION - Panasonic KX-P3696 | Operating Instructions - Page 30
Sheet Feeder (KX-P38).] Setting to ON allows you to download (user-defined) special characters and setting to OFF allows you to send more data to your printer's buffer, thereby freeing up your computer. Setting to ON enables the printer to automatically enter ON LINE mode after installing paper. Ms - Panasonic KX-P3696 | Operating Instructions - Page 31
Initial Setup Mode Menu Item Setting Description INTERFACE [This setting is effective only when the optional KX-PS14, RS-232C serial interface board is installed.] INTERFACE DATA LENGTH BAUD RATE" PARALLEL* SERIAL 8 BITS* 7 BITS 150 BPS 300 BPS 600 BPS 1200 BPS 2400 BPS 4800 BPS 9600 BPS* - Panasonic KX-P3696 | Operating Instructions - Page 32
printer has been factory set settings meet your requirements. If no changes are required, you should be ready to print. Note: •Use the DISKCOPY command of the operating system to make a back-up copy. Refer to your DOS manual for further information. •You may find it convenient to install For WINDOWS> - Panasonic KX-P3696 | Operating Instructions - Page 33
. (If your display is monochrome, press "M" key.) 6 The window will be highlighted. « < Menu > tt PRINT STYLE *EMULATION *PAGE FORMAT *PRINT MODE *TEXT ENHANCEMENT +CHARACTER SET +INSTALL +INTERFACE *T0 F. SETTING Seep Utility (******* r < Item > FONT PITCH In I» « COMMENT » Select VIM - Panasonic KX-P3696 | Operating Instructions - Page 34
Disk, you can verify the settings by getting a print-out. 1 Press [F5 A Print Setting window will be displayed. 2 Press (VI or (11) or highlight the appropriate command and press Enter "Y": Current print settings will be printed. "N": The print settings won't be printed and the display will return - Panasonic KX-P3696 | Operating Instructions - Page 35
STYLE *EMULATION [ FONT PITCH e Draft Roman *PAGE FORMAT Sans Serif *PRINT MODE Courier *TEXT ENHANCEMENT Prestige s CHARACTER SET Script *INSTALL Bold PS O *INTERFACE r yT O F SETTING 0) 4 Press • I. window will be highlighted. 5 Press I t I or Highlight the desired - Panasonic KX-P3696 | Operating Instructions - Page 36
.INSTALL *INTERFACE •T.O.F. SETTING Exit to DOS ? I EXIT I [CANCEL) E Select print style. « KEY OPERATION » [F1=HELP] (F2=FACTORY SETTING] IFUSAVE TO DISK) [F4*LOAD FROM DISK] [FS.PRINT SETTING] [Fe=LIST) IFI0.SEND TO PRINTER) (ESC=EXIT) Save to Disk 1 Press (F3 A Save to Disk window - Panasonic KX-P3696 | Operating Instructions - Page 37
do not change the Drive or Directory, proceed to Step 3. Menu > x -PRINT STYLE 4:EMULATION FileName it DAT Path : CA OK < Se rF - Panasonic KX-P3696 | Operating Instructions - Page 38
window will be displayed. 2 Press(Y or N) "V": All the settings will be sent to the printer. "N": The display will return to the Main screen. «SetupUtilay(xxxxxxxxxx.)» < Menu > SPRINT STYLE • EMULATION r < Item > [ FONT PITCH *PAGE FORMAT *PRINT MODE . TEXT ENHANCEMENT *CHARACTER SET *INSTALL - Panasonic KX-P3696 | Operating Instructions - Page 39
STRIKE> « HELP ITEM » - Panasonic KX-P3696 | Operating Instructions - Page 40
F• T a •Press and release (FONT This printer contains resident fonts which are accessible through the Control Panel out • =light is blinking Note: •When the power is turned off, font will reset to default setting. If you want to save a font selection as your default, you may do so by using the - Panasonic KX-P3696 | Operating Instructions - Page 41
PI CH 0 Control D •Press and release PITCH) This printer contains resident pitches which are accessible through the Control Panel. You is blinking Note: •When the power is turned off, pitch will reset to default setting. If you want to save a pitch selection as your default, you may do so - Panasonic KX-P3696 | Operating Instructions - Page 42
when the printer is in the OFF LINE mode or when the printer is not printing in the ON LINE mode. Line Feed With paper installed, pressing ( LF/FF), the amount of paper which is fed is determined by the current setting for lines per inch as specified by the Setup Disk, control panel (Initial - Panasonic KX-P3696 | Operating Instructions - Page 43
0 Control Pane Top of Form Function (TOF SET) This printer has a Top of Form (TOF) function which stores the first print line position and loads the paper to the designated position automatically. The first print line position will be stored even after the power is turned off. Additionally, the - Panasonic KX-P3696 | Operating Instructions - Page 44
position. After tearing off the page you can return your paper to the first print line by pressing (TEAR OFF) again. If (TEAR OFF) is not pressed a second time, the printer will automatically reverse to the first print line upon receiving data from the computer. 1 ON LINE TEAR OFF LF/FF LOAD - Panasonic KX-P3696 | Operating Instructions - Page 45
"E (Friction Mode). o Load single sheets or envelopes. (gr P. 23 "Single Sheets and Envelopes") C) When you are finished printing, remove the sheet (or envelope) from the printer. pued loiwoo et Bulsn G a 4 O Paper feed selector Paper easel 0 ti 0 Lower the paper easel. o Fold back the - Panasonic KX-P3696 | Operating Instructions - Page 46
until the page is completed. 2 Install the new paper. (ow P. 16-24) 3 PITCH FON LINE indicators mi ON LINE POWER PAPER OUT ON LINE TEAR OFF If the ON LINE indicator is not lit, press ON LINE Note: ',When PAPER OUT DETECT is set to ON, printing stops at 0.5" from the bottom of - Panasonic KX-P3696 | Operating Instructions - Page 47
Panel; Emulation, Auto Line Feed, Graphic Direction, Page Length and Cut Sheet Feeder Mode if optional KX-P38 is installed. These features can also be set using the Setup Disk (fir P. 28). Setting the Printer Setup Mode 1 Load a sheet of paper or P. 16- 24), and turn the power off. 2 ► To enter - Panasonic KX-P3696 | Operating Instructions - Page 48
On • O FONT O • PITCH Cut Sheet Feeder Mode: Press (FONT 3 times. Off Press (PITCH On [This setting is only necessary when the optional Cut Sheet Feeder (KX-P38) is installed.] • • FONT O O PITCH • • FONT O • PITCH Graphic Direction: Press FONT 4 times. Uni directional Press PITCH - Panasonic KX-P3696 | Operating Instructions - Page 49
LOAD/PARK FONT indicators will go off and the current conditions will print. Setting the Serial Setup Mode (Only when the KX-PS14 is installed) Only when the KX-PS14 (Serial Interface board) is installed, the following items can be set in the Serial Setup mode through the Control Panel. You can - Panasonic KX-P3696 | Operating Instructions - Page 50
PITCH) See the table below to verify desired status To change additional settings, repeat steps 3 and 4. pued patio° aq 6u!sr Item Setting Press FONT key FONT indicators Press PITCH key PITCH indicators Print Current _ Setup Condition _ 4"41' _ o o Interface Parallel Serial once - Panasonic KX-P3696 | Operating Instructions - Page 51
Settings to the Factory Settings This procedure will reset ALL settings to the original factory settings. This includes those settings made through the Setup Disk. Follow the instructions PARK Press TEAR OFF All current settings will be reset to the Factory settings, and a beep will sound. pued - Panasonic KX-P3696 | Operating Instructions - Page 52
explanation can be printed out if manual for further information. •You may find it convenient to install Panasonic KX-P3696 command reference utility (xxxxxxxxxxx) » -- SELECT EMULATION - - EPSON IBM SpUBWW03 010/1/1110S 6 Press (t) or( Select an emulation (Enter] IE] : Select emulation : Set - Panasonic KX-P3696 | Operating Instructions - Page 53
Enter The emulation will be set and screen 2 will be displayed. Screen 2 « Panasonic KX-P3696 command reference utility (xxxxxxxxxxx) » -- SELECT COMMAND -- (EPSON) FONT SELECTION ESC+'x'+n ESC+'k'+n ESC+'S'+0 ESC+'S'+1 ESC+'7' Selects print quality Selects print font style Selects superscript - Panasonic KX-P3696 | Operating Instructions - Page 54
you want to exit the Command Reference program, go to step 10. Screen 4 c< Panasonic KX-P3696 command reference utility (xxxxxxxxxxx) » ESC+'x'+n Selects print quality [EPSON] Selects print quality. Name: ESC x Dec.: 27 120 n Hex.: 1B 78 Comments: *Near letter quality - Panasonic KX-P3696 | Operating Instructions - Page 55
your Authorized Panasonic Service Center for advice on lubrication. Ribbon Cassette Note: If the ribbon begins to catch, snag, or tear from the printhead, your printer requires servicing. Troubleshooting Most problems associated with the printer can be traced to improper setup, installation, or - Panasonic KX-P3696 | Operating Instructions - Page 56
Printer cannot load single sheet through the top Cut Sheet Feeder option (KX-P38) is installed but does not work Unexpected characters appear in printing 32K Buffer Chip option (KX-P44) is installed but cannot download Printout is double-spaced Keeps printing on the same line Wrong character set - Panasonic KX-P3696 | Operating Instructions - Page 57
command is received -the clear buffer function is used When the printer is initialized, the following conditions are set: -the print buffer is cleared -the receive buffer is cleared (not cleared by RESET PRINTER command) -the download character buffer is cleared (not cleared by PRIME signal in IBM - Panasonic KX-P3696 | Operating Instructions - Page 58
0 0 Power requirements: Frequency: Current: Interface: Print fonts: Software emulation: Buffer: Character sets: Dot configuration: Refer to the nameplate located on the rear of the printer. Centronics parallel RS-232C/Serial interface board [KX-PS14, KX-PS13] (option) 3 Draft (Pica, Elite, - Panasonic KX-P3696 | Operating Instructions - Page 59
Specificat athi Operating environment: Power consumption: Storage environment: Head service life: Ribbon: Detectors: Dimensions: Mass {Weight}: Temperature: 10°C-35°C (50°F-95°F) Humidity: 20-80% RH (Please allow the printer to stabilize at room temperature within the operating temperature range - Panasonic KX-P3696 | Operating Instructions - Page 60
printing. • In multi-layered paper with carbon, the carbon is equivalent to a sheet of paper. •"Weight in pounds" represents the weight of 500 [17x22 inches (432x559 mm)] sheets. •The printer •Due to letter head varying in paper weight and construction, we cannot guarantee print quality and paper - Panasonic KX-P3696 | Operating Instructions - Page 61
sheet and Envelope B IC B 1st character C Printing area D Single sheet and Envelope 1.5" (38 mm) 0.33" (8.38 mm) 1" (25.4 mm) B: Value B indicates the minimum distance between the edge of the paper and the first printable character. (When the left paper guide is set to the left end and the - Panasonic KX-P3696 | Operating Instructions - Page 62
signal goes low. (The BUSY signal is also high when the printer is OFF LINE.) When the busy signal occurs, the ACK signal ERROR HIGH LOW LOW 19 1 000000000000000000 000000000000000000 36 19 Parallel interface connector (printer side Signal Return pin side pin Signal 1 19 STB 2 20 DATA - Panasonic KX-P3696 | Operating Instructions - Page 63
Auto LF setting in the Function mode can alter the response by the printer to an AFXT signal. If auto LF is ON, the printer will perform is normally low, and goes high when using the Setup Disk. Timing Chart (When normal printing code is received) DATA1 8 TB BUSY ACK T1 T2 T3 T5 T4 T1 0 5µs - Panasonic KX-P3696 | Operating Instructions - Page 64
ESC • KI I VT ESC 1 k 12 C PP < 1. 11 1 11 PP A 1A 13 0 CR • M 0 0 CR 4 m) 14 E 80 > 0 n 80 15 P SI / 0 o DEL 81 / 20 0 NUL Epson Graphic Character Set 2 (USA) PC437 Dec. 0 16 32 48 64 80 96 112 128 144 160 176 192 208 224 240 Nex 0 1 2 3 4 5 6 7 8 9 A B C D 8 r 0 0 NUL SP - Panasonic KX-P3696 | Operating Instructions - Page 65
r1 8 • 10 A LF 1 31 F0 F + r0 11 6 V2 ESC 12 C FF I k 1 • 61 t I 61 C L R I If 1 0 4 I t a • • 13 D CR 14 E SO 15 F SI 9 X 0 9 1 0 n 0 0 DEL A 1 1 a4 0 1 I 0 I + • 0 • n SP Note: •Set 1 is the same one which 80H-9FH is switched to 00H-1F. and 95H is switched to NUL. Epson Character - Panasonic KX-P3696 | Operating Instructions - Page 66
C FP A I A PP I E 1 B SP SP 13 D CR • 6 m 2 CR I 1 SP SP 14 E SO N" n SO Y 5 1 L SP SP 15 r SI / 70 o DEL SI 8 8 i SPIEL IBM Character Set 2 (USA) o -o Q. Dec. 0 16 32 48 64 60 96 112 128 144 160 176 192 208 224 240 Hex 0 1 2 3 4 5 6 7 8 9 A B C O E r 0 0 NUL SP 0 4 P ', mg - Panasonic KX-P3696 | Operating Instructions - Page 67
> X ri A x < At I • • / 3 0 _ a 0 A I • 1 tl • BP Note: •Set 1 is the same one which 03H-06H and 15H are switched to NUL, and 80H-9FH is switched to OOH-1FH . IBM Character Set 2 (Portugal) Dec 0 16 32 48 64 80 96 532 128 144 160 - Panasonic KX-P3696 | Operating Instructions - Page 68
03H-06H and 154 are switched to NUL, and 80H-9FH is switched to 004-1FH. IBM Character Set 2 (Norway) Dec. 0 16 32 40 64 80 96 112 128 144 160 176 192 208 224 S ei • I . . ' 13 D CR 14 4 SO 4 I m 3 10 'I - I 0 ' n xP aI + I r • 15 F BI 7 0 a A 1 0 1 4 • n se IBM All Character (Norway) - Panasonic KX-P3696 | Operating Instructions - Page 69
1 is the same one which 03H-06H and 15H are switched to NUL, and 804-9FH is switched to 004-1F4. IBM Character Set (BRASCII) Dec. 0 16 32 48 64 80 96 112 128 144 160 176 192 208 224 240 Hex 0 1 2 3 4 5 6 7 8 9 A 0 C 0 6 F 0 0 901 SP 0 0 P P SUL SP • A D 6 8 1 1 2 2 3 3 on ! 1 A Q • 0 IIC2 - Panasonic KX-P3696 | Operating Instructions - Page 70
n o ) CR SO SI I 1 0 SP 8P I 6 1 1 BP SP A A 1 SP DEL IBM All Character Set (ABICOMP) Dec. 0 16 32 48 64 80 96 112 128 144 160 176 192 208 224 240 Hex 0 1 2 3 / 7 0 o BP BP SP A • A 1 SP SP International Character Set 3> -Vo Gt USA FRANCE GERMANY ENGLAND n 35o 36o 64o 910 920 93o 940 - Panasonic KX-P3696 | Operating Instructions - Page 71
to bits per second. Bidirectional printing: Processing speed is increased by bidirectional printing. That is, the printer prints right-to-left as well settings when shipped from the factory. Dots per inch (DPI): A measure of resolution used for monitors and printers. Download character: Download - Panasonic KX-P3696 | Operating Instructions - Page 72
means the leftmost position in a binary number. Near Letter Quality (NLQ): NLQ is one of two print qualities available on this printer. NLQ mode increases the number of dots per character to improve the print quality but decreases the printing speed. OFF LINE: OFF LINE is the condition in which the - Panasonic KX-P3696 | Operating Instructions - Page 73
the shelf software programs use printer drivers to control printer functions. These drivers contain the software codes your software program uses to access printer features. With the printer driver installed, you will seldom need to know any of the KX-P3696 commands. Printing area: The area of the - Panasonic KX-P3696 | Operating Instructions - Page 74
Default setting Detectors a x Dot configuration Double high printing Double strike printing Double wide printing Download printing Unidirectional printing 29, 48 29, 48 29, 48 H Head gap lever 10 Head service life 59 Hex dump 57 Initialization Interfacing International Character set - Panasonic KX-P3696 | Operating Instructions - Page 75
direction Bidirectional printing Unidirectional printing Top margin Top of Form (TOF) set Tractor Tractor clamping lever Troubleshooting TTL (Transistor-Transistor-Logic) 44 9 44 29 29 29 28 43 10, 17 17 55, 56 62 U Unidirectional printing (UNI DIRECTION) Unpacking w Windows printer driver z Zero - Panasonic KX-P3696 | Operating Instructions - Page 76
USERS IN CONTINENTAL UNITED STATES ONLY TECHNICAL SUPPORT CALLS If you have read this manual and tried the troubleshooting procedures and you are still having support, to order options and supplies, or for the nearest authorized service center please call 1-800-222-0584. Panasonic Communications
-
 1
1 -
 2
2 -
 3
3 -
 4
4 -
 5
5 -
 6
6 -
 7
7 -
8
-
9
-
10
-
11
-
12
-
13
-
14
-
15
-
16
-
17
-
18
-
19
-
20
-
21
-
22
-
23
-
24
-
25
-
26
-
27
-
28
-
29
-
30
-
31
-
32
-
33
-
34
-
35
-
36
-
37
-
38
-
39
-
40
-
41
-
42
-
43
-
44
-
45
-
46
-
47
-
48
-
49
-
50
-
51
-
52
-
53
-
54
-
55
-
56
-
57
-
58
-
59
-
60
-
61
-
62
-
63
-
64
-
65
-
66
-
67
-
68
-
69
-
70
-
71
-
72
-
73
-
74
-
75
-
76
 |
 |
Operating
Instructions
Impact
Dot
Matrix
Printer
KX-P3696
-
a
•
•
se
•
•
•
•
•
•
•
•
•
•
•
• • •
•
•
•
•••
••
•
••
• •
•
*
•
41
, •
•
••
• • •
••••
•
•
••••**
•
•
••
•
#
••-
4
is
t
S
k
•
•
4
•
.
•
$
Before
operating
this
unit.
please
read
these
instructions
completely.