Panasonic KX-P3696 Operating Instructions - Page 27
OOn_5,°ri
 |
View all Panasonic KX-P3696 manuals
Add to My Manuals
Save this manual to your list of manuals |
Page 27 highlights
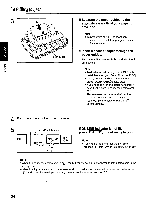
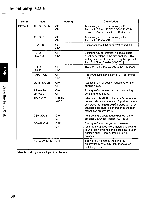
a OO0n_5,°riEiRgi D 0 0 The following steps are only necessary if using Microsoft Windows Version 3.1, The Setup Disk packaged with your printer contains a Panasonic KX-P3696 Printer Driver for Windows Version 3.1. To install this printer driver, you must begin at the Program Manager screen in your Windows program. Follow the steps below for the proper installation procedure. Note: •Use the DISKCOPY command of the operating system to make a back-up copy. Refer to your DOS manual for further information. 1 In "Main Group", select "Control Panel". 2 In "Control Panel", select "Printers". If you have installed a printer driver, the dialog box expands to display a list of printers available in the Windows Ver. 3.1 package, and Add» is unavailable. In "Installed Printers", select the printer you want. Go to step 9. 3 Click Add» Default Printer XXXXXXXXXXXXXX - Installed Printers. XXXXXXXXXXX Printers Set As Default Printer Cancel Connect... Setup... Remove Add» lc Help 4 In "List of Printers", select "Install Unlisted or Updated Printer". 5 Click Install... C) 7 Click OK tv Install-Driver Insert unlisted, updated, or vendor-provided printer driver disk in: A:\ OK /AL cn Cancel m -CO Browse... Help The printer driver KX-P3696 is shown in the dialog box. 8 Click OK Add Unlisted or Updated Printer List of Printers: Panasonic KX-P3696 OK lc Cancel 0 Help 9 Click Set As Default Printer 10 Click Close 11 Exit the "Control Panel". 6 Insert the Setup Disk into drive A. If reading the printer driver disk from drive 8, type B:\ 27
-
 1
1 -
2
-
3
-
4
-
5
-
6
-
7
-
8
-
9
-
10
-
11
-
12
-
13
-
14
-
15
-
16
-
17
-
18
-
19
-
20
-
21
-
 22
22 -
 23
23 -
 24
24 -
 25
25 -
 26
26 -
 27
27 -
 28
28 -
 29
29 -
 30
30 -
 31
31 -
 32
32 -
33
-
34
-
35
-
36
-
37
-
38
-
39
-
40
-
41
-
42
-
43
-
44
-
45
-
46
-
47
-
48
-
49
-
50
-
51
-
52
-
53
-
54
-
55
-
56
-
57
-
58
-
59
-
60
-
61
-
62
-
63
-
64
-
65
-
66
-
67
-
68
-
69
-
70
-
71
-
72
-
73
-
74
-
75
-
76
 |
 |