Pantech Verse Manual - English/Spanish - Page 61
When A New Message Arrives, New Message
 |
View all Pantech Verse manuals
Add to My Manuals
Save this manual to your list of manuals |
Page 61 highlights
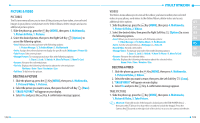
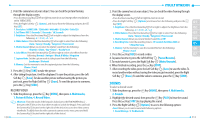
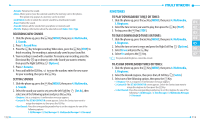
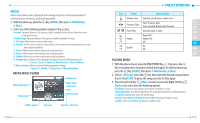
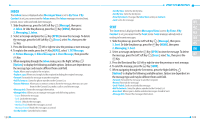
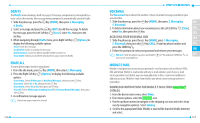
WHEN A NEW MESSAGE ARRIVES 1. The following display appears when a new message arrives. 2. To display the message, select View Now and then press the Key. NEW MESSAGE TXT MESSAGE 1. Slide the phone up, press the Left Soft Key [Message], then press New Message. Or slide the phone up, press the Key [MENU], then press 2. Messaging, 1. New Message. 2. Press 1. TXT Message. Shortcut: From idle mode, press the TXT Composer Key . 3. Under To, input the phone number or e-mail address of the recipient, then press the Key. • By pressing the Right Soft Key [Add], you can choose from the following: 1. From Contacts: Search for a phone number which is stored in the Contact List. 2. Call History: Search for a phone number which is stored in the Call History menu. 3. Groups: Search for a group stored in the Groups menu. 4. To Contacts: Save the number or e-mail address to the Contact List that you have entered in the To field. 4. Under Text, input your message. • By pressing the Right Soft Key [Options], you can choose from the following: 1. Insert Quick Text: Inserts predefined sentences in the text message. 2. Save As Draft: Save the text message to Drafts. 3. Add: Allows you to add a Address From Contacts. 4. Priority Level: Set the level of the priority to High or Normal. 5. Cancel Message: Cancel the message and select whether to save it in Drafts. 5. When completed, press the Key [SEND] to send the text message. 118 These options will vary depending on the message contents chosen. PICTURE MESSAGE 1. Slide the phone up, press the Left Soft Key [Message], then press New Message. Or slide the phone up, press the Key [MENU], 01 then press 2. Messaging, 1. New Message. 02 2. Press 2. Picture Message. 03 3. Under To, input the phone number or e-mail address of the recipient, then press the Key. 04 • By pressing the Right Soft Key [Add], you can choose from the following: 1. From Contacts: Search for a phone number which is stored in the Contact List. 05 2. Call History: Search for a phone number which is stored in the Call History menu. 06 3. Groups: Search for a group stored in the Groups menu. 4. To Online Album: Send the picture message to your Online Album. 07 5. To Contacts: Save the number or e-mail address to the Contact List that you have entered in the To field. 4. Under Text, input your message, then press the Directional Key down. 5. Under Picture, press the Left Soft Key [Pictures] to select the picture you would like to send, then press the Key. Press the Directional Key down. 6. Under Sound, press the Left Soft Key [Sounds] to select the sound you would like to send, then press the Key. Press the Directional Key down. 7. Under Name Card, press the Left Soft Key [Add], press the Directional Key up or down to select 1. My Name Card or 2. From Contacts then press the Key. If 2.From Contacts is selected, select the desired Contact and press the Key [MARK/UNMARK] then press the Left Soft Key [Done]. Press the Directional Key down. 8. Under Subject, input the message subject. 9. Press the Right Soft Key [Options] to access the following: • Preview: Shows the picture message before it is sent. • Save As Draft: Save the picture message to Drafts. • Insert Quick Text: Inserts predefined sentences in the picture message. 119
-
 1
1 -
2
-
3
-
4
-
5
-
6
-
7
-
8
-
9
-
10
-
11
-
12
-
13
-
14
-
15
-
16
-
17
-
18
-
19
-
20
-
21
-
22
-
23
-
24
-
25
-
26
-
27
-
28
-
29
-
30
-
31
-
32
-
33
-
34
-
35
-
36
-
37
-
38
-
39
-
40
-
41
-
42
-
43
-
44
-
45
-
46
-
47
-
48
-
49
-
50
-
51
-
52
-
53
-
54
-
55
-
 56
56 -
 57
57 -
 58
58 -
 59
59 -
 60
60 -
 61
61 -
 62
62 -
 63
63 -
 64
64 -
 65
65 -
 66
66 -
67
-
68
-
69
-
70
-
71
-
72
-
73
-
74
-
75
-
76
-
77
-
78
-
79
-
80
-
81
-
82
-
83
-
84
-
85
-
86
-
87
-
88
-
89
-
90
-
91
-
92
-
93
-
94
-
95
-
96
-
97
-
98
-
99
-
100
-
101
-
102
-
103
-
104
-
105
-
106
-
107
-
108
-
109
-
110
-
111
-
112
-
113
-
114
-
115
-
116
-
117
-
118
-
119
-
120
-
121
-
122
-
123
-
124
-
125
-
126
-
127
-
128
-
129
-
130
-
131
-
132
-
133
-
134
-
135
-
136
-
137
-
138
-
139
-
140
-
141
-
142
-
143
-
144
-
145
-
146
-
147
-
148
-
149
-
150
-
151
-
152
-
153
-
154
-
155
-
156
-
157
-
158
-
159
-
160
-
161
-
162
-
163
-
164
-
165
-
166
-
167
-
168
-
169
-
170
-
171
-
172
-
173
-
174
 |
 |
