Pfaff creative 1467 Owner's Manual - Page 181
Lingerie, buttonholes
 |
View all Pfaff creative 1467 manuals
Add to My Manuals
Save this manual to your list of manuals |
Page 181 highlights
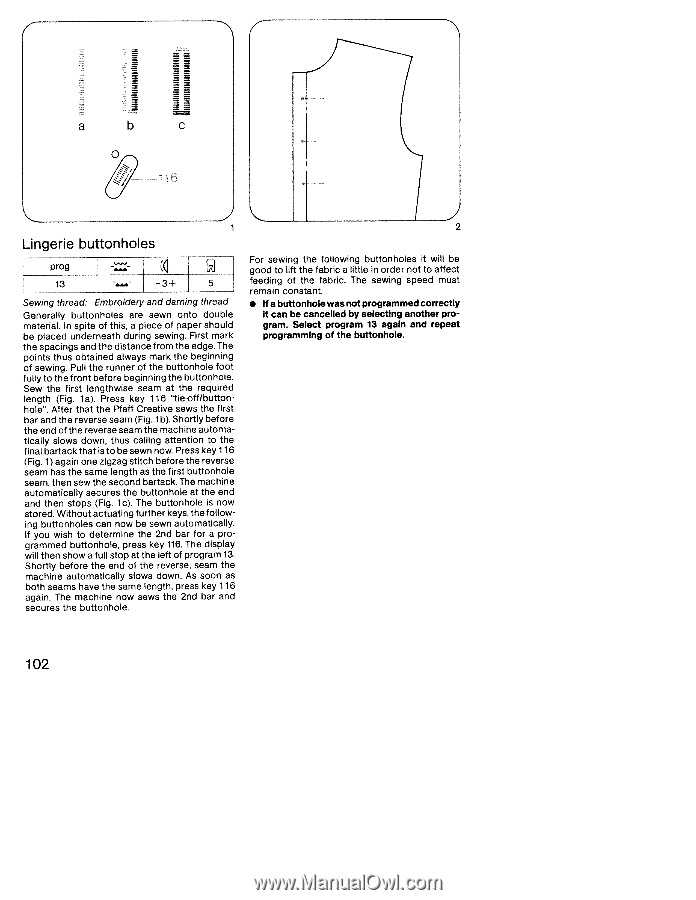
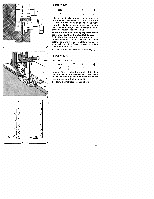
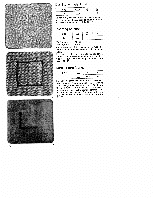
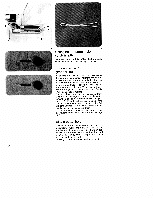
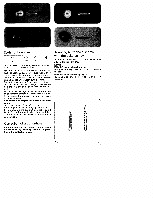
7- a b 0 J Lingerie buttonholes prog tJ Sewing thread: Embroidery and darning thread Generally buttonholes are sewn onto double material. In spite of this, a piece of paper should be placed underneath during sewing. First mark the spacings and the distance from the edge. The points thus obtained always mark the beginning of sewing. Pull the runner of the buttonhole foot fully to the front before beginning the buttonhole. Sew the first lengthwise seam at the required length (Fig. la). Press key 116 "tie-off/button hole. After that the Pfaff Creative sews the first bar and the reverse seam (Fig. 1 b). Shortly before the end of the reverse seam the machine automa tically slows down, thus calling attention to the final bartack that is to be sewn now. Press key 116 (Fig. 1) again one zigzag stitch before the reverse seam has the same length as the first buttonhole seam, then sew the second bartack. The machine automatically secures the buttonhole at the end and then stops (Fig. ic). The buttonhole is now stored. Without actuating further keys, the follow ing buttonholes can now be sewn automatically. If you wish to determine the 2nd bar for a pro grammed buttonhole, press key 116. The display will then show a full stop at the left of program 13. Shortly before the end of the reverse, seam the machine automatically slows down. As soon as both seams have the same length, press key 116 again. The machine now sews the 2nd bar and secures the buttonhole. 2 For sewing the following buttonholes it will be good to lift the fabric a little in order not to affect feeding of the fabric. The sewing speed must remain constant. • If a buttonhole was not programmed correctly it can be cancelled by selectIng another pro gram. Select program 13 agaIn and repeat programming of the buttonhole. 102
-
 1
1 -
2
-
3
-
4
-
5
-
6
-
7
-
8
-
9
-
10
-
11
-
12
-
13
-
14
-
15
-
16
-
17
-
18
-
19
-
20
-
21
-
22
-
23
-
24
-
25
-
26
-
27
-
28
-
29
-
30
-
31
-
32
-
33
-
34
-
35
-
36
-
37
-
38
-
39
-
40
-
41
-
42
-
43
-
44
-
45
-
46
-
47
-
48
-
49
-
50
-
51
-
52
-
53
-
54
-
55
-
56
-
57
-
58
-
59
-
60
-
61
-
62
-
63
-
64
-
65
-
66
-
67
-
68
-
69
-
70
-
71
-
72
-
73
-
74
-
75
-
76
-
77
-
78
-
79
-
80
-
81
-
82
-
83
-
84
-
85
-
86
-
87
-
88
-
89
-
90
-
91
-
92
-
93
-
94
-
95
-
96
-
97
-
98
-
99
-
100
-
101
-
102
-
103
-
104
-
105
-
106
-
107
-
108
-
109
-
110
-
111
-
112
-
113
-
114
-
115
-
116
-
117
-
118
-
119
-
120
-
121
-
122
-
123
-
124
-
125
-
126
-
127
-
128
-
129
-
130
-
131
-
132
-
133
-
134
-
135
-
136
-
137
-
138
-
139
-
140
-
141
-
142
-
143
-
144
-
145
-
146
-
147
-
148
-
149
-
150
-
151
-
152
-
153
-
154
-
155
-
156
-
157
-
158
-
159
-
160
-
161
-
162
-
163
-
164
-
165
-
166
-
167
-
168
-
169
-
170
-
171
-
172
-
173
-
174
-
175
-
 176
176 -
 177
177 -
 178
178 -
 179
179 -
 180
180 -
 181
181 -
 182
182 -
 183
183 -
 184
184 -
 185
185 -
 186
186 -
187
-
188
-
189
-
190
-
191
-
192
 |
 |