Pfaff creative 1467 Owner's Manual - Page 45
Ornamental, borders
 |
View all Pfaff creative 1467 manuals
Add to My Manuals
Save this manual to your list of manuals |
Page 45 highlights
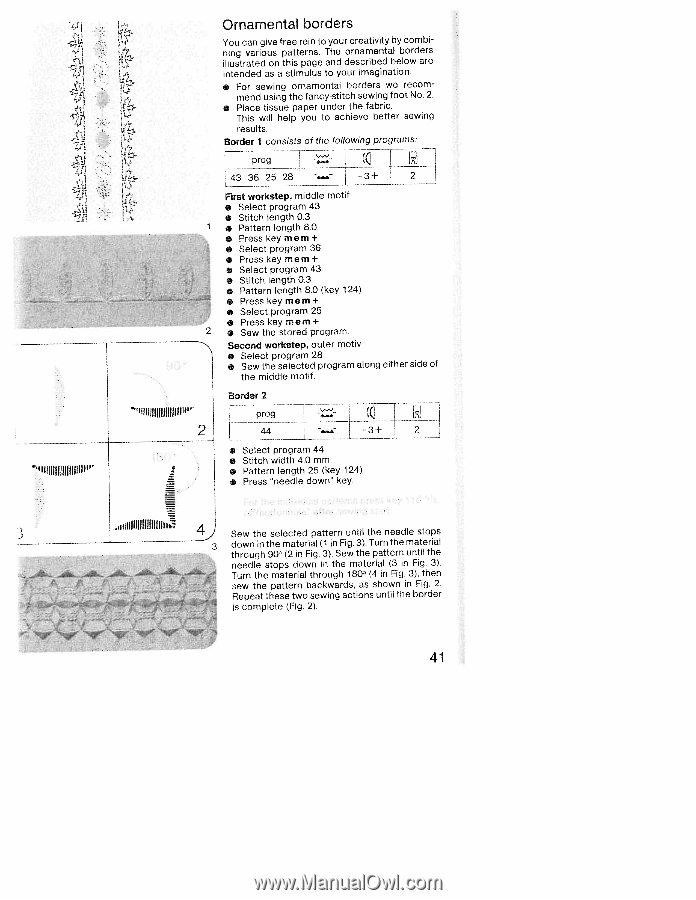
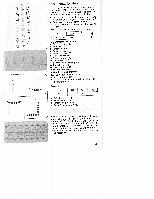
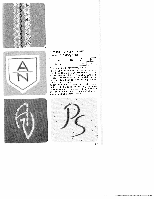
4.i} ill "illiJljIljlIIjJIfljllflh{"' Ornamental borders You can give free rein to your creativity by combi ning various patterns. The ornamental borders illustrated on this page and described below are intended as a stimulus to your imagination. For sewing ornamental borders we recom mend using the fancy-stitch sewing foot No. 2. • Place tissue paper under the fabric. This will help you to achieve better sewing results. Border 1 consists of the following programs; Z 43362528 .- -3+ 2 2 Th Ffrst workstep, middle motif • Select program 43 • Stitch length 0.3 • Pattern length 8.0 • Presskeymem+ • Select program 36 • Press key mem + • Select program 43 • Stitch length 0.3 • Pattern length 8.0 (key 124) • Presskeymem+ • Select program 25 • Presskeymem+ • Sew the stored program. Second workstep, outer motiv • Select program 28 • Sew the selected program along either side of the middle motif. Border 2 ilIIlljIjflhIjIjjIIjjIIlll)iP prog 2 44 -3+ 2 • • Select program 44 • Stitch width 4.0 mm • Pattern length 25 (key 124) • Press 'needle down" key. ,lIIlIIIlIlllI ._f& - ° Sew the selected pattern until the needle stops down in the material (1 in Fig. 3). Turn the material through 90' (2 in Fig. 3). Sew the pattern until the needle stops down in the material (3 in Fig. 3). Turn the material through 180° (4 in Fig. 3), then sew the pattern backwards, as shown in Fig. 2. Repeat these two sewing actions until the border is complete (Fig. 2). 41
-
 1
1 -
2
-
3
-
4
-
5
-
6
-
7
-
8
-
9
-
10
-
11
-
12
-
13
-
14
-
15
-
16
-
17
-
18
-
19
-
20
-
21
-
22
-
23
-
24
-
25
-
26
-
27
-
28
-
29
-
30
-
31
-
32
-
33
-
34
-
35
-
36
-
37
-
38
-
39
-
 40
40 -
 41
41 -
 42
42 -
 43
43 -
 44
44 -
 45
45 -
 46
46 -
 47
47 -
 48
48 -
 49
49 -
 50
50 -
51
-
52
-
53
-
54
-
55
-
56
-
57
-
58
-
59
-
60
-
61
-
62
-
63
-
64
-
65
-
66
-
67
-
68
-
69
-
70
-
71
-
72
-
73
-
74
-
75
-
76
-
77
-
78
-
79
-
80
-
81
-
82
-
83
-
84
-
85
-
86
-
87
-
88
-
89
-
90
-
91
-
92
-
93
-
94
-
95
-
96
-
97
-
98
-
99
-
100
-
101
-
102
-
103
-
104
-
105
-
106
-
107
-
108
-
109
-
110
-
111
-
112
-
113
-
114
-
115
-
116
-
117
-
118
-
119
-
120
-
121
-
122
-
123
-
124
-
125
-
126
-
127
-
128
-
129
-
130
-
131
-
132
-
133
-
134
-
135
-
136
-
137
-
138
-
139
-
140
-
141
-
142
-
143
-
144
-
145
-
146
-
147
-
148
-
149
-
150
-
151
-
152
-
153
-
154
-
155
-
156
-
157
-
158
-
159
-
160
-
161
-
162
-
163
-
164
-
165
-
166
-
167
-
168
-
169
-
170
-
171
-
172
-
173
-
174
-
175
-
176
-
177
-
178
-
179
-
180
-
181
-
182
-
183
-
184
-
185
-
186
-
187
-
188
-
189
-
190
-
191
-
192
 |
 |