Pfaff creative 1467 Owner's Manual - Page 85
Making, taor's, tacks, Basting, stitch length
 |
View all Pfaff creative 1467 manuals
Add to My Manuals
Save this manual to your list of manuals |
Page 85 highlights
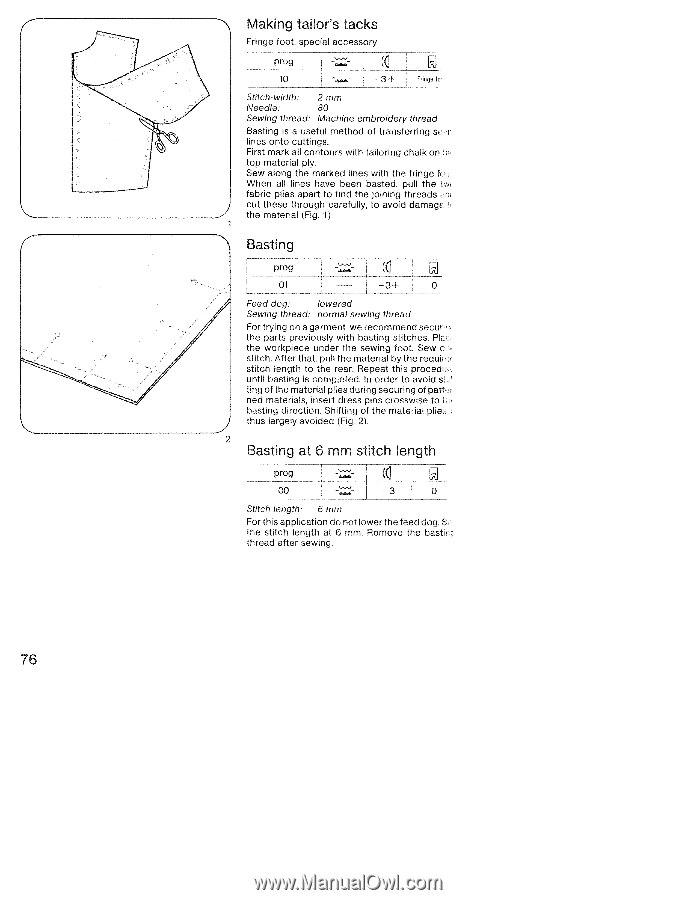
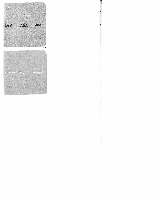
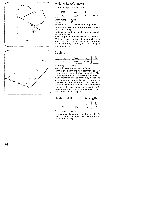
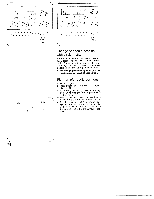
Making taor's tacks Fringe foot, special accessory Z 10 -a....- + Fnge I:, - .L. Stitch-width: 2 mm Needle: 80 Sewing thread: Machine embroidery thread Bashng is a useful method of transferring sr lines onto cuttings. First mark all contours with tailoring chalk on top material ply. Sew along the marked lines with the fringe fi When all lines have been basted, pull the fabric plies apart to find the joining threads: cut these through carefully, to avoid damag the material (Fig. 1). Basting prog 01 L- -3+ 0 Feed dog: lowered Sewing thread: normal sewing thread For trying on a garment, we recommend secur the parts previously with basting stitches. Pl the workpiece under the sewing foot. Sew c stitch. After that, pull the material by the requir stitch length to the rear. Repeat this procech until basting is completed. In order to avoid s ting of the material plies during securing of pati ned materials, insert dress pins crosswise to I basting direction. Shifting of the material plies thus largely avoided (Fig. 2). 2 Basting at 6 mm stitch length prog çq 00 ± . Stitch length: 6 mm For this application do not lower the feed dog. S the stitch length at 6 mm. Remove the bastii thread after sewing. 76
-
 1
1 -
2
-
3
-
4
-
5
-
6
-
7
-
8
-
9
-
10
-
11
-
12
-
13
-
14
-
15
-
16
-
17
-
18
-
19
-
20
-
21
-
22
-
23
-
24
-
25
-
26
-
27
-
28
-
29
-
30
-
31
-
32
-
33
-
34
-
35
-
36
-
37
-
38
-
39
-
40
-
41
-
42
-
43
-
44
-
45
-
46
-
47
-
48
-
49
-
50
-
51
-
52
-
53
-
54
-
55
-
56
-
57
-
58
-
59
-
60
-
61
-
62
-
63
-
64
-
65
-
66
-
67
-
68
-
69
-
70
-
71
-
72
-
73
-
74
-
75
-
76
-
77
-
78
-
79
-
 80
80 -
 81
81 -
 82
82 -
 83
83 -
 84
84 -
 85
85 -
 86
86 -
 87
87 -
 88
88 -
 89
89 -
 90
90 -
91
-
92
-
93
-
94
-
95
-
96
-
97
-
98
-
99
-
100
-
101
-
102
-
103
-
104
-
105
-
106
-
107
-
108
-
109
-
110
-
111
-
112
-
113
-
114
-
115
-
116
-
117
-
118
-
119
-
120
-
121
-
122
-
123
-
124
-
125
-
126
-
127
-
128
-
129
-
130
-
131
-
132
-
133
-
134
-
135
-
136
-
137
-
138
-
139
-
140
-
141
-
142
-
143
-
144
-
145
-
146
-
147
-
148
-
149
-
150
-
151
-
152
-
153
-
154
-
155
-
156
-
157
-
158
-
159
-
160
-
161
-
162
-
163
-
164
-
165
-
166
-
167
-
168
-
169
-
170
-
171
-
172
-
173
-
174
-
175
-
176
-
177
-
178
-
179
-
180
-
181
-
182
-
183
-
184
-
185
-
186
-
187
-
188
-
189
-
190
-
191
-
192
 |
 |