Ricoh 403080 Operation Guide - Page 16
II. Installation, Install Printer
 |
UPC - 026649030802
View all Ricoh 403080 manuals
Add to My Manuals
Save this manual to your list of manuals |
Page 16 highlights
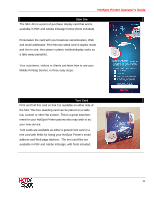
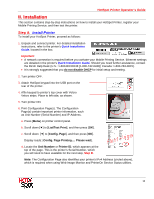
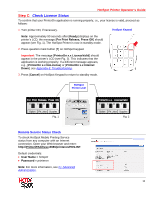
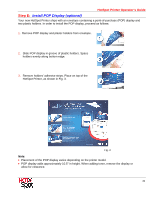
HotSpot Printer Operator's Guide II. Installation This section contains step-by-step instructions on how to install your HotSpot Printer, register your Mobile Printing Service, and then test the printer. Step A: Install Printer To install your HotSpot Printer, proceed as follows: 1. Unpack and connect printer. For detailed installation instructions, refer to the printer's Quick Installation Guide, located in the box. Important: • A network connection is required before you activate your Mobile Printing Service. Ethernet settings are detailed in the printer's Quick Installation Guide. Should you need further assistance, contact the Ricoh Help Desk (U.S.: 1-800-RICOH38 [1-800-742-6438]; Canada: 1-800-263-0815). • It is strongly suggested that you do not disable DHCP for initial setup and testing. 2. Turn printer OFF. 3. Attach HotSpot keypad into the USB port on the rear of the printer. 4. Affix keypad to printer's top cover with Velcro Velcro strips. Place to left side, as shown. 5. Turn printer ON. 6. Print Configuration Page(s). The Configuration Page(s) contain important printer information, such as Unit Number (Serial Number) and IP Address. a. Press [Menu] on printer control panel. b. Scroll down [] to [List/Test Print], and then press [OK]. c. Scroll down [] to [Config. Page], and then press [OK]. Display reads: [Config. Page Printing.... Please wait]. d. Locate the Unit Number or Printer ID, which appears at the top of the page. This is the printer's Serial Number, which you will need to have available for the next step, Step B. Note: The Configuration Page also identifies your printer's IPv4 Address (circled above), which is required when using Web Image Monitor and PrinterOn Service Status utilities. 16
-
 1
1 -
2
-
3
-
4
-
5
-
6
-
7
-
8
-
9
-
10
-
 11
11 -
 12
12 -
 13
13 -
 14
14 -
 15
15 -
 16
16 -
 17
17 -
 18
18 -
 19
19 -
 20
20 -
 21
21 -
22
-
23
-
24
-
25
-
26
-
27
-
28
-
29
-
30
-
31
-
32
-
33
-
34
-
35
-
36
-
37
-
38
-
39
-
40
-
41
-
42
-
43
-
44
-
45
-
46
-
47
-
48
-
49
-
50
-
51
-
52
-
53
-
54
-
55
-
56
-
57
-
58
-
59
-
60
-
61
-
62
-
63
-
64
-
65
-
66
-
67
-
68
-
69
-
70
-
71
-
72
-
73
-
74
-
75
-
76
-
77
-
78
-
79
-
80
-
81
-
82
-
83
-
84
-
85
-
86
-
87
-
88
-
89
-
90
-
91
-
92
-
93
 |
 |