Ricoh 403080 Operation Guide - Page 30
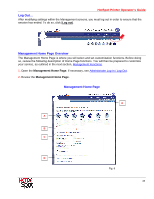
Management Home Approve Print Job
 |
UPC - 026649030802
View all Ricoh 403080 manuals
Add to My Manuals
Save this manual to your list of manuals |
Page 30 highlights
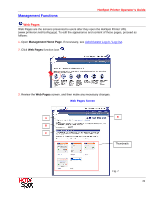
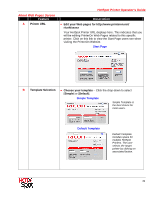
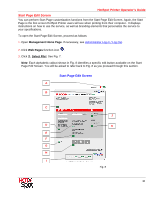
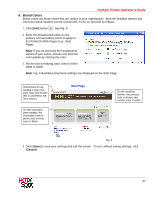
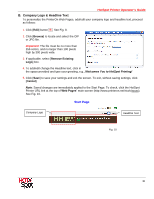
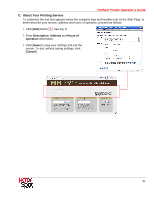
HotSpot Printer Operator's Guide C Thumbnail Selection The thumbnails shown in Fig. 7 are for illustration purposes and do not reflect changes made to a page. Note: • When using the [Simple] template, some features shown for editing may appear differently in the user interface. • On each page, click the green [Edit] buttons to make changes. Your changes are saved automatically. D Function Icons 1. Select File - Click to view the first screen users will see, called the Start Page, where he/she identifies themselves, uploads a document and selects a printer (if you have offered more than one). This is also the screen where you can insert a company logo, colors and text. 2. Options - Click to view the [Printing Options] screen. This screen presents the user with options, such as page range and number of copies for specific document types. Note that you have the option of not offering this screen to users. 3. Approve - Click to view the [Approve Print Job] screen. This is another optional screen you may offer to your users that displays the page count for their print job, and costs associated with the job. It gives the user the opportunity to approve printing or cancel the job before it is printed. 4. Confirm - Click to view the [Confirmation of print job] screen. This screen notifies the user that the document has been processed, and allows the user to check the status of a job in progress. 5. PDS - This function is not applicable to HotSpot Printers. Reference: Detailed instructions for customization functions 1 - 4 (above) are covered in the sections to follow. Click on a function icon to navigate to another screen, e.g., the Management Home Page . 4. Return to the Management Home Page, if necessary. 30
-
 1
1 -
2
-
3
-
4
-
5
-
6
-
7
-
8
-
9
-
10
-
11
-
12
-
13
-
14
-
15
-
16
-
17
-
18
-
19
-
20
-
21
-
22
-
23
-
24
-
 25
25 -
 26
26 -
 27
27 -
 28
28 -
 29
29 -
 30
30 -
 31
31 -
 32
32 -
 33
33 -
 34
34 -
 35
35 -
36
-
37
-
38
-
39
-
40
-
41
-
42
-
43
-
44
-
45
-
46
-
47
-
48
-
49
-
50
-
51
-
52
-
53
-
54
-
55
-
56
-
57
-
58
-
59
-
60
-
61
-
62
-
63
-
64
-
65
-
66
-
67
-
68
-
69
-
70
-
71
-
72
-
73
-
74
-
75
-
76
-
77
-
78
-
79
-
80
-
81
-
82
-
83
-
84
-
85
-
86
-
87
-
88
-
89
-
90
-
91
-
92
-
93
 |
 |
