Ricoh 403080 Operation Guide - Page 89
Issue, Action, Step 1
 |
UPC - 026649030802
View all Ricoh 403080 manuals
Add to My Manuals
Save this manual to your list of manuals |
Page 89 highlights
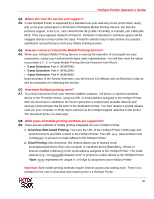
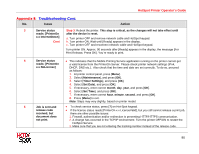
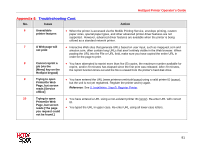
HotSpot Printer Operator's Guide Appendix 8: Troubleshooting Cont. No. Issue Action 3 Service status To correct the problem, proceed as follows: reads: [PrinterOn x.x InternetDown] Step 1: From the printer's control panel, assign IP Address, Subnet Mask, Gateway Address values. Note: Reboot the printer by turning the power off for at least five seconds. Cont. Reference: For more information, refer to the printer's Hardware Guide > Configuration, located on the Manual CD-ROM included with the printer. Step 2: From Web Image Monitor, change the DNS Server values to match those entered via the printer's control panel. Important: Assign both primary and back-up DNS Addresses. a. Make sure you have Internet access on an unrestricted network line. b. Open your Web browser c. Go to: http://PrinterIPAddress. d. Enter login credentials. Defaults: • Login User Name: admin • Password: leave blank e. Click [Login]. f. Click [Configuration] link, left sidebar. g. Under Network, click [IPv4]. h. Under Details, click [Specify] button adjacent to [Auto Obtain (DHCP)]. Important: If the DNS server is set to [Specify], enter the values for the Primary (DNS Server1) and Secondary (DNS Server2) servers. i. Click [OK] to save changes. 89
-
 1
1 -
2
-
3
-
4
-
5
-
6
-
7
-
8
-
9
-
10
-
11
-
12
-
13
-
14
-
15
-
16
-
17
-
18
-
19
-
20
-
21
-
22
-
23
-
24
-
25
-
26
-
27
-
28
-
29
-
30
-
31
-
32
-
33
-
34
-
35
-
36
-
37
-
38
-
39
-
40
-
41
-
42
-
43
-
44
-
45
-
46
-
47
-
48
-
49
-
50
-
51
-
52
-
53
-
54
-
55
-
56
-
57
-
58
-
59
-
60
-
61
-
62
-
63
-
64
-
65
-
66
-
67
-
68
-
69
-
70
-
71
-
72
-
73
-
74
-
75
-
76
-
77
-
78
-
79
-
80
-
81
-
82
-
83
-
 84
84 -
 85
85 -
 86
86 -
 87
87 -
 88
88 -
 89
89 -
 90
90 -
 91
91 -
 92
92 -
 93
93
 |
 |