Ricoh SP 213Nw User Guide - Page 18
Configuring Network Settings, Configuring the IP Address Settings Using the Smart Organizing Monitor
 |
View all Ricoh SP 213Nw manuals
Add to My Manuals
Save this manual to your list of manuals |
Page 18 highlights
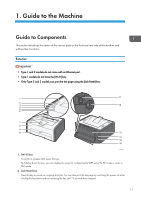
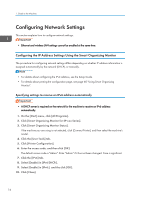
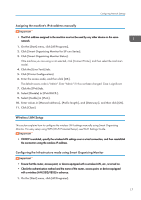
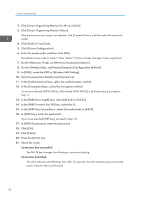
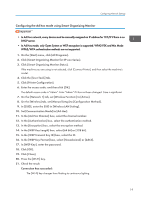
1. Guide to the Machine Configuring Network Settings This section explains how to configure network settings. • Ethernet and wireless LAN settings cannot be enabled at the same time. Configuring the IP Address Settings Using the Smart Organizing Monitor The procedure for configuring network settings differs depending on whether IP address information is assigned automatically by the network (DHCP), or manually. • For details about configuring the IPv4 address, see the Setup Guide. • For details about printing the configuration page, see page 60 "Using Smart Organizing Monitor". Specifying settings to receive an IPv6 address automatically • A DHCP server is required on the network for the machine to receive an IPv6 address automatically. 1. On the [Start] menu, click [All Programs]. 2. Click [Smart Organizing Monitor for SP xxx Series]. 3. Click [Smart Organizing Monitor Status]. If the machine you are using is not selected, click [Connect Printer], and then select the machine's model. 4. Click the [User Tools] tab. 5. Click [Printer Configuration]. 6. Enter the access code, and then click [OK]. The default access code is "Admin". Enter "Admin" if it has not been changed. Case is significant. 7. Click the [IPv6] tab. 8. Select [Enable] in [IPv6 DHCP:]. 9. Select [Enable] in [IPv6:], and the click [OK]. 10. Click [Close]. 16
-
 1
1 -
2
-
3
-
4
-
5
-
6
-
7
-
8
-
9
-
10
-
11
-
12
-
 13
13 -
 14
14 -
 15
15 -
 16
16 -
 17
17 -
 18
18 -
 19
19 -
 20
20 -
 21
21 -
 22
22 -
 23
23 -
24
-
25
-
26
-
27
-
28
-
29
-
30
-
31
-
32
-
33
-
34
-
35
-
36
-
37
-
38
-
39
-
40
-
41
-
42
-
43
-
44
-
45
-
46
-
47
-
48
-
49
-
50
-
51
-
52
-
53
-
54
-
55
-
56
-
57
-
58
-
59
-
60
-
61
-
62
-
63
-
64
-
65
-
66
-
67
-
68
-
69
-
70
-
71
-
72
-
73
-
74
-
75
-
76
-
77
-
78
-
79
-
80
-
81
-
82
-
83
-
84
-
85
-
86
-
87
-
88
-
89
-
90
-
91
-
92
-
93
-
94
-
95
-
96
 |
 |