Sharp LC-45GD6U LC-45GD6U Operation Manual - Page 64
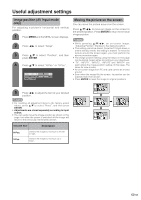
Useful adjustment settings
 |
UPC - 074000362437
View all Sharp LC-45GD6U manuals
Add to My Manuals
Save this manual to your list of manuals |
Page 64 highlights
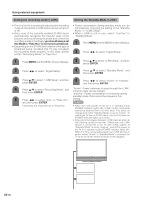
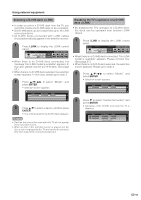
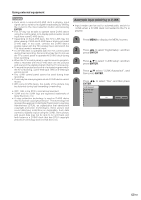
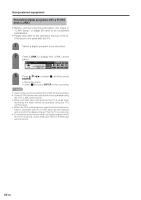
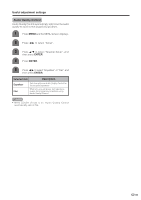
Useful adjustment settings Image position (AV input mode only) For adjusting a picture's horizontal and vertical position. 1 Press MENU and the MENU screen displays. 2 Press c/d to select "Setup". 3 Press a/b to select "Position", and then press ENTER. 4 Press a/b to select "H-Pos." or "V-Pos.". H-Pos. [ 0] -10 +10 V-Pos. [ 0] -20 +20 Reset Moving the picture on the screen You can move the picture around on the screen. Press a/b/c/d to move an image on the screen to the desired position. Press ENTER to return to the initial image position. NOTE • While pressing a/b/c/d, an on-screen image, "Adjusting Position" displays to the desired position. • This setting cannot be stored. Once the TV shuts down or enters standby mode, the setting is erased. To move the picture around the screen again, you must perform the above procedure again. • The image position setting using the steps on this page can be stored. Select either according to your objectives. • "TV", "INPUT1", "INPUT2", "INPUT3" and "INPUT4" can each adjust the image position setting on this page. The same for view modes. • An on-screen image from PC and card cannot be moved around. • Even when the image fills the screen, its position can be adjusted with this function. • Press ENTER to reset the image to original positions. 5 Press c/d to adjust the item to your desired position. NOTE • For resetting all adjustment items to the factory preset values, press a/b to select "Reset", and then press ENTER. • Adjustments are stored separately according to input source. • You can easily move the image position as shown on this page, but when the power is switched off the image will return to the previously memorized position. Selected item Description H-Pos. V-Pos. Centers the image by moving it to the left or right. Centers the image by moving it up or down. 63
-
 1
1 -
2
-
3
-
4
-
5
-
6
-
7
-
8
-
9
-
10
-
11
-
12
-
13
-
14
-
15
-
16
-
17
-
18
-
19
-
20
-
21
-
22
-
23
-
24
-
25
-
26
-
27
-
28
-
29
-
30
-
31
-
32
-
33
-
34
-
35
-
36
-
37
-
38
-
39
-
40
-
41
-
42
-
43
-
44
-
45
-
46
-
47
-
48
-
49
-
50
-
51
-
52
-
53
-
54
-
55
-
56
-
57
-
58
-
 59
59 -
 60
60 -
 61
61 -
 62
62 -
 63
63 -
 64
64 -
 65
65 -
 66
66 -
 67
67 -
 68
68 -
 69
69 -
70
-
71
-
72
-
73
-
74
-
75
-
76
-
77
-
78
-
79
-
80
-
81
-
82
-
83
-
84
-
85
-
86
-
87
-
88
-
89
-
90
-
91
-
92
-
93
-
94
-
95
-
96
-
97
-
98
-
99
-
100
-
101
-
102
-
103
 |
 |