Sharp LC-45GD6U LC-45GD6U Operation Manual - Page 67
Auto Sync. adjustment PC input, mode only, Fine Sync. adjustment PC input
 |
UPC - 074000362437
View all Sharp LC-45GD6U manuals
Add to My Manuals
Save this manual to your list of manuals |
Page 67 highlights
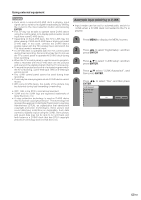
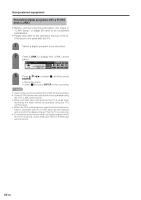
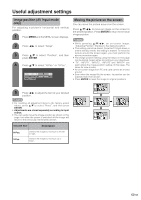
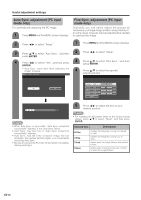
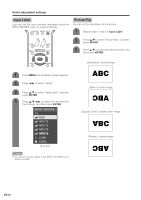
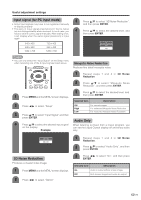
Useful adjustment settings Auto Sync. adjustment (PC input mode only) For automatically adjusting the PC image. 1 Press MENU and the MENU screen displays. Fine Sync. adjustment (PC input mode only) Ordinarily you can easily adjust the picture as necessary to change image position using Auto Sync. In some cases, however, manual adjustment is needed to optimize the image. 2 Press c/d to select "Setup". 1 Press MENU and the MENU screen displays. 3 Press a/b to select "Auto Sync.", and then press ENTER. 4 Press c/d to select "Yes", and then press ENTER. • Auto Sync. starts and "Now adjusting the image" displays. MENU [Setup ... Auto Sync.] 2 Press c/d to select "Setup". 3 Press a/b to select "Fine Sync.", and then press ENTER. 4 Press a/b to select the specific adjustment item. Yes No H-Pos. [ 90] - + V-Pos. [ 39] - + Clock [ 90] - + Phase [ 20] - + Reset 30% NOTE • When Auto Sync. is successful, "Auto Sync completed successfully" displays. If not, Auto Sync. failed. • Auto Sync. may fail even if "Auto Sync completed successfully" displays. • Auto Sync. may fail if the computer image has low resolution, has unclear (black) edges, or is moved while executing Auto Sync. • Be sure to connect the PC to the TV and switch it on before starting Auto Sync. 5 Press c/d to adjust the item to your desired position. NOTE • For resetting all adjustment items to the factory preset values, press a/b to select "Reset", and then press ENTER. Selected item Description H-Pos. V-Pos. Clock Phase Centers the image by moving it to the left or right. Centers the image by moving it up or down. Adjust when the image flickers with vertical stripes. Adjust when characters have low contrast or when the image flickers. 66
-
 1
1 -
2
-
3
-
4
-
5
-
6
-
7
-
8
-
9
-
10
-
11
-
12
-
13
-
14
-
15
-
16
-
17
-
18
-
19
-
20
-
21
-
22
-
23
-
24
-
25
-
26
-
27
-
28
-
29
-
30
-
31
-
32
-
33
-
34
-
35
-
36
-
37
-
38
-
39
-
40
-
41
-
42
-
43
-
44
-
45
-
46
-
47
-
48
-
49
-
50
-
51
-
52
-
53
-
54
-
55
-
56
-
57
-
58
-
59
-
60
-
61
-
 62
62 -
 63
63 -
 64
64 -
 65
65 -
 66
66 -
 67
67 -
 68
68 -
 69
69 -
 70
70 -
 71
71 -
 72
72 -
73
-
74
-
75
-
76
-
77
-
78
-
79
-
80
-
81
-
82
-
83
-
84
-
85
-
86
-
87
-
88
-
89
-
90
-
91
-
92
-
93
-
94
-
95
-
96
-
97
-
98
-
99
-
100
-
101
-
102
-
103
 |
 |