Sharp NP-PH3501QL Installation Manual - NEC
Sharp NP-PH3501QL Manual
 |
View all Sharp NP-PH3501QL manuals
Add to My Manuals
Save this manual to your list of manuals |
Sharp NP-PH3501QL manual content summary:
- Sharp NP-PH3501QL | Installation Manual - NEC - Page 1
Projector PH3501QL/PH2601QL powered by NP-LV01BD Installation Manual Model No. NP-PH3501QL, NP-PH2601QL, NP-PH3501QL+, NP-PH2601QL+, NP-LV01BD - Sharp NP-PH3501QL | Installation Manual - NEC - Page 2
is intended the readers who have basic knowledge about projector installation. Refer to the user's manual of an applicable projector for basic operation and remarks. The product name used in this manual In this manual, the device name is written as listed below. If the function has difference by - Sharp NP-PH3501QL | Installation Manual - NEC - Page 3
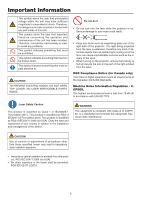
Therefore, it should be read carefully in order to avoid any problems. This symbol indicates something that must be prohibited. This symbol attention to. CAUTION TO PREVENT ELECTRIC SHOCK, DO NOT OPEN TOP COVER. NO USER SERVICEABLE PARTS INSIDE. Do not do it • Do not look into the lens while the - Sharp NP-PH3501QL | Installation Manual - NEC - Page 4
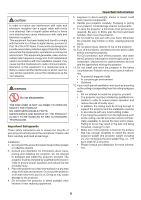
with the installation manual, may cause harmful SERVICEABLE PARTS. MAINTENANCE AND SERVICE OF THE PRODUCT IS ONLY TO BE HANDLED BY NEC AUTHORIZED TECHNICIANS. Important Safeguards These safety instructions the ceiling must be strong enough to support the projector and the installation must be - Sharp NP-PH3501QL | Installation Manual - NEC - Page 5
WARNING Do not do it 1. Do not use the projector with the supplied lens cap or equivalent while the projector is operating. This may cause the lens cap to heat up and deform or melt. 2. Do not place any objects, which are easily affected by heat, in front of the projector lens. Doing so could lead - Sharp NP-PH3501QL | Installation Manual - NEC - Page 6
to the projector immediately and have the object removed by a qualified service person. For C2 connection, turn off the projector, shut down the the projector does not operate normally when you follow the instructions described in this user's manual. • If the projector has been dropped or the cabinet - Sharp NP-PH3501QL | Installation Manual - NEC - Page 7
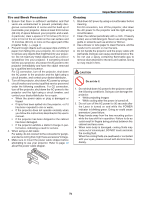
multiple laser diodes is included in the product as the light source. 2. These laser diodes are sealed in the light module. No maintenance or service is required for the performance of the light module. 3. End user is not allowed to replace the light module. 4. Contact qualified distributor for - Sharp NP-PH3501QL | Installation Manual - NEC - Page 8
Label Information Label A Important Information Label A: Risk Group /Lamp Safety Label vi - Sharp NP-PH3501QL | Installation Manual - NEC - Page 9
Label B Laser Explanatory Label Label C PH3501QL Label C Important Information Label B Label D Label E 3263343400 vii - Sharp NP-PH3501QL | Installation Manual - NEC - Page 10
Label C PH2601QL Important Information Label D Label E viii - Sharp NP-PH3501QL | Installation Manual - NEC - Page 11
Important Information Radiation Range of Emitted Light by the Projector (HD: Hazard Distance) • The below table describes the radiation range of emitted light by the projector that is classified as Risk Group 3 (RG3) of IEC62471-5 First edition 2015. • The below table describes the radiation range - Sharp NP-PH3501QL | Installation Manual - NEC - Page 12
heed all precaution for safety. To install the projector • For planning the layout of the projector, make sure to take safety measures instructed on the installation manual. • In order to refuse danger, install either a wall outlet within easy reach for pulling out the power plug in emergency or - Sharp NP-PH3501QL | Installation Manual - NEC - Page 13
Information Health precautions to users viewing 3D images Before viewing, be sure to read health care precautions that may be found in the user's manual included with your 3D eyeglasses or your 3D compatible content such as Blu-ray Discs, video games, computer's video files and the like. To - Sharp NP-PH3501QL | Installation Manual - NEC - Page 14
dass wichtige Informationen hinsichtlich des Betriebs und der Wartung dieses Geräts enthalten sind. Diese sind deshalb sorgfältig zu lesen, um jegliche Probleme zu vermeiden. Dieses Symbol weist auf etwas hin, das verboten ist. Dieses Symbol weist auf etwas hin, das nicht zerlegt werden darf. Dieses - Sharp NP-PH3501QL | Installation Manual - NEC - Page 15
Wichtige Informationen ACHTUNG Verwenden Sie ein Signalkabel mit Ferritkern, um Störungen beim Radio- und Fernsehempfang zu reduzieren. Die Verwendung eines Signalkabels ohne Ferritkern kann Störungen beim Radio- und Fernsehempfang verursachen. Durch Prüfung dieses Gerätes nach FCC, Part 15 wurde - Sharp NP-PH3501QL | Installation Manual - NEC - Page 16
WARNUNG Nicht tun 1. Verwenden Sie den Projektor nicht, während die mitgelieferte Linsenkappe oder Ähnliches angebracht ist, und der Projektor in Betrieb ist. Andernfalls kann sich die Linsenkappe oder Glasschutzkappe erhitzen und sich verformen oder schmelzen. 2. Platzieren Sie keine - Sharp NP-PH3501QL | Installation Manual - NEC - Page 17
/ Lieferanten. 3. Schalten Sie den Projektor aus, ziehen Sie den Netzstecker und kontaktieren Sie unter den folgenden Bedingungen qualifiziertes Service-Personal. Für Anschluss C2 schalten Sie den Projektor aus, trennen Sie die Netzspannung zur Spannungsversorgung des Projektors und der Lichtquelle - Sharp NP-PH3501QL | Installation Manual - NEC - Page 18
Vorsicht beim Transportieren des Projektors/Umgang mit der optischen Linse Wenn Sie ein Objektiv installieren / entfernen, schalten Sie die Stromversorgung des Projektors ab. Wenn Sie den Projektor mit der Linse verschicken, entfernen Sie die Linse vor dem Versand. Bringen Sie immer die - Sharp NP-PH3501QL | Installation Manual - NEC - Page 19
Etiketteninformationen Aufkleber A Wichtige Informationen Aufkleber A: Lampe Warnzeichen Etikette xvii - Sharp NP-PH3501QL | Installation Manual - NEC - Page 20
Aufkleber B Laser erklärendes Etikett Aufkleber C PH3501QL Aufkleber C Wichtige Informationen Aufkleber D Aufkleber B Aufkleber E 3263343400 xviii - Sharp NP-PH3501QL | Installation Manual - NEC - Page 21
Aufkleber C PH2601QL Wichtige Informationen Aufkleber D Aufkleber E xix - Sharp NP-PH3501QL | Installation Manual - NEC - Page 22
Wichtige Informationen Strahlungsbereich des abgegebenen Lichts durch den Projektor(Sicherheitsabstand - HD: Hazard distance) • Die nachfolgend abgebildete Tabelle gibt den Strahlungsbereich des abgegebenen Lichts durch den Projektor an, das als Risikogruppe 3 (RG3) nach IEC62471-5 Erste Ausgabe - Sharp NP-PH3501QL | Installation Manual - NEC - Page 23
Wichtige Informationen WARNUNG Bitte beachten Sie alle Sicherheitshinweise. Installation des Projektors • Beachten Sie bei der Planung des Aufbaus des Projektors die Sicherheitsmaßnahmen im Installationshandbuch. • Installieren Sie zur Gefahrenverringerung eine Wandsteckdose in Reichweite, damit der - Sharp NP-PH3501QL | Installation Manual - NEC - Page 24
Wichtige Informationen Vorsichtsmaßnahmen zur Gesundheit bei der Betrachtung von 3D-Bildern Bevor Sie 3D-Bilder betrachten, lesen Sie unbedingt die Vorsichtsmaßnahmen zu Gesundheitsrisiken, die Sie im Benutzerhandbuch Ihrer 3D-Brillen oder Ihrer 3D-kompatiblen Medien wie Blu-ray-Disks, Videospiele, - Sharp NP-PH3501QL | Installation Manual - NEC - Page 25
Table of Contents Introduction...b Important Information i Wichtige Informationen xii 1. Before Setting Up Your Projector 1 1-1. Clearance for Installing the Projector (English 1 1-2. Freiraum bei der Projektorinstallation (Deutsch 3 1-3. Selecting the lens unit 5 1-4. Carrying the projector - Sharp NP-PH3501QL | Installation Manual - NEC - Page 26
Table of Contents 4-4. Adjusting the Picture Size and Position 75 4-4-1. Adjustment of the projector's settings (Level adjusters 76 4-4-2. Adjusting the vertical position of a projected image (Lens shift 77 4-4-3. Focus...79 4-4-4. Zoom...81 4-5. Connecting to Other Equipments 82 4-5-1. - Sharp NP-PH3501QL | Installation Manual - NEC - Page 27
1. Before Setting Up Your Projector 1-1. Clearance for Installing the Projector (English) Allow ample clearance between the projector and its surroundings as shown below. The high temperature exhaust coming out of the device may be sucked into the device again. Avoid installing the projector in a - Sharp NP-PH3501QL | Installation Manual - NEC - Page 28
(2) For ceiling mounting: 1. Before Setting Up Your Projector 30 cm/11.8" or greater Lens 70 cm/27.6" or greater NOTE: • The drawing shows the proper clearance required for the front, right, left, and bottom of the projector. 2 - Sharp NP-PH3501QL | Installation Manual - NEC - Page 29
1. Before Setting Up Your Projector 1-2. Freiraum bei der Projektorinstallation (Deutsch) Sorgen Sie für ausreichend Abstand zwischen dem Projektor und der Umgebung wie unten abgebildet. Die mit hoher Temperatur aus dem Gerät ausströmende Abluft könnte wieder in das Gerät eingesaugt werden. - Sharp NP-PH3501QL | Installation Manual - NEC - Page 30
(2) Für Deckenmontage: 1. Before Setting Up Your Projector 30 cm oder mehr Linse 70 cm oder mehr HINWEIS: • Die Zeichnung zeigt den richtigen Abstand des Projektor nach vorn, rechts, links und unten an. 4 - Sharp NP-PH3501QL | Installation Manual - NEC - Page 31
for your presentation purposes. Many types of optical lens for the projector are available for separate sale to support various projection range. Note that all descriptions given in this manual assume that the angle of projection is zero degree. In case of projection from an upper position or - Sharp NP-PH3501QL | Installation Manual - NEC - Page 32
1. Before Setting Up Your Projector Throw distance and screen size Seven separate bayonet style lenses can be used on this projector. Refer to the information on this page and use a lens suited for the installation environment (screen size and throw distance). For installation and replacement of - Sharp NP-PH3501QL | Installation Manual - NEC - Page 33
1. Before Setting Up Your Projector 3840 × 2160 (Aspect ratio: 16:9) unit: inch Screen size 100" 120" 150" 200" 250" 300" 350" 400" 500" 600" 800" 1000" L2K-10F1 82.7 102.4 126.0 169.3 212.6 255.9 299.2 342.5 433.1 519.7 692.9 866.1 L4K-11ZM 111.5-157.5 134.9-189.0 169.8-240.2 228.0-318.9 286 - Sharp NP-PH3501QL | Installation Manual - NEC - Page 34
Projection range for the different lenses 4096 × 2160 (Aspect ratio: 17:9) 1. Before Setting Up Your Projector L2K-55ZM1 433.1-6937.0"/11.0-176.2 m L2K-30ZM 232.3-338.6"/5.9-88.5 m L2K-10F1 78.7-822.8"/ 2.0-20.9 m 100-1000" L4K-15ZM 131.2-1866.1"/ 3.3-47.4 m 100-1000" 100-1000" 100-1000" - Sharp NP-PH3501QL | Installation Manual - NEC - Page 35
Tables of screen sizes and dimensions 4096 × 2160 (Aspect ratio: 17:9) Screen height 17:9 screen size (diagonal) Screen width Size (inches) 100 120 150 200 250 300 350 400 450 500 550 600 650 700 750 800 850 900 950 1000 1. Before Setting Up Your Projector Screen width (inches) (cm) 88.5 - Sharp NP-PH3501QL | Installation Manual - NEC - Page 36
1. Before Setting Up Your Projector Lens shifting range This projector is equipped with a lens shift function for adjusting the position of the projected image by using the LENS SHIFT buttons (→ page 77). The lens can be shifted within the range shown below. NOTE: • Please do not use the lens shift - Sharp NP-PH3501QL | Installation Manual - NEC - Page 37
3840 × 2160 (Aspect ratio: 16:9) Lens unit Drawing number ①② ③④ L2K-10F1 12%H 34%V L4K-11ZM 22%H 55%V L4K-15ZM 22%H 55%V L4K-20ZM 22%H 55%V L2K-30ZM 12%H 34%V L2K-43ZM1 12%H 34%V L2K-55ZM1 14%H 37%V 1. Before Setting Up Your Projector (Example calculation) If projecting on - Sharp NP-PH3501QL | Installation Manual - NEC - Page 38
1-4. Carrying the projector 1. Before Setting Up Your Projector WARNING • When moving the projector, it should be carried by holding the handles or hook on the base of the unit by 6 or more people. • When moving the projector, first turn off the power and always disconnect the power plug from the - Sharp NP-PH3501QL | Installation Manual - NEC - Page 39
outlet Plate inlet Air outlet Air inlet (Filter cover / Filter) Air outlet NOTE: • "Side panel" and "Lens cover" are equipped with key locks. Special keys (service key) are required to remove or mount them. Refer to "Position of the key locks on the covers" (→ page 14) for details. • Do not turn - Sharp NP-PH3501QL | Installation Manual - NEC - Page 40
the key locks on the covers When removing or attaching a cover of the projector main unit, the lock needs to be unlocked using the included service key. The positions of the locks on each of the covers are as follows. WARNING TO REDUCE THE RISK OF ELECTRIC SHOCK AND LASER RADIATION - Sharp NP-PH3501QL | Installation Manual - NEC - Page 41
filter cover in the direction of the arrow to remove it. 1. Before Setting Up Your Projector 2. Unlock the lens cover. Unlock the cover using the service key. Handle 3. Remove the lens cover. The lens cover is secured to the projector body by two claws each at the cover top and bottom - Sharp NP-PH3501QL | Installation Manual - NEC - Page 42
• This completes removing the lens cover. To mount the cover, perform the removal procedure in reverse. Make sure to lock the key. 1. Before Setting Up Your Projector * Lens cover removed condition Hook NOTE: • If the cover is not properly mounted, an error may occur. Securely push all claws - Sharp NP-PH3501QL | Installation Manual - NEC - Page 43
the Side Panel Preparation: Phillips-head screwdriver (No.2), service key (attached goods) 1. Loosen the ten fixing . 1. Before Setting Up Your Projector 2. Unlock the side panel. Unlock the cover using the service key. 3. Remove the side panel. The side panel is fixed in place by hooks at the - Sharp NP-PH3501QL | Installation Manual - NEC - Page 44
1. Before Setting Up Your Projector 1-6. Selecting the Power Cable for C2 Connection (English) The power cable for C2 Connection is not included with the projector. Refer to "AC Power Work Specifications" (next page) and provide the necessary power cable. WARNING Carefully read the contents - Sharp NP-PH3501QL | Installation Manual - NEC - Page 45
AC Power Work Specifications 1. Before Setting Up Your Projector AC power supply equipment Do not use any voltage other than those shown below for the AC power supply connected to the projector. 200-240V AC, single phase, power, 50/60Hz AC power supply cable for the projector The projector is - Sharp NP-PH3501QL | Installation Manual - NEC - Page 46
Japan JIS C 8303 Plug Cable HVCTF 3 x 1.25 mm2 1. Before Setting Up Your Projector Connector IEC60320 C13 China GB2099 Plug Cable RVV 300/500 Connector GB17465.1 Connector Dimensions of the connector of the power cable are shown below. 28 +0 - 0.9 2.5 + 0.5 -0 4-R3.5 (Min) + 0.5 -0 - Sharp NP-PH3501QL | Installation Manual - NEC - Page 47
1. Before Setting Up Your Projector 1-7. Auswahl des Netzkabels für Anschluss C2 (Deutsch) Es wird kein Netzkabel für Anschluss C2 mit dem Projektor geliefert. Nehmen Sie auf „Netzstrom-Spezifikationen" (Nächste Seite) Bezug, und beschaffen Sie das notwendige Netzkabel. WARNUNG Lesen Sie diesen - Sharp NP-PH3501QL | Installation Manual - NEC - Page 48
Netzstrom-Spezifikationen 1. Before Setting Up Your Projector Netzkabel Der Projektor ist mit einem C19-Steckverbinder gemäß IEC60320 zum Anschließen des Netzkabels ausgestattet. Sorgen Sie dafür, dass die Netzkabel, die von den Steckverbindern am Projektor zum Netzanschluss führen, über die unten - Sharp NP-PH3501QL | Installation Manual - NEC - Page 49
Japan JIS C 8303 Stecker Kabel HVCTF 3 x 1.25 mm2 1. Before Setting Up Your Projector Steckverbinder IEC60320 C13 China GB2099 Stecker Kabel RVV 300/500 Steckverbinder GB17465.1 Für Benutzer in UK Verwenden Sie ein Netzteil mit BS-Zulassung und 10A-Sicherung. Steckverbinder Die Abmessungen - Sharp NP-PH3501QL | Installation Manual - NEC - Page 50
1. Before Setting Up Your Projector 1-8. Connecting the power cable (English) Connect the power cable of the projector. The AC power cable is not attached as an accessory. Be sure to have professional technicians do any power supply construction. WARNING Carefully read the contents described in this - Sharp NP-PH3501QL | Installation Manual - NEC - Page 51
1. Before Setting Up Your Projector • C2 connection AC power is provided to the projector power supply and the light power supply by separate cables. AC power supply equipment AC power supply equipment Breaker Electric outlet AC power supply cable Breaker AC power supply cable C2 connection - Sharp NP-PH3501QL | Installation Manual - NEC - Page 52
1. Before Setting Up Your Projector Input Selection The power supply connection method is configured by the wiring to the input selection. The configurations are as follows. C1 Connection C2 Connection AC power supply cable • For the AC power cable, use a cable of thickness as appropriate for the - Sharp NP-PH3501QL | Installation Manual - NEC - Page 53
1. Before Setting Up Your Projector WARNING • The power supply unit handles large electrical currents. To maintain safety, use wires with the specifications as shown in the following table, and affix to the terminals at the designated attachment torque. • Always use solderless terminals with the - Sharp NP-PH3501QL | Installation Manual - NEC - Page 54
• Ground terminal G (Green/Yellow) JIS Thickness of compatible 14 mm2 wiring (using solderless terminal) Solderless terminal dimen- M6 x 15 sions Tightening torque 3.5 to 5.0N·m Solderless terminal dimensions 1. Before Setting Up Your Projector IEC/EN 14 mm2 UL AWG6 or AWG8 CSA AWG6 or AWG8 - Sharp NP-PH3501QL | Installation Manual - NEC - Page 55
1. Before Setting Up Your Projector Connecting the cable In order to attach the power cable to the connector block, connect the wires using the following procedure such that the individual wires cannot directly touch each other. 1. Remove the power cable sleeves from the terminals to ensure that - Sharp NP-PH3501QL | Installation Manual - NEC - Page 56
When connecting the cables to the ground terminal block, ensure that parts other than the solderless terminal (such as cable wires and fittings) are not pinched within the terminal fastening area. 1. Before Setting Up Your Projector When correctly fastened. When the cable wire has become pinched - Sharp NP-PH3501QL | Installation Manual - NEC - Page 57
1. Before Setting Up Your Projector 1-8-2. Procedure for connecting the power cable (C1 connection) Preparation: Phillips-head screwdriver (No. 2), service key (projector accessory) WARNING • Before connecting the power cable, make sure that the AC power supply is disconnected. Otherwise a fire or - Sharp NP-PH3501QL | Installation Manual - NEC - Page 58
1. Before Setting Up Your Projector 3. Remove the terminal cover of the power supply terminals. Remove the terminal cover by pulling it upward. 4. Insert the L/N lines of the AC power cable into the connection terminals, and tighten the screws. Insert the crimping terminals of the AC power cable - Sharp NP-PH3501QL | Installation Manual - NEC - Page 59
1. Before Setting Up Your Projector 7. Remove the fixing screws (at two points), eject the fixing bracket in the direction of the arrow, and pull out the power connector. 8. Configure the power supply for C1 connection. For C1 connection, connect the inner-side connector. Connect Connect 9. - Sharp NP-PH3501QL | Installation Manual - NEC - Page 60
1. Before Setting Up Your Projector 1-8-3. Procedure for connecting the power cable (C2 connection) Preparation: Phillips-head screwdriver (No. 2), service key (projector accessory) WARNING Before connecting the power cable, make sure that the AC power supply is disconnected. Otherwise a fire or - Sharp NP-PH3501QL | Installation Manual - NEC - Page 61
5. Connect the AC power supply cable. (1)Connect the AC power supply cable. Connect the AC power supply cable to the projector. 1. Before Setting Up Your Projector AC input (2)Connect the power plug to the electrical outlet. This completes the connection of the AC power supply cable. To wall - Sharp NP-PH3501QL | Installation Manual - NEC - Page 62
1. Before Setting Up Your Projector Attaching the power cable stopper To prevent the power cable from accidently removing from the AC IN of the projector, attach the supplied power cable stopper to clamp the power cable. CAUTION • To prevent the power cable from coming loose, make sure that all the - Sharp NP-PH3501QL | Installation Manual - NEC - Page 63
4. Pull the band to hold the power cable. Pulling the knob in the arrow direction allows you to adjust the band position. Pull the top and bottom bands by keeping their balance. Once the band position is adjusted, release the knob to lock. 1. Before Setting Up Your Projector Knob This completes - Sharp NP-PH3501QL | Installation Manual - NEC - Page 64
1. Before Setting Up Your Projector 1-9. Anschließen des Netzkabels (Deutsch) Schließen Sie das Netzkabel des Projektors an. Das Netzkabel ist nicht abziehbar sondern fest mit dem Gerät verbunden. Lassen Sie die Installation einer Netzstromversorgung unbedingt nur von professionellen Elektrikern - Sharp NP-PH3501QL | Installation Manual - NEC - Page 65
1. Before Setting Up Your Projector • Anschluss C2 Die Stromversorgung zu den Netzteilen des Projektors und der Lichtquelle wird über getrennte Kabel zugeführt. Netzstromversorgung Netzstromversorgung Elektrosteckdos Sicherung Netzstromkabel Sicherung Netzstromkabel Anschluss C2 Projektor ( - Sharp NP-PH3501QL | Installation Manual - NEC - Page 66
1. Before Setting Up Your Projector Eingabe Auswahl Die Netzanschluss Methode wird durch die Schaltung der Eingabe Auswahl festgelegt. Die Konfigurationsmöglichkeiten sind im Folgenden aufgeführt. Anschluss C1 Anschluss C2 Netzkabel • Verwenden Sie als Netzkabel ein Kabel mit einer Kabelader aus - Sharp NP-PH3501QL | Installation Manual - NEC - Page 67
1. Before Setting Up Your Projector WARNUNG • Das Netzteil verarbeitet hohe elektrische Ströme. Verwenden Sie zur Gewährleistung der Sicherheit Kabeladern entsprechend den in der folgenden Tabelle aufgeführten Vorgaben, und befestigen Sie die Anschlussklemmen am angegebenen Klemmenblock. • Verwenden - Sharp NP-PH3501QL | Installation Manual - NEC - Page 68
• Erdungsklemme G (Grün/Gelb) JIS Leiterquerschnitt kompati- 14 mm2 bler Kabel (bei Verwendung lötfreier Anschlussklemmen) Abmessungen lötfreier An- M6 x 15 schlussklemmen Anzugsmoment 3,5 bis 5,0 N·m Abmessungen lötfreier Anschlussklemmen 1. Before Setting Up Your Projector IEC/EN 14 mm2 UL - Sharp NP-PH3501QL | Installation Manual - NEC - Page 69
1. Before Setting Up Your Projector Anschließen des Kabels Schließen Sie zum Befestigen des Netzkabels am Klemmenblock die Drähte entsprechend den folgenden Anweisungen an, sodass sich die einzelnen Drähte nicht direkt berühren können. 1. Ziehen Sie die Kabelmanschetten der Netzkabel von den - Sharp NP-PH3501QL | Installation Manual - NEC - Page 70
Achten Sie beim Anschließen der Kabel an die Masseanschlussklemme darauf, dass keine anderen Teile als der Quetschkabelschuh (z. B. Kabeladern undVerschraubungen) in der Klemmenbefestigung eingeklemmt werden. 1. Before Setting Up Your Projector Richtig befestigt. Kabeldraht ist verkantet, da eine - Sharp NP-PH3501QL | Installation Manual - NEC - Page 71
1. Before Setting Up Your Projector 1-9-2. Anschluss des Stromkabels (Anschluss C1) Vorbereitung: Kreuzschraubenzieher (Nr. 2), Serviceschlüssel (Projektorzubehör) WARNUNG • Stellen Sie sicher, dass die Stromversorgung unterbrochen ist, bevor Sie das Stromkabel anschließen. Es besteht Brand- und - Sharp NP-PH3501QL | Installation Manual - NEC - Page 72
1. Before Setting Up Your Projector 3. Entfernen Sie den Deckel der Strombuchse. Ziehen Sie dazu den Deckel zu sich hin und heben Sie ihn nach oben. 4. Stecken Sie die L-Leitung und N-Leitung des Stromkabels in die Anschlussbuchse und schrauben Sie sie fest. Stecken Sie den Crimpanschluss des - Sharp NP-PH3501QL | Installation Manual - NEC - Page 73
1. Before Setting Up Your Projector 7. Lösen Sie die zwei Fixierschrauben und entfernen Sie das Fixiermetall in Pfeilrichtung, und ziehen Sie den Stromverbinder heraus. 8. Richten Sie die Stromversorgung über Anschluss C1 ein. Verbinden Sie Anschluss C1 mit dem hinteren Verbinder. Anschluss - Sharp NP-PH3501QL | Installation Manual - NEC - Page 74
1. Before Setting Up Your Projector 1-9-3. Anschluss des Stromkabels (Anschluss C2) Vorbereitung: Kreuzschraubenzieher (Nr. 2), Serviceschlüssel (Projektorzubehör) WARNUNG Stellen Sie sicher, dass die Stromversorgung unterbrochen ist, bevor Sie das Stromkabel anschließen. Es besteht Brand- und - Sharp NP-PH3501QL | Installation Manual - NEC - Page 75
5. Schließen Sie das Netzkabel an. (1)Schließen Sie das Netzkabel an. Schließen Sie das Netzkabel an den Projektor an. 1. Before Setting Up Your Projector AC input (2)Schließen Sie das Netzkabel an die Netzsteckdose an. Dadurch ist der Anschluss des Netzkabels abgeschlossen. Zur Wandsteckdose - Sharp NP-PH3501QL | Installation Manual - NEC - Page 76
1. Before Setting Up Your Projector Anbringen des Netzkabelstoppers Um zu verhindern, dass sich das Netzkabel unbeabsichtigt aus dem Wechselstromeingang des Projektors löst, bringen Sie den im Lieferumfang enthaltenen Netzkabelstopper an, um das Netzkabel zu sichern. ACHTUNG • Um zu verhindern, dass - Sharp NP-PH3501QL | Installation Manual - NEC - Page 77
4. Ziehen Sie das Band zur Befestigung des Netzkabels. Durch Ziehen des Knopfes in Pfeilrichtung können Sie die Bandposition justieren. Ziehen Sie das obige und das untere Band gleichmäßig im Wechsel. Sobald die Bandposition justiert wurde, lassen Sie den Knopf los, um zu sperren. 1. Before Setting - Sharp NP-PH3501QL | Installation Manual - NEC - Page 78
2. Configuring the projector's initial settings This chapter describes the preparations necessary for using the projector for the first time. 2-1. Initial settings flow Step 1 • Updating the software (this page) Step 2 • Installing the LV unit on the projector (→ page 59) Step 3 • Attaching the - Sharp NP-PH3501QL | Installation Manual - NEC - Page 79
32-bit or 64-bit) Microsoft Windows Server 2008/2012 Except for supported host names of standard TCP/IP, a fixed IP address is required The installer starts. 3. Install the DCC (version upgrading) according to the instruction of the installer. DCC has now been installed (the version has been - Sharp NP-PH3501QL | Installation Manual - NEC - Page 80
the HDBaseT port. 2. Set the projector to the standby mode. Follow the instructions at "4-2. Turning on the Projector" (→ page 70) and set the then displaying Chinese or Japanese is not supported and the [ 中文] button or button is not displayed. • DCC supports "English", "Chinese (Simplified)", and - Sharp NP-PH3501QL | Installation Manual - NEC - Page 81
2. Configuring the projector's initial settings 4. Setting a connection destination When the DCC is activated, the Projector Select screen is displayed. This screen is used to set the IP address or host name of the connection destination device. The connection destination devices that have been - Sharp NP-PH3501QL | Installation Manual - NEC - Page 82
2-2-4. Updating the projector 2. Configuring the projector's initial settings Preparation: • Obtain the latest release package and store it in a local drive on your computer. NOTE • Perform the update by adhering to the following warnings. If you do not adhere to these warnings, there is a risk - Sharp NP-PH3501QL | Installation Manual - NEC - Page 83
2. Click the "Full-Auto" button. 2. Configuring the projector's initial settings 3. Select the "nprelease" file stored on the local drive, then click the "Open" button. A progress bar is displayed and the update begins. The update proceeds automatically. NOTE • During updating, the projector turns - Sharp NP-PH3501QL | Installation Manual - NEC - Page 84
7. Check that all of the results are "OK". 2. Configuring the projector's initial settings If Different is displayed Return to step 1 and execute the update again. NOTE • When, after having mounted the LV unit, updating the projector for the purpose of version upgrade, instead of the projector's - Sharp NP-PH3501QL | Installation Manual - NEC - Page 85
2-3. Installing the LV unit Mount the LV unit on the projector unit. 2. Configuring the projector's initial settings NOTE: • The projector cannot be used alone. Be sure to mount the LV unit before using the projector. • Before mounting, be sure to turn off the projector's power, disconnect the AC - Sharp NP-PH3501QL | Installation Manual - NEC - Page 86
B, be sure to store them in a safe place. 3. Mount the LV unit onto the projector. (1)Insert the LV unit by following the guide on either side of the slot. guide (left/right) (2)Tighten the screws (4) on the front of the LV unit to fasten. NOTE: • Set the LV unit's displays in the - Sharp NP-PH3501QL | Installation Manual - NEC - Page 87
2. Configuring the projector's initial settings 2-4. Attaching the controls/indicator panel display label Attach the supplied controls/indicator panel display label to the projector's control panel. (1) Peel off the default attached label. (2) Peel the label off the backing paper and attach it to - Sharp NP-PH3501QL | Installation Manual - NEC - Page 88
3. Setting Up Your Projector 3-1. Setup Procedure Set up the projector according to the procedure below. This chapter describes the installation of procedure until turning on of the power. Step 1 • Installing the projector (→ page 63) Step 2 • Mounting the Lens Unit (→ page 64) 62 - Sharp NP-PH3501QL | Installation Manual - NEC - Page 89
3. Setting Up Your Projector 3-2. Installing the projector Move the projector to the projection position and install it corresponding to the screen and projection conditions. The projector must be placed square to the screen otherwise keystone distortion may appear on the screen. For setting the - Sharp NP-PH3501QL | Installation Manual - NEC - Page 90
-55ZM1, attach the gearbox cover. • For the L4K-20ZM, the lens cover's ring must be removed. At the same time, the image adjustment mechanism by manual besides the focus adjustment is also equipped on the L4K-11ZM, L4K-15ZM and L4K-20ZM. 64 - Sharp NP-PH3501QL | Installation Manual - NEC - Page 91
as to protect the lens from any damage. 3. Insert the lens holder from under the lens. Align the lens holder slits with two lens insertion guides and insert the lens holder. 4. Fix two mounting metals of the lens holder with four mounting screws. Lens holder Slit Lens holder mounting metal Lens - Sharp NP-PH3501QL | Installation Manual - NEC - Page 92
(Applicable lens units: L2K-30ZM, L2K-43ZM1 and L2K55ZM1) Attach the gearbox cover. Attach the attached gearbox cover with two screws. 3. Setting Up Your Projector Gearbox cover Fixing screws 5. Remove the lens cap. If the lens has a lens cap, remove the lens cap. 6. Remove the lens cover. For - Sharp NP-PH3501QL | Installation Manual - NEC - Page 93
7. Hold the lens unit with its guide faced upward and insert the lens until it cannot go further. Insert the lens holder into the fixing hole of the lens ring and mount - Sharp NP-PH3501QL | Installation Manual - NEC - Page 94
3. Setting Up Your Projector 10. Attach the lens cover. For details on attaching the lens cover, refer to "1-5-1. Removing and Mounting the Lens Cover" (page 15). This completes the installation of the lens unit. Removal is done in reverse order of installation. NOTE: • When unplugging the lens - Sharp NP-PH3501QL | Installation Manual - NEC - Page 95
4. Projector Adjustment and Connecting 4-1. Flow of Adjustment and Connecting Perform the adjustment and connection of the projector according to the the following procedure Step 1 • Turning on the Projector (→ page 70) Step 2 • Selecting the projector orientation (→ page 74) Step 3 • Adjusting the - Sharp NP-PH3501QL | Installation Manual - NEC - Page 96
4. Projector Adjustment and Connecting 4-2. Turning on the Projector Please contact your dealer/distributor to connect the power cable. Preparation: • Connect the power cable to the projector. (→ page 24) • Supply AC power to the projector. NOTE: • Turn off the projector power switch and light power - Sharp NP-PH3501QL | Installation Manual - NEC - Page 97
4. Projector Adjustment and Connecting 3. Turn on the light power switch ([1]) then the projector power switch ([2]) on the side of the projector. The POWER indicator lights up orange. • The buzzer sound is released when [NOTIFICATION SETTING] for [BUZZER] is ON. ON OFF Light power switch - Sharp NP-PH3501QL | Installation Manual - NEC - Page 98
4. Projector Adjustment and Connecting Performing Lens Calibration • After installing the lens unit L4K-11ZM/L4K-15ZM/L4K- 20ZM (sold separately), press the L-CALIB. button on the projector, or hold down the CTL button on the remote control then press the INFO/L-CALIB. button to carry out [LENS - Sharp NP-PH3501QL | Installation Manual - NEC - Page 99
4. Projector Adjustment and Connecting Note on Startup screen (Menu Language Select screen) When you first power on the projector, you will get the Startup menu. This menu gives you the opportunity to select one of the 30 menu languages. To select a menu language, follow these steps: 1. Use the or - Sharp NP-PH3501QL | Installation Manual - NEC - Page 100
, ceiling rear projection, desktop rear projection, and ceiling front projection. NOTE: • Please consult the distributor if you require special installation services e.g. when mounting the projector to a ceiling or suspend- ing from the ceiling using eye bolts. Never install the projector on your - Sharp NP-PH3501QL | Installation Manual - NEC - Page 101
4. Projector Adjustment and Connecting 4-4. Adjusting the Picture Size and Position Adjusting the projector's settings [Level adjuster] (→ page 76) Adjusting the projected image's vertical and horizontal position [Lens shift] (→ page 77) Adjusting the focus [Focus] (→ page 79) Finely adjusting - Sharp NP-PH3501QL | Installation Manual - NEC - Page 102
CAUTION 4. Projector Adjustment and Connecting • Perform the adjustment from behind or from the side of the projector. Adjusting from the front could expose your eyes to strong light which could injure them. • Keep hands away from the lens mounting portion while the lens shift is in operation. - Sharp NP-PH3501QL | Installation Manual - NEC - Page 103
4. Projector Adjustment and Connecting 4-4-2. Adjusting the vertical position of a projected image (Lens shift) NOTE: • Shifting the lens to the maximum in two directions combined will cause the edges of the image to become dark or will cause some shadows. Adjusting with buttons on the cabinet 1. - Sharp NP-PH3501QL | Installation Manual - NEC - Page 104
4. Projector Adjustment and Connecting Adjusting with the remote control 1. Hold the CTL button and press the ECO/L-SHIFT button. The [LENS SHIFT] screen will be displayed. 2. Press the ▼▲◀ or ▶ button. Use the buttons to move the projected image. TIP: • The figure below shows the lens shift - Sharp NP-PH3501QL | Installation Manual - NEC - Page 105
4. Projector Adjustment and Connecting 4-4-3. Focus For the L4K-11ZM, L4K-15ZM and L4K-20ZM lens units, perform the image surface adjustment before adjusting the focus. (→ next page) 1. Press the FOCUS +/− button. The FOCUS adjustment bar will be displayed on. The focus is adjusted. • On the remote - Sharp NP-PH3501QL | Installation Manual - NEC - Page 106
4. Projector Adjustment and Connecting Lens image surface adjustment (Applicable lens units: L4K-11ZM, L4K-15ZM and L4K-20ZM) When using the L4K-11ZM, L4K-15ZM or L4K-20ZM lens units, perform the image surface adjustment before adjusting the lens' focus. Adjustment procedure 1. Loosen the lock bolt. - Sharp NP-PH3501QL | Installation Manual - NEC - Page 107
4-4-4. Zoom 1. Press the ZOOM +/− button. The ZOOM adjustment bar will be displayed on. 4. Projector Adjustment and Connecting The zoom is adjusted. • On the remote control, while pressing on the CTL button, press the D-ZOOM/ZOOM (+) or (−) button. • ◀ or ▶ buttons on the cabinet or the remote - Sharp NP-PH3501QL | Installation Manual - NEC - Page 108
4. Projector Adjustment and Connecting 4-5. Connecting to Other Equipments 4-5-1. Connecting to external equipments Below is an example of connections to external equipment. No connection cables are included with this unit. Use the appropriate cables for the connections. CAUTION For HDMI, - Sharp NP-PH3501QL | Installation Manual - NEC - Page 109
a shielded twisted pair (STP) cable of Category 5e or higher for the LAN cable (sold commercially). • The HDBaseT port of the projector supports HDMI signals (HDCP) from transmission devices, control signals from external devices (serial, LAN) and remote control signals (IR commands). • The maximum - Sharp NP-PH3501QL | Installation Manual - NEC - Page 110
4. Projector Adjustment and Connecting 4-5-2. Mounting the Optional Board (sold separately) CAUTION • Before mounting or removing the optional board, check that the projector power switch and light power switch of the projector is turned off. Implement the connection with AC power shut off. Tool - Sharp NP-PH3501QL | Installation Manual - NEC - Page 111
4. Projector Adjustment and Connecting 4-6. Turning off the Projector To turn off the projector: 1. First, press the (POWER) button on the projector cabinet or the POWER OFF button on the remote control. The [POWER OFF / ARE YOU SURE ?] message will appear. 2. Secondly, press the ENTER button or - Sharp NP-PH3501QL | Installation Manual - NEC - Page 112
4. Projector Adjustment and Connecting NOTE: • In the following instances, do not turn off the projector power switch and light power switch or disconnect the AC power. Doing so can damage the projector. • While projecting images • While the power is on • During the cooling after the power is turned - Sharp NP-PH3501QL | Installation Manual - NEC - Page 113
5. List of Menu Items Some menu items are not available depending on the input source. • Basic menu items are indicated by shaded area. Menu Item INPUT HDMI1 HDMI2 DisplayPort1 DisplayPort2 HDBaseT SDI1 SDI2 SDI3 SDI4 SLOT ENTRY LIST TEST PATTERN MODE PRESET PICTURE DETAIL SETTINGS ADJUST - Sharp NP-PH3501QL | Installation Manual - NEC - Page 114
Menu Item 3D SETTINGS(1) STEREO VIEWER FORMAT ADJUST 3D SETTINGS(2) 3D DETAIL SETTINGS L/R DISPLAY REF. DELAY FRAME RATE RATIO TIME PHASE INPUT FRAME DOMINANCE L/R OUTPUT REF. POLARITY DARK TIME L/R INPUT REF. LENS MEMORY STORE MOVE RESET LOAD BY SIGNAL FORCED MUTE MODE SUB1 INPUT - Sharp NP-PH3501QL | Installation Manual - NEC - Page 115
TINA, MAGYAR, POLSKI, NEDERLANDS, SUOMI NORSK, TÜRKÇE ROMÂNĂ, HRVATSKA INDONESIA Tiếng Việt COLOR, MONOCHROME OFF, ON OFF, ON OFF, ON OFF, ON MANUAL, AUTO 5 SEC, AUTO 15 SEC, AUTO 45 SEC OFF, 100[H], 500[H], 1000[H], 2000[H], 5000[H], 10000[H], 20000[H] 0°, 90°, 270° TOP-LEFT, TOP-CENTER, TOP - Sharp NP-PH3501QL | Installation Manual - NEC - Page 116
Menu Item SETUP CONTROL 5. List of Menu Items ADMINISTRATOR MODE PROGRAM TIMER MENU MODE NOT SAVE SETTING VALUES NEW PASSWORD CONFIRM PASSWORD ENABLE ACTIVE DAY EDIT SETTINGS TIME FUNCTION ADVANCED SETTINGS POWER INPUT REPEAT DELETE UP DOWN BACK TOOLS TIME ZONE UTC SETTIMGS DATE MM/DD/ - Sharp NP-PH3501QL | Installation Manual - NEC - Page 117
Menu Item NETWORK SETTINGS SETUP SOURCE OPTIONS(1) SOURCE OPTIONS(2) POWER OPTIONS RESET WIRED LAN PROJECTOR NAME DOMAIN ALERT MAIL NETWORK SERVICE INTERFACE PROFILES DHCP IP ADDRESS SUBNET MASK GATEWAY AUTO DNS DNS CONFIGURATION RECONNECT PROJECTOR NAME HOST NAME DOMAIN NAME ALERT - Sharp NP-PH3501QL | Installation Manual - NEC - Page 118
Menu Item INFO. LIGHT HOURS USED USAGE TIME FILTER HOURS USED LOW FAN MODE HOURS USED INPUT TERMINAL RESOLUTION HORIZONTAL FREQUENCY SOURCE(1) VERTICAL FREQUENCY SYNC POLARITY SCAN TYPE SOURCE NAME ENTRY NO. SIGNAL TYPE SOURCE(2) BIT DEPTH VIDEO LEVEL 3D FORMAT NETWORK INTERFACE IP - Sharp NP-PH3501QL | Installation Manual - NEC - Page 119
a dry cloth. When you use a chemical dust cloth, follow the instructions in the manual attached to it. • Do not use a solvent, such as thinner allowed to accumulate there, may cause heating inside, which leads to functional trouble. The interval, which can vary with the location of your projector, - Sharp NP-PH3501QL | Installation Manual - NEC - Page 120
6. Maintenance 6-3. Cleaning the Air Filters Air filters are attached over the air inlet of the projector to prevent dust. The air filters should be cleaned periodically in order to maintain projector performance. WARNING • Dust in air filters will hinder ventilation of the projector, lead to a rise - Sharp NP-PH3501QL | Installation Manual - NEC - Page 121
2. Remove the air filter. (1)Press the stopper button (2 places). 6. Maintenance (2)Pull the top part of the air filter towards you. Once you have freed the upper half of the air filter, remove the filter by pulling it diagonally upwards. 3. Lift the air filter in the direction of the arrow and - Sharp NP-PH3501QL | Installation Manual - NEC - Page 122
(2)Lift the upper air filter in the direction of the arrow and remove it. NOTE • Do not apply a high degree of force or attempt to pry it open. This could deform the flange making it impossible to reattach the filter cover. 6. Maintenance 5. Clean all the dust from the filters using a vacuum - Sharp NP-PH3501QL | Installation Manual - NEC - Page 123
7. Fix the filter inside the projector unit. (1)Snap the filter cover tabs into the cutout portion of the projector unit to secure it. (2)Seat the air filter aligned with the air inlet. 8. Attach the front filter cover. Push the front filter cover in the direction of the arrow to install. 6. - Sharp NP-PH3501QL | Installation Manual - NEC - Page 124
7. Appendix 7-1. Compatible Input Signal List HDMI/HDBaseT VGA SVGA XGA HD Signal WXGA Quad-VGA SXGA FWXGA SXGA+ WXGA+ WXGA++ WSXGA+ UXGA Full HD WUXGA 2K WQHD iMac 27" WQXGA 4K HDTV (1080p) HDTV (1080i) HDTV (720p) SDTV (480p) SDTV (576p) SDTV (480i) SDTV (576i) DisplayPort VGA SVGA XGA - Sharp NP-PH3501QL | Installation Manual - NEC - Page 125
Top and Bottom Frame Packing Side By Side (Half) Top and Bottom Frame Packing Side By Side (Half) Top and Bottom *1 HDBaseT does not support this signal. *2 Native resolution • Upon shipment, the projector is set for signals with standard display resolutions and frequencies, but adjustments may be - Sharp NP-PH3501QL | Installation Manual - NEC - Page 126
section helps you resolve problems you may encounter while ) Orange Red Lit Green Orange Red Projector status No problem - Shutter is closed - Procedure Power on (The Wait a while. Error occurring Contact your distributor or service personnel. Let us know the details displayed on the - Sharp NP-PH3501QL | Installation Manual - NEC - Page 127
Orange 7. Appendix Projector status The light module is turned - off. Light module lit - Procedure Projector status Procedure No problem Temperature problem Ambient temperature is out of the operation temperature. Check if any obstruction stays near the exhaust vent. High surrounding tem - Sharp NP-PH3501QL | Installation Manual - NEC - Page 128
7. Appendix If the temperature protector is activated If the projector's internal temperature rises abnormally, the light module turns off and the temperature indicator flashes. It may happen that the projector's temperature protector is simultaneously activated and the projector's power turns off. - Sharp NP-PH3501QL | Installation Manual - NEC - Page 129
7. Appendix 7-3. Pin assignments and signal names of main terminals HDMI1/2 IN Terminal (Type A) 2 4 6 8 10 12 14 16 18 1 3 5 7 9 11 13 15 17 19 Pin No. 1 2 3 4 5 6 7 8 9 10 Signal TMDS Data 2+ TMDS Data 2 Shield TMDS Data 2− TMDS Data 1+ TMDS Data 1 Shield TMDS Data 1− TMDS Data 0+ TMDS Data 0 - Sharp NP-PH3501QL | Installation Manual - NEC - Page 130
RS-232C terminal (PC control) (D-Sub 9 Pin) 9876 54 3 21 Pin No. 1 2 3 4 5 6 7 8 9 Signal Unused Transmission data Reception data Connection/Pin 6 Grounding Connection/Pin 4 Unused Unused Unused GP I/O terminal (External control) (D-sub 37 pin) 19 18 17 16 15 14 13 12 11 10 9 8 7 6 5 4 3 2 1 37 - Sharp NP-PH3501QL | Installation Manual - NEC - Page 131
7. Appendix GP I/O Connector Inside Projector Ext_GPIN_P Pin No.: 5 6 7 8 Voltage applied across the pins of Ext_GPIN_P and Ext_GPIN_N should be in the range from 3.3 Vdc to 10 Vdc. Recommended Operating Current: 5 mA Absolute Maximum Rating: 23 mA Ext_GPIN_N Pin No.: 24 25 26 27 Resist = 360 - Sharp NP-PH3501QL | Installation Manual - NEC - Page 132
Timing chart of GPIO control Example of Select HDMI1 Off at least 300 ms on 5-24/7-26 off on 6-25/8-27 off at least 300 ms approx. 300 ms Execute Select HDMI1 7. Appendix time 106 - Sharp NP-PH3501QL | Installation Manual - NEC - Page 133
3D terminal (D-sub 15 pin) This is used to connect a 3D image system to the projector. 7. Appendix Pin view of a female connector Pin No. Signal Name I/O Function 1 +12V PWR Supplies power (+12V) to the 3D image system 2 GNDC GND Ground 3 GNDC GND Ground 4 RS232_RX IN Data - Sharp NP-PH3501QL | Installation Manual - NEC - Page 134
7. Appendix 7-4. Remote Interlock Connector This connector functions as safety device for the projector. The contacts are normally closed. When an abnormality occurs, the contacts open to immediately stop the projector (interlock state) (shipped with a shorting wire installed). By replacing the - Sharp NP-PH3501QL | Installation Manual - NEC - Page 135
Circuit diagram Interlock connector 4 Shorting wire 2 3 Inside projector GND 390Ω/0.5W resistor Shorting wire 1 390Ω/0.5W resistor 2 1A fuse 1 VCC +5V Photocoupler 7. Appendix Connector no. 1 2 3 4 Photocoupler ON/OFF - ON/OFF - Description +5V supply Connects to the photocoupler anode - Sharp NP-PH3501QL | Installation Manual - NEC - Page 136
/4800 bps 8 bits No parity 1 bit None Full duplex 2. Connection via network Communication Protocol (Connection via LAN) Item Communication speed Supported standard Information Set automatically (10/100 Mbps) IEEE802.3 (10BASE-T) IEEE802.3u (100BASE-TX, Auto-Negotiation) Use the TCP port number - Sharp NP-PH3501QL | Installation Manual - NEC - Page 137
sdi sdi2 sdi3 sdi4 slot or slot1 Status command Response error:temp error:fan error:light error:lens error:system Error Status Temperature error Fan trouble Light source trouble Lens trouble System trouble 7. Appendix 111 - Sharp NP-PH3501QL | Installation Manual - NEC - Page 138
112 278.5 (11) 64.5 (2.5) 519.1 (20.4) 454.6 (17.9) 244.5 (9.6) 1180 (46.5) 1412 (55.6) 116 (4.6) 410 (16.1) 7-6. Outline Drawing Unit: mm (inch) 697 (27.4) 7. Appendix - Sharp NP-PH3501QL | Installation Manual - NEC - Page 139
7-7. Special Installation This projector can be installed in various ways, including on the floor. 7. Appendix NOTE: • When turning the projector upside down during installation, use a soft cloth, etc., to protect the projector from scratches. • When suspending or inclining the projector, check - Sharp NP-PH3501QL | Installation Manual - NEC - Page 140
7. Appendix 7-7-2 Installing using eye bolts Eye bolts can be used to lift and move the projector or to install it permanently suspended from the ceiling. Mount the eye bolts to the bottom or side surface of the blocks shown in the diagram below. Max M10x20 Max M10x20 Max M10x20 Max M10x20 NOTE - Sharp NP-PH3501QL | Installation Manual - NEC - Page 141
must be installed at the top and bottom. To ensure air flow to the bottom intake vent, a rack to support the unit is necessary. Please hire an installation service provider (for a fee) to make a custom portrait projection stand. • When installed in portrait orientation the projector can be tilted - Sharp NP-PH3501QL | Installation Manual - NEC - Page 142
temperature will increase and it may cause of malfunction and fire. • Make sure to produce the support metal for the projector as the ceiling mount metal. Please ask the service company about the support metal production. (for a fee) • In case you need to install the projector in tilted angle - Sharp NP-PH3501QL | Installation Manual - NEC - Page 143
higher resolution. For information on each setting up procedures, see the user's manual. [Note on Setting Up Two or More Projectors Aligned] • Leave sufficient Cabinet WARNING Please request the retail store for special installation services such as when mounting the projector to the ceiling or - Sharp NP-PH3501QL | Installation Manual - NEC - Page 144
7-8. Using the DCC's functions 7-8-1. Description of the Sections in the screen You can change the size of the window display by dragging. 7. Appendix Tool bar Shortcut button Status display (status of light source and shutter) Menu bar Shield button Menu tree Main window Tab display Tool - Sharp NP-PH3501QL | Installation Manual - NEC - Page 145
menu buttons are displayed by default. 7. Appendix Select Projector Change mode Create Log Viewer * Refresh log * The function of Log Viewer is available on Service Mode only. You can add menu buttons to the menu bar by dragging the menu buttons from the tree menu found on the left. To - Sharp NP-PH3501QL | Installation Manual - NEC - Page 146
Menu tree The menu selected here appears on the right part of the main window. 7. Appendix Tab display The windows displayed on the main window appear as tabs at the bottom of the screen, and you can change the display by clicking on a tab. Click "x" to close a tab. 120 - Sharp NP-PH3501QL | Installation Manual - NEC - Page 147
Main window The main window selected from the tree menu is displayed. Multiple main windows can be displayed by dragging a tab out of the current window. Status display The status of the projector is displayed through a number of icons. 1 2 7. Appendix 1. Laser warning icon 3 Indicates - Sharp NP-PH3501QL | Installation Manual - NEC - Page 148
bar, you can switch the mode. Dedicated passcodes need to be entered in order to switch to Service mode. Mode User mode Service mode Menu for installation. (initial setting) Menu for the service personnel. Description 1. Click the "Change mode " button on the menu bar. The "Control Mode" screen - Sharp NP-PH3501QL | Installation Manual - NEC - Page 149
TIP: • When the mode is changed, the "Change mode" button is displayed as shown below. • User mode • Service mode 7. Appendix 123 - Sharp NP-PH3501QL | Installation Manual - NEC - Page 150
7. Appendix 7-8-3. Checking Information of the Projector and Logs Click one of the buttons under the "INFORMATION" on the tree menu to display the respective screens. The INFORMATION screen is made up of the following six screens that allow you to check information and various logs of the projector - Sharp NP-PH3501QL | Installation Manual - NEC - Page 151
INFORMATION Screen (Status) Click the "STATUS" button from the menu bar to go to the STATUS screen. From the STATUS screen, you can check the Projector setting status. 7. Appendix 125 - Sharp NP-PH3501QL | Installation Manual - NEC - Page 152
7. Appendix INFORMATION Screen (Usage) Click the "Usage" button on the tree menu to display the INFORMATION-Usage screen. This screen allows you to check the usage times of the main projector unit, cooling fan, light source, phosphor, and diffuser, as well as other information such as the air filter - Sharp NP-PH3501QL | Installation Manual - NEC - Page 153
7. Appendix INFORMATION Screen (Temperature) Click the "Temperature" button on the tree menu to display the INFORMATION-Temperature screen. This screen displays the temperatures and atmospheric pressure of each internal part of the projector. 127 - Sharp NP-PH3501QL | Installation Manual - NEC - Page 154
7. Appendix INFORMATION Screen (FAN Speed) Click the "FAN Speed" button on the tree menu to display the INFORMATION-FAN Speed screen. This screen displays the fan speeds of each part of the projector, as well as the Phosphor/Diffuser speeds. 128 - Sharp NP-PH3501QL | Installation Manual - NEC - Page 155
INFORMATION Screen (Log) Click the "Log" button on the tree menu to display the INFORMATION-Log screen. You can check the various logs saved in the projector main unit from this screen. 7. Appendix "Error Log" button "Usage Reset Log" button "Temperature Log" button [Pressure Log] button "FAN - Sharp NP-PH3501QL | Installation Manual - NEC - Page 156
. You can set the period of logs to display using this screen. Displays the current filtering settings. "Filter" button Today 7days 30days 2years Manual "OK" button "Cancel" button Displays only the log for today. Displays the log for the last 7 days including today. (Default setting) Displays the - Sharp NP-PH3501QL | Installation Manual - NEC - Page 157
System Error Log Screen This screen displays a log inside the projector main unit errors. 7. Appendix "Filter" button "Exit" button Sets the period of the log to display. Returns to the previous screen. 131 - Sharp NP-PH3501QL | Installation Manual - NEC - Page 158
7. Appendix Usage Reset Log Screen When the usage times for the following items are reset, the value immediately before the reset is saved as log information. This screen shows 64 items at most (64 items from the newest one are displayed). • Light, Air filter, Fan, Phosphor, Diffuser "Filter" - Sharp NP-PH3501QL | Installation Manual - NEC - Page 159
7. Appendix Temperature Log Screen This screen displays the maximum temperature recorded in the period from when the projector was turned on until it was turned off. Displays the maximum temperatures measured and dates and times for each item from when the power was last turned on until now. The - Sharp NP-PH3501QL | Installation Manual - NEC - Page 160
7. Appendix FAN Speed Log Screen This screen displays the minimum fan speeds recorded in the period from when the projector was turned on until it was turned off. Displays the minimum fan speeds measured and dates and times for each item from when the power was last turned on until now. The - Sharp NP-PH3501QL | Installation Manual - NEC - Page 161
2. Select the log acquisition range and click the [OK] button. 7. Appendix 3. Select where to save the log and click the [Save] button. Log creation processing starts. • The progress bar is displayed while the log is being created. • Once the log has been created, the normal screen reappears. 135 - Sharp NP-PH3501QL | Installation Manual - NEC - Page 162
In Europe NEC Display Solutions Europe GmbH Address: Landshuter Allee 12-14 D-80637 Munich, Germany Telephone: +49 89 99699 0 Email: [email protected] In North and South America NEC Display Solutions of America, Inc. Address: 500 Park Boulevard, Suite 1100, Itasca, Illinois 60143 U.S.A.
-
 1
1 -
 2
2 -
 3
3 -
 4
4 -
 5
5 -
 6
6 -
 7
7 -
8
-
9
-
10
-
11
-
12
-
13
-
14
-
15
-
16
-
17
-
18
-
19
-
20
-
21
-
22
-
23
-
24
-
25
-
26
-
27
-
28
-
29
-
30
-
31
-
32
-
33
-
34
-
35
-
36
-
37
-
38
-
39
-
40
-
41
-
42
-
43
-
44
-
45
-
46
-
47
-
48
-
49
-
50
-
51
-
52
-
53
-
54
-
55
-
56
-
57
-
58
-
59
-
60
-
61
-
62
-
63
-
64
-
65
-
66
-
67
-
68
-
69
-
70
-
71
-
72
-
73
-
74
-
75
-
76
-
77
-
78
-
79
-
80
-
81
-
82
-
83
-
84
-
85
-
86
-
87
-
88
-
89
-
90
-
91
-
92
-
93
-
94
-
95
-
96
-
97
-
98
-
99
-
100
-
101
-
102
-
103
-
104
-
105
-
106
-
107
-
108
-
109
-
110
-
111
-
112
-
113
-
114
-
115
-
116
-
117
-
118
-
119
-
120
-
121
-
122
-
123
-
124
-
125
-
126
-
127
-
128
-
129
-
130
-
131
-
132
-
133
-
134
-
135
-
136
-
137
-
138
-
139
-
140
-
141
-
142
-
143
-
144
-
145
-
146
-
147
-
148
-
149
-
150
-
151
-
152
-
153
-
154
-
155
-
156
-
157
-
158
-
159
-
160
-
161
-
162
 |
 |
Projector
PH3501QL/PH2601QL
powered by
NP-LV01BD
Installation Manual
Model No.
NP-PH3501QL, NP-PH2601QL, NP-PH3501QL+, NP-PH2601QL+, NP-LV01BD