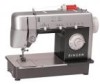
Singer CG-500 Commercial Grade Instruction Manual 2 - Page 11
Additional, accessories, Attaching Finger Guard, Cómo Colocar el Guarda, Dedos
 |
View all Singer CG-500 Commercial Grade manuals
Add to My Manuals
Save this manual to your list of manuals |
Page 11 highlights
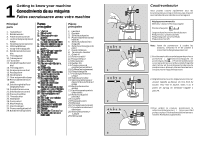
Additional accessories Additional Accessories for your sewing machineareavailableforpurchasefromyour retailer. 1. Straight stitch presser foot (D) and needle plate (C) are used together when straightstitchinglightweightfabricsorwhen your fabric or sewing procedure requires closecontrol. 2. Buttonsewingfoot(H) isusedtoholdany two-hole or four-hole button securely for stitching. 3. Lintbrush isusedforcleaninghardtoreach areasofyoursewingmachine. 4. Oilcontainer formachinelubrication. Attaching Finger Guard Cómo Colocar el "GuardaDedos" MachinePreparation: ! Setpowerswitchto"O"onmachine ! LoosenPresserFootScrew. Position Finger Guard s o t h a t c u r v e d e d g e i s turnedtowardsthebottomrighthandside(see illustration). Slip t h e c u r v e d h o o k b e h i n d a n d t h e n u p a n d overthepresserfootscrewbetweenthescrew andtheshankasillustrated. TightenPresserFootScrew.Youarenowready toworkwiththeFingerGuardinplace. PreparacióndelaMáquina: ! Coloqueelencendedoren"O" ! AflojeelTornillodelPrensatelas.. PosicioneelGuarda-Dedos demaneraquela curva est volteada hacia la derecha (vea ilustración). Desliceelganchoredondoporlapartedeatrás yluegohaciaarribadeltornillodelprensatelas (entreeltornilloylapalancacomomuestrala ilustración). Apriete Tornillo del Prensatela. Ya puede comenzaratrabajarconelGuarda-Dedos. 84 9
-
 1
1 -
2
-
3
-
4
-
5
-
 6
6 -
 7
7 -
 8
8 -
 9
9 -
 10
10 -
 11
11 -
 12
12 -
 13
13 -
 14
14 -
 15
15 -
 16
16 -
17
-
18
-
19
-
20
-
21
-
22
-
23
-
24
-
25
-
26
-
27
-
28
-
29
-
30
-
31
-
32
-
33
-
34
-
35
-
36
-
37
-
38
-
39
-
40
-
41
-
42
-
43
-
44
-
45
-
46
-
47
-
48
 |
 |
