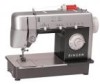
Singer CG-500 Commercial Grade Instruction Manual 2 - Page 7
Attachingabutton, Pegadodebotones
 |
View all Singer CG-500 Commercial Grade manuals
Add to My Manuals
Save this manual to your list of manuals |
Page 7 highlights
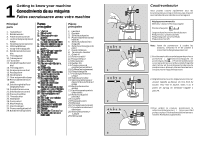
Attachingabutton Flatbuttonscanbesewnonquicklyandeasily using theplainzig-zagstitch.Aspecialbutton sewing foot(H),maybepurchasedfromyour retailer. Recommendedsettings StitchSelection:Zig-zagstitch(B) Needle Position: StitchWidth:TosuitButton Foot:ButtonSewing(H) NeedlePlate:GeneralPurpose (A) AttachFeedCover (F) Pegadodebotones Los botones planos pueden coserse con rapidez y facilidad, utilizando el punto de zigzag plano. El prensatelas especial paracoser botones (H)puedeadquirirloensucentrode costura. Posicionesrecomendadas Selecciónpunto:Puntozig-zag(B) Posiciónaguja: Anchurapunto:Apropiadaalbotón Prensatelas:Paracoserbotones(H) Planchaaguja:Usogeneral(A) ColocarPlanchaCubreArrastre(F) Note: Before you can attach a button, the bobbin thread must be brought up throughtheholeinthefeedcover. 1.Setstitchwidthat( ),andneedleposition selectorat( ).Positionbuttonunderfoot andlowertheneedleintothecenteroftheleft hole.Lowerthefoot.Turnhandwheeltoward you until needle rises out of button and is abovethefoot. Nota: Antes de pegar un b o t ó n , e l h i l o d e l a bobinadebesacarseporelagujerode laplanchacubrearrastre. 1.Coloque elanchodelpuntoen( )yel selector de posición de aguja en ( ). Colocar el botón debajo del prensatelas y bajar la agujadentro del centro del agujero izquierdo.Bajarelprensatelas.Gireelvolante haciaVd.hastaquelaagujasalgadelbotóny estéporencimadelprensatelas. 10 7 4 89 11 12 15 14 13 17 18 2 1 21 3 5 6 19 20 2.Movestitchwidthselectoruntilneedleisover theotherholeinthebutton.Then,whenyou begintostitch,the needleshouldenterinto therightholeofthebutton.Takesixormore zig-zag stitches to attach button and finish withtheneedleontheleftside. 2.Mueva elselectordeanchura hasta q u e l a aguja esté sobreelotroagujerodel botón. Entonces,cuandoempieceacoser,laaguja deberíaentrardentrodelagujeroderechodel botón.Deseisomáspuntosenzig-zagpara pegarelbotónyacabeconlaagujaenellado izquierdo. 3.Tosecurestitching,adjustwidthto( )and takethreeorfourstitches.Removework,draw threadstounderside,tieandtrim. 3.Paraassegurarelpunto,ajustelaanchura a ( ),ydetresocuatropuntadas.Quitela labor,lleveloshiloshacia laparteposterior, anúdelosycorte. 88 22 23 16 29 28 27 24 25 26 P/N362095 5
-
 1
1 -
 2
2 -
 3
3 -
 4
4 -
 5
5 -
 6
6 -
 7
7 -
 8
8 -
 9
9 -
 10
10 -
 11
11 -
 12
12 -
13
-
14
-
15
-
16
-
17
-
18
-
19
-
20
-
21
-
22
-
23
-
24
-
25
-
26
-
27
-
28
-
29
-
30
-
31
-
32
-
33
-
34
-
35
-
36
-
37
-
38
-
39
-
40
-
41
-
42
-
43
-
44
-
45
-
46
-
47
-
48
 |
 |
