Sony DAV IS50 Operating Instructions - Page 27
then press, to select [CUSTOM], then
 |
UPC - 027242730953
View all Sony DAV IS50 manuals
Add to My Manuals
Save this manual to your list of manuals |
Page 27 highlights
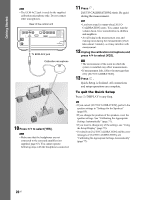
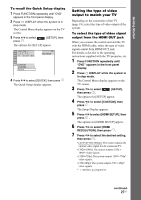
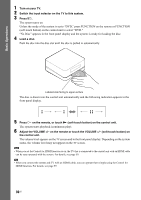
Getting Started To recall the Quick Setup display 1 Press FUNCTION repeatedly until "DVD" appears in the front panel display. 2 Press DISPLAY when the system is in stop mode. The Control Menu display appears on the TV screen. 3 Press X/x to select press . [SETUP], then The options for [SETUP] appear. 9 4 ( 9 9 ) 1( 1) T 0:01:08 DVD VIDEO CUSTOM CUSTOM QUICK BNR Sl Cl 4 Press X/x to select [QUICK], then press . The Quick Setup display appears. Setting the type of video output to match your TV Depending on the connection of the TV (page 19), select the type of video output of the system. To select the type of video signal output from the HDMI OUT jack When you connect the control unit and the TV with the HDMI cable, select the type of video signals output from HDMI OUT jack. For details, refer also to the operating instructions supplied with the TV/projector, etc. 1 Press FUNCTION repeatedly until "DVD" appears in the front panel display. 2 Press DISPLAY while the system is in stop mode. The Control Menu display appears on the TV screen. 3 Press X/x to select [SETUP], then press . The options for [SETUP] appear. 4 Press X/x to select [CUSTOM], then press . The Setup Display appears. 5 Press X/x to select [HDMI SETUP], then press . The options for [HDMI SETUP] appear. 6 Press X/x to select [HDMI RESOLUTION], then press . 7 Press X/x to select the desired setting, then press . • [AUTO(1920×1080p)]: The system outputs the optimal video signal for the connected TV. • [1920×1080i]: The system outputs 1920 × 1080i* video signals. • [1280×720p]: The system outputs 1280 × 720p* video signals. • [720×480p]: The system outputs 720 × 480p* video signals. * i: interlace, p: progressive continued 27US
-
 1
1 -
2
-
3
-
4
-
5
-
6
-
7
-
8
-
9
-
10
-
11
-
12
-
13
-
14
-
15
-
16
-
17
-
18
-
19
-
20
-
21
-
 22
22 -
 23
23 -
 24
24 -
 25
25 -
 26
26 -
 27
27 -
 28
28 -
 29
29 -
 30
30 -
 31
31 -
 32
32 -
33
-
34
-
35
-
36
-
37
-
38
-
39
-
40
-
41
-
42
-
43
-
44
-
45
-
46
-
47
-
48
-
49
-
50
-
51
-
52
-
53
-
54
-
55
-
56
-
57
-
58
-
59
-
60
-
61
-
62
-
63
-
64
-
65
-
66
-
67
-
68
-
69
-
70
-
71
-
72
-
73
-
74
-
75
-
76
-
77
-
78
-
79
-
80
-
81
-
82
-
83
-
84
-
85
-
86
-
87
-
88
-
89
-
90
-
91
-
92
-
93
-
94
-
95
-
96
-
97
-
98
-
99
-
100
-
101
-
102
-
103
-
104
-
105
-
106
-
107
-
108
-
109
-
110
-
111
-
112
-
113
-
114
-
115
 |
 |
